Trezor Firmware documentation
This documentation can also be found at docs.trezor.io where it is available in a HTML-built version compiled using mdBook.
Welcome to the Trezor Firmware repository. This repository is so called monorepo, it contains several different yet very related projects that together form the Trezor Firmware ecosystem.
Repository Structure
ci: Helper files, data, and scripts for the CI pipelinecommon/defs: JSON coin definitions and support tablescommon/protob: Common protobuf definitions for the Trezor protocolcommon/tools: Tools for managing coin definitions and related datacore: Trezor Core, firmware implementation for Trezor Tcrypto: Stand-alone cryptography library used by both Trezor Core and the Trezor One firmwaredocs: Assorted documentationlegacy: Trezor One firmware implementationpython: Python client library and thetrezorctlcommandstorage: NORCOW storage implementation used by both Trezor Core and the Trezor One firmwaretests: Firmware unit test suitetools: Miscellaneous build and helper scriptsvendor: Submodules for external dependencies
Contribute
See CONTRIBUTING.md.
Also please have a look at the docs, either in the docs folder or at docs.trezor.io before contributing. The misc chapter should be read in particular because it contains some useful assorted knowledge.
Security vulnerability disclosure
Please report suspected security vulnerabilities in private to [email protected], also see the disclosure section on the Trezor.io website. Please do NOT create publicly viewable issues for suspected security vulnerabilities.
Note on terminology
The key words "MUST", "MUST NOT", "REQUIRED", "SHALL", "SHALL NOT", "SHOULD", "SHOULD NOT", "RECOMMENDED", "MAY", and "OPTIONAL" in this document are to be interpreted as described in RFC 2119.
Trezor Core
Trezor Core is the second-gen firmware running on Trezor devices. It currently runs on Trezor T, Trezor Safe 3, Trezor Safe 5 and Trezor Safe 7.
Trezor Core is part of the trezor-firmware monorepo to be found on GitHub, in the core subdirectory.
Trezor Core uses MicroPython, it is a Python implementation for embedded systems, which allows us to have an application layer in Python, which makes the code significantly more readable and sustainable. This is what you find in the src folder.
Not everything is in Python though, we need to use C occasionally, usually for performance reasons. That is what embed/upymod is for. It extends MicroPython's modules with a number of our owns and serves as a bridge between C and Python codebase. Related to that, mocks contain Python mocks of those functions to improve readability and IDE functioning.
Where appropriate, we also use Rust. For example, all UI components and animations are implemented in embed/rust. Similarly to C bindings, you can find Python mocks for the Rust functions in mocks directory. Developing new features in Rust is preferred in the future.
Boot
Module src/main.py is the first one to be invoked in MicroPython. It starts the USB, initializes the wire codec and boots applications (see Apps).
Build
Building for Trezor Model One? See the legacy documentation.
New Project
Run the following to checkout the project:
git clone --recurse-submodules https://github.com/trezor/trezor-firmware.git
cd trezor-firmware
uv sync
cd core
After this you will need to install some software dependencies based on what flavor of Core you want to build. You can either build the Emulator or the actual firmware running on ARM devices. Emulator (also called unix port) is a unix version that can run on your computer. See Emulator for more information.
Existing Project
If you are building from an existing checkout, do not forget to refresh the submodules
and sync the uv environment:
git submodule update --init --recursive --force
uv sync
Uv
We use uv to install and track Python dependencies. You
need to install it, sync the packages and then use uv run for every command or
activate the uv environment before typing any commands. The commands in this section
suppose you are in a uv environment!
uv sync
source .venv/bin/activate
Build instructions for Embedded (ARM port)
First, clone the repository and initialize the submodules as defined here.
Then, you need to install all necessary requirements.
Requirements
The recommended way to control the requirements across all systems is to install nix-shell, which automatically installs all requirements in an isolated environment using the shell.nix configuration file located in the repository root.
To install nix-shell, follow the instructions here.
Once nix-shell is installed, go to the repository root and run:
nix-shell
Working with Developer Tools
If you need to work with embedded development tools such as OpenOCD, gcc-arm-embedded, gdb, etc., you can run nix-shell with the following argument to enable additional development tools:
nix-shell --arg devTools true
Manual Requirements Installation
If you prefer to install the requirements manually, look into the shell.nix file where you can find a list of requirements with versions.
Python Dependencies
All Python dependencies and packages are handled with uv. If you work in nix-shell, uv will be installed automatically. Then, you can install the dependencies and run the uv shell in the repository root.
uv sync
source .venv/bin/activate
Note: The recommended way of initializing your environment is to first run nix-shell and then initialize the uv shell within it.
Protobuf Compiler
The protocol buffer compiler protoc is needed to (unsurprisingly) compile protocol buffer files. Follow the installation instructions for your system.
Rust
Install the appropriate target with rustup:
rustup target add thumbv7em-none-eabihf  # for TT
rustup target add thumbv7m-none-eabi     # for T1
Building
make vendor build_boardloader build_bootloader build_firmware
Uploading
Use make upload to upload the firmware to a production device.
- For TT: Do not forget to enter bootloader on the device beforehand.
- For TS3: You will have to unlock bootloader first. Make sure to read the link in completeness for potentially unwanted effects.
Flashing
For flashing firmware to blank device (without bootloader) use make flash.
You need to have OpenOCD installed.
Building in debug mode
You can also build firmware in debug mode to see log output or run tests.
PYOPT=0 make build_firmware
To get a full debug build, use:
make build_firmware BITCOIN_ONLY=0 PYOPT=0
Use screen to enter the device's console. Do not forget to add your user to the dialout group or use sudo. Note that both the group and the tty name can differ, use ls -l /dev/tty* or ls /dev/tty* | grep usb to find out proper names on your machine.
screen /dev/ttyACM0
Build instructions for Emulator (Unix port)
Hint: Using emulator as described here is useful during firmware development. If you intend to use the emulator without modifying the firmware, you might be looking for Trezor User Env.
First clone, initialize submodules, install uv and enter the uv shell as
defined here. Do not forget you need to be in a uv shell
environment!
Dependencies
Install the required packages, depending on your operating system.
- Debian/Ubuntu:
sudo apt-get install scons libsdl2-dev libsdl2-image-dev llvm-dev libclang-dev clang
- Fedora:
sudo yum install scons SDL2-devel SDL2_image-devel clang-devel
- OpenSUSE:
sudo zypper install scons libSDL2-devel libSDL2_image-devel
- Arch:
sudo pacman -S scons sdl2 sdl2_image clang-devel
- NixOS:
There is a shell.nix file in the root of the project. Just run the following before entering the core directory:
nix-shell
- Mac OS X:
Consider using Nix. With Nix all you need to do is nix-shell.
For other users:
brew install scons sdl2 sdl2_image pkg-config llvm
- Windows: not supported yet, sorry.
Protobuf Compiler
The protocol buffer compiler protoc is needed to (unsurprisingly) compile protocol buffer files. Follow the installation instructions for your system.
Rust
You will require Rust and Cargo. The currently supported version is 1.96 nightly. The
recommended way to install both is with rustup. Make sure you
are up to date:
rustup default nightly
rustup update
The bindgen crate requires libclang for generating MicroPython FFI.
Build
Run the build with:
make build_unix                     # default
make build_unix TREZOR_MODEL=T2B1   # different model
Run
Now you can start the emulator:
./emu.py
The emulator has a number of interesting features all documented in the Emulator section.
Building for debugging and hacking in Emulator (Unix port)
Build the debuggable unix binary so you can attach the gdb or lldb. This removes optimizations and reduces address space randomization. Beware that this will significantly bloat the final binary and the firmware runtime memory limit HEAPSIZE may have to be increased.
make build_unix_debug
Emulator
:bulb: Hint: Using emulator as described here is useful during firmware development. If you intend to use the emulator without modifying the firmware, you might be looking for Trezor User Env.
Emulator is a unix version of Core firmware that runs on your computer.
There is neither boardloader nor bootloader and no firmware uploads. Emulator runs the current code as is it is and if you want to run some specific firmware version you need to use git for that (simply checkout the right branch/tag). Actually, maybe we should call it simulator to be precise, because it does not emulate the device in its completeness, it just runs the firmware on your host.
Emulator significantly speeds up development and has several features to help you along the way.
⚠️ Disclaimer ⚠️
This emulator is for development purposes only. It uses a pseudo random number generator, and thus no guarantee on its entropy is made. No security or hardening efforts are made here. It is, and will continue to be, intended for development purposes only. Security and hardening efforts are only made available on physical Trezor hardware.
Any other usage of the emulator is discouraged. Doing so runs the risk of losing funds.
How to run
- build the emulator
- run
emu.pyinside theuvenvironment:- either activate the
uvenvironment first, and then use./emu.py - or always use
uv run ./emu.py
- either activate the
- start the bridge:
- to initialise the bridge with emulator support, start it with
trezord-go -e 21324 - alternatively, launch the desktop suite from the command line with the argument
--bridge-dev
- to initialise the bridge with emulator support, start it with
Now you can use the emulator the same way as you use the device, for example you can use Trezor Suite, use our Python CLI tool (trezorctl), etc. Simply click to emulate screen touches.
Features
Run ./emu.py --help to see all supported command line options and shortcuts. The
sections below only list long option names and most notable features.
Debug and production mode
By default the emulator runs in debug mode. Debuglink is available (on port 21325 by default), exceptions and log output goes to console. To indicate debug mode, there is a red square in the upper right corner of Trezor screen.
To enable production mode, run ./emu.py --production, or set environment variable PYOPT=1.
Initialize with mnemonic words
In debug mode, the emulator can be pre-configured with a mnemonic phrase.
To use a specific mnemonic phrase:
./emu.py --mnemonic "such deposit very security much theme..."
When using Shamir shares, repeat the --mnemonic option:
./emu.py --mnemonic "your first share" --mnemonic "your second share" ...
To use the "all all all" seed defined in SLIP-14:
./emu.py --slip0014
./emu.py -s
Storage and Profiles
Internal Trezor's storage is emulated and stored in the /var/tmp/trezor.flash file by
default. Deleting this file is similar to calling wipe device. You can also find
/var/tmp/trezor.sdcard for SD card. Starting the emulator with -e / --erase will
delete the files beforehand.
You can specify a different location for the storage and log files via the -p /
--profile option:
./emu.py -p foobar
This will create a profile directory in your home ~/.trezoremu/foobar containing
emulator run files. Alternatively you can set a full path like so:
./emu.py -p /var/tmp/foobar
You can also set a full profile path to TREZOR_PROFILE_DIR environment variable.
Specifying -t / --temporary-profile will start the emulator in a clean temporary
profile that will be erased when the emulator stops. This is useful, e.g., for tests.
Logging
By default, emulator output goes to stdout. When silenced with --quiet, it is
redirected to ${TREZOR_PROFILE_DIR}/trezor.log. You can specify an alternate output
file with --output.
Running subcommands with the emulator
In scripts, it is often necessary to start the emulator, run a command while it is available, and then stop it. The following command runs the device test suite using the emulator:
./emu.py --command pytest ../tests/device_tests
Profiling support
Run ./emu.py --profiling, or set environment variable TREZOR_PROFILING=1, to run the
emulator with a profiling wrapper that generates statistics of executed lines.
Memory statistics
Run ./emu.py --log-memory, or set environment variable TREZOR_LOG_MEMORY=1, to dump
memory usage information after each workflow task is finished.
Run in gdb
Running ./emu.py --debugger runs emulator inside gdb/lldb.
Watch for file changes
Running ./emu.py --watch watches for file changes and reloads the emulator if any
occur. Note that this does not do rebuild, i.e. this works for MicroPython code (which
is interpreted) but if you make C changes, you need to rebuild yourself.
Print screen
Press p on your keyboard to capture emulator's screen. You will find a png screenshot
in the src directory.
Disable animation
Run ./emu.py --disable-animation, or set environment variable
TREZOR_DISABLE_ANIMATION=1 to disable all animations.
Profiling emulator with Valgrind
Sometimes, it can be helpful to know which parts of your code take most of the CPU time. Callgrind tool from the Valgrind instrumentation framework can generate profiling data for a run of Trezor emulator. These can then be visualized with KCachegrind.
Bear in mind that profiling the emulator is of very limited usefulness due to:
- different CPU architecture,
- different/mocked drivers,
- & other differences from actual hardware. Still, it might be a way to get some insight without a hardware debugger and a development board.
Valgrind also currently doesn't understand MicroPython call stack so it won't help you when your code is spending a lot of time in pure python functions that don't call out to C. It might be possible to instrument trezor-core so that Valgrind is aware of MicroPython stack frames.
Build
make build_unix_frozen TREZOR_EMULATOR_DEBUGGABLE=1 ADDRESS_SANITIZER=0
With PYOPT=0, most of the execution time is spent formatting and writing logs, so it is recommended to use
PYOPT=1 (and lose DebugLink) or get rid of logging manually.
Run
If you're using Nix, you can use Valgrind and KCachegrind packages from our shell.nix:
nix-shell --arg devTools true
Record profiling data on some device tests:
./emu.py -a --debugger --valgrind -c 'sleep 10; pytest ../../tests/device_tests/ -v --other-pytest-args...'
Open profiling data in KCachegrind (file suffix is different for each emulator process):
kcachegrind src/callgrind.out.$PID
Trezor Core event loop
The event loop is implemented in src/trezor/loop.py and forms the core of the
processing. At boot time, default tasks are started and inserted into an event queue.
Such task will usually run in an endless loop: wait for event, process event, loop back.
Application code is written with async/await constructs. Low level of the event queue
processes running coroutines via coroutine.send() and coroutine.throw() calls.
MicroPython details
MicroPython does not distinguish between coroutines, awaitables, and generators. Some
low-level constructs are using yield and yield from constructions.
async def definition marks the function as a generator, even if it does not contain
await or yield expressions. It is thus possible to see async def __iter__, which
indicates that the function is a generator.
For type-checking purposes, objects usually define an __await__ method that delegates
to __iter__. The __await__ method is never executed, however.
Low-level API
Function summary
loop.run() starts the event loop. The call only returns when there are no further
waiting tasks -- so, in usual conditions, never.
loop.schedule(task, value, deadline, finalizer, reschedule) schedules an awaitable to
be run either as soon as possible, or at a specified time (given as a deadline in
microseconds since system bootup.)
In addition, when the task finishes processing or is closed externally, the finalizer
callback will be executed, with the task and the return value (or the raised exception)
as a parameter.
If reschedule is true, the task is first cleared from the scheduled queue -- in
effect, it is rescheduled to run at a different time.
loop.close(task) removes a previously scheduled task from the list of waiting tasks
and calls its finalizer.
loop.pause(task, interface) sets the task as waiting for a particular interface:
either reading from or writing to one of the USB interfaces, or waiting for a touch
event.
Implementation details
Trezor Core runs coroutine-based cooperative multitasking, i.e., there is no preemption.
Every task is a coroutine, which means that it runs uninterrupted until it yields a
value (or, in async terms, until it awaits something). In every processing step, the
currently selected coroutine is resumed by sending a value to it (which is returned as a
result of the yield/await, or raised as an exception if it is an instance of
BaseException). The tasks then runs uninterrupted again, until it yields or exits.
A loop in loop.run() spins for as long as any tasks are waiting. Two lists of waiting
tasks exist:
-
_queueis a priority queue where the ordering is defined by real-time deadlines. In most cases, tasks are scheduled for "now", which makes them run one after another in FIFO order. It is also possible to schedule a task to run in the future. -
_pausedis a collection of tasks grouped by the interface for which they are waiting.
In each run of the loop, io.poll is called to query I/O events. If an event arrives on
an interface, all tasks waiting on that interface are resumed one after another. No
scheduled tasks in _queue can execute until the waiting tasks yield again.
At most one I/O event is processsed in this phase.
When the I/O phase is done, a task with the highest priority is popped from _queue and
resumed.
I/O wait
When no tasks are paused on a given interface, events on that interface remain in queue.
When multiple tasks are paused on the same interface, all of them receive every event. However, a waiting task receives at most one event. To receive more, it must pause itself again. Event processing is usually done in an endless loop with a pause call.
If two tasks are attempting to read from the same interface, and one of them re-pauses
itself immediately while the other doesn't (possibly due to use of loop.race, which
introduces scheduling gaps), the other task might lose some events.
For this reason, you should avoid waiting on the same interface from multiple tasks.
Syscalls
Syscalls bridge the gap between await-based application code and the coroutine-based
low-level implementation.
Every sequence of awaits will at some point boil down to yielding a Syscall
instance. (Yielding anything else is an error.) When that happens, control returns to
the event loop.
The handle(task) method is called on the result. This way the syscall gets hold of the
task object, and can schedule() or pause() it as appropriate.
As an example, consider pausing on an input event. A running task has no way to call
pause() on itself. It would need to pass a separate function as a callback.
The wait syscall can be implemented as a simple wrapper around the pause() low-level
call:
class wait(Syscall):
    def __init__(self, msg_iface: int) -> None:
        self.msg_iface = msg_iface

    def handle(self, task: Task) -> None:
        pause(task, self.msg_iface)
The __init__() method takes all the arguments of the "call", and handle() pauses the
task on the given interface.
Calling code will look like this:
event = await loop.wait(io.TOUCH)
The loop.wait(io.TOUCH) expression instantiates a new Syscall object. The argument
is passed to the constructor, and stored on the instance. The rest boils down to
event = await some_syscall_instance
which is equivalent to
event = yield from some_syscall_instance.__iter__()
The Syscall.__iter__() method yields self, returning control to the event loop. The
event loop invokes some_syscall_instance.handle(task_object). The task_object is
then set to resume when a touch event arrives.
A side-effect of this design is that it is possible to store and reuse syscall instances. That can be advantageous for avoiding unnecessary allocations.
while True:
    # every run of the loop allocates a new object
    event = await loop.wait(io.TOUCH)
    process_event(event)

touch_source = loop.wait(io.TOUCH)
while True:
    # same instance is reused
    event = await touch_source
    process_event(event)
High-level API
Application code should not be using any of the above low-level functions. Awaiting syscalls is the preferred method of writing code.
The following syscalls and constructs are available:
loop.sleep(delay_ms: int): Suspend execution until the given delay (in
milliseconds) elapses. Return value is the planned deadline in milliseconds since system
start.
Calling await loop.sleep(0) yields execution to other tasks, and schedules the current
task for the next tick.
loop.wait(interface): Wait indefinitely for an event on the given interface.
Return value is the event.
Upcoming code modification adds a timeout parameter to loop.wait.
loop.race(*children): Schedule each argument to run, and suspend execution until
the first of them finishes.
It is possible to specify wait timeout for loop.wait by using loop.race:
result = await loop.race(loop.wait(io.TOUCH), loop.sleep(1000))
This introduces scheduling gaps: every child is treated as a task and scheduled
to run. This means that if the child is a syscall, as in the above example, its action
is not done immediately. Instead, the wait begins on the next tick (or whenever the
newly created coroutine runs) and the sleep in the tick afterwards. When nesting
multiple races, the child races also run later.
Also, when a child task is done, another scheduling gap happens, and the parent task is scheduled to run on the next tick.
Upcoming changes may solve this in relevant cases, by inlining syscall operations.
loop.mailbox() is an unidirectional communication channel, simplification of Go
channels.
It allows to put a value in the channel using put(value) on the mailbox instance.
To retrieve the value, use await on the same mailbox instance.
loop.spawn(task): Start the task asynchronously. Return an object that allows
the caller to await its result, or shut the task down.
Example usage:
task = loop.spawn(some_background_task())
await do_something_here()
result = await task
Unlike other syscalls, loop.spawn starts the task at instantiation time. awaiting
the same loop.spawn instance a second time will immediately return the result of the
original run.
If the task is cancelled (usually by calling task.close()), the awaiter receives a
loop.TaskClosed exception.
It is also possible to register a synchronous finalizer callback via
task.set_finalizer. This is used internally to implement workflow management.
Apps
The folder src/apps/ is the place where all the user-facing features are implemented.
Each app must be registered by the register function inside the file workflow_handlers.py. This functions assigns what function should be called if some specific message was received. In other words, it is a link between the MicroPython functions and the Protobuf messages.
Example
For a user facing application you would assign the message to the module in _find_message_handler_module. This binds the message GetAddress to function get_address inside the apps.bitcoin.get_address module.
# in core/src/apps/workflow_handlers.py

# ...

def _find_message_handler_module(msg_type: int) -> str:
    from trezor.enums import MessageType

    # ...

    if msg_type == MessageType.GetAddress:
        return "apps.bitcoin.get_address"

    # ...
# in core/src/apps/bitcoin/get_address.py

# ...

async def get_address(msg: GetAddress, keychain: Keychain, coin: CoinInfo) -> Address:
    # ...
Testing
We have two types of tests in Core:
- Unit tests that are specific to Trezor Core.
- Common tests, which are common to both Trezor Core (Model T, Safe 3) and Legacy (Model one). Device tests belong to this category.
Core unit tests
Unit tests are placed in the core/tests/ directory.
To start them, build unix port and run the following command from core/:
make test                                           # run all unit test
make test TESTOPTS=test_apps.bitcoin.address.py     # run a specific test
Common tests
See the tests section.
Embedded debug of firmware (C and Rust)
Notes on how to get both C and Rust debugging working "nicely".
Building properly
The #1 hassle in embedded debug is proper build because it is very easy to run out of flash space. Size optimizations on the other hand go against comfort or usability of debug.
Therefore it's usually hard to make a single profile or setting, but best way is to start with is probably these build options:
make PYOPT=0 BITCOIN_ONLY=1 V=1 VERBOSE=1 OPTIMIZE=-Og build_firmware
Options mean:
PYOPT=0- enable debuglink and testV=1 VERBOSE=1- just more of a check to see it's building with options you wantBITCOIN_ONLY=1- most of the time for C/Rust parts you don't need other coins and it saves space on flash to be usable for other than-OsoptimizationOPTIMIZE=-Og- optimization of C better suited for debug, but it will be larger than default-Os
Micropython has its own optimization setting, so if you need to step through its code as well, set it separately in its build.
Another way to save space in case build overflows flash is changing -fstack-protector-all to
-fstack-protector-strong or -fstack-protector-explicit temporarily for debugging in
SConscript.firmware.
Debug info is enabled for C and Rust in the flags and profiles (stripped when generating the .bin final image).
Putting it into debugger
Once you have built and flashed the FW, configure debugger for remote debug.
General background into remote debug and instructions
for basic arm-none-eabi-gdb and VSCode are listed here.
Below are instructions for CLion with Rust plugin.
So far CLion seems the most complete implementation for ARM embedded debug, but these evolve quickly now.
Though all debuggers will have some historic limitations (especially some watch expressions and return values).
Start OpenOCD/JLink GDB server in a terminal
Depending on your SWD adapter, either (change speed up to 50000 depending on adapter)
JLinkGDBServerCLExe -select USB -device STM32F427VI -endian little -if SWD -speed 4000 -LocalhostOnly
or with openocd (best to use latest from git)
openocd -f interface/stlink.cfg -f target/stm32f4x.cfg
Set up a debug configuration as remote debug
Default port for "target remote" JLink GDB server is :2331, for openocd :3333

It should be also possible to use "Remote GDB Server" setting and let CLion execute openocd or JLink GDB server.
Now you can see variables from both Rust and C, set breakpoints
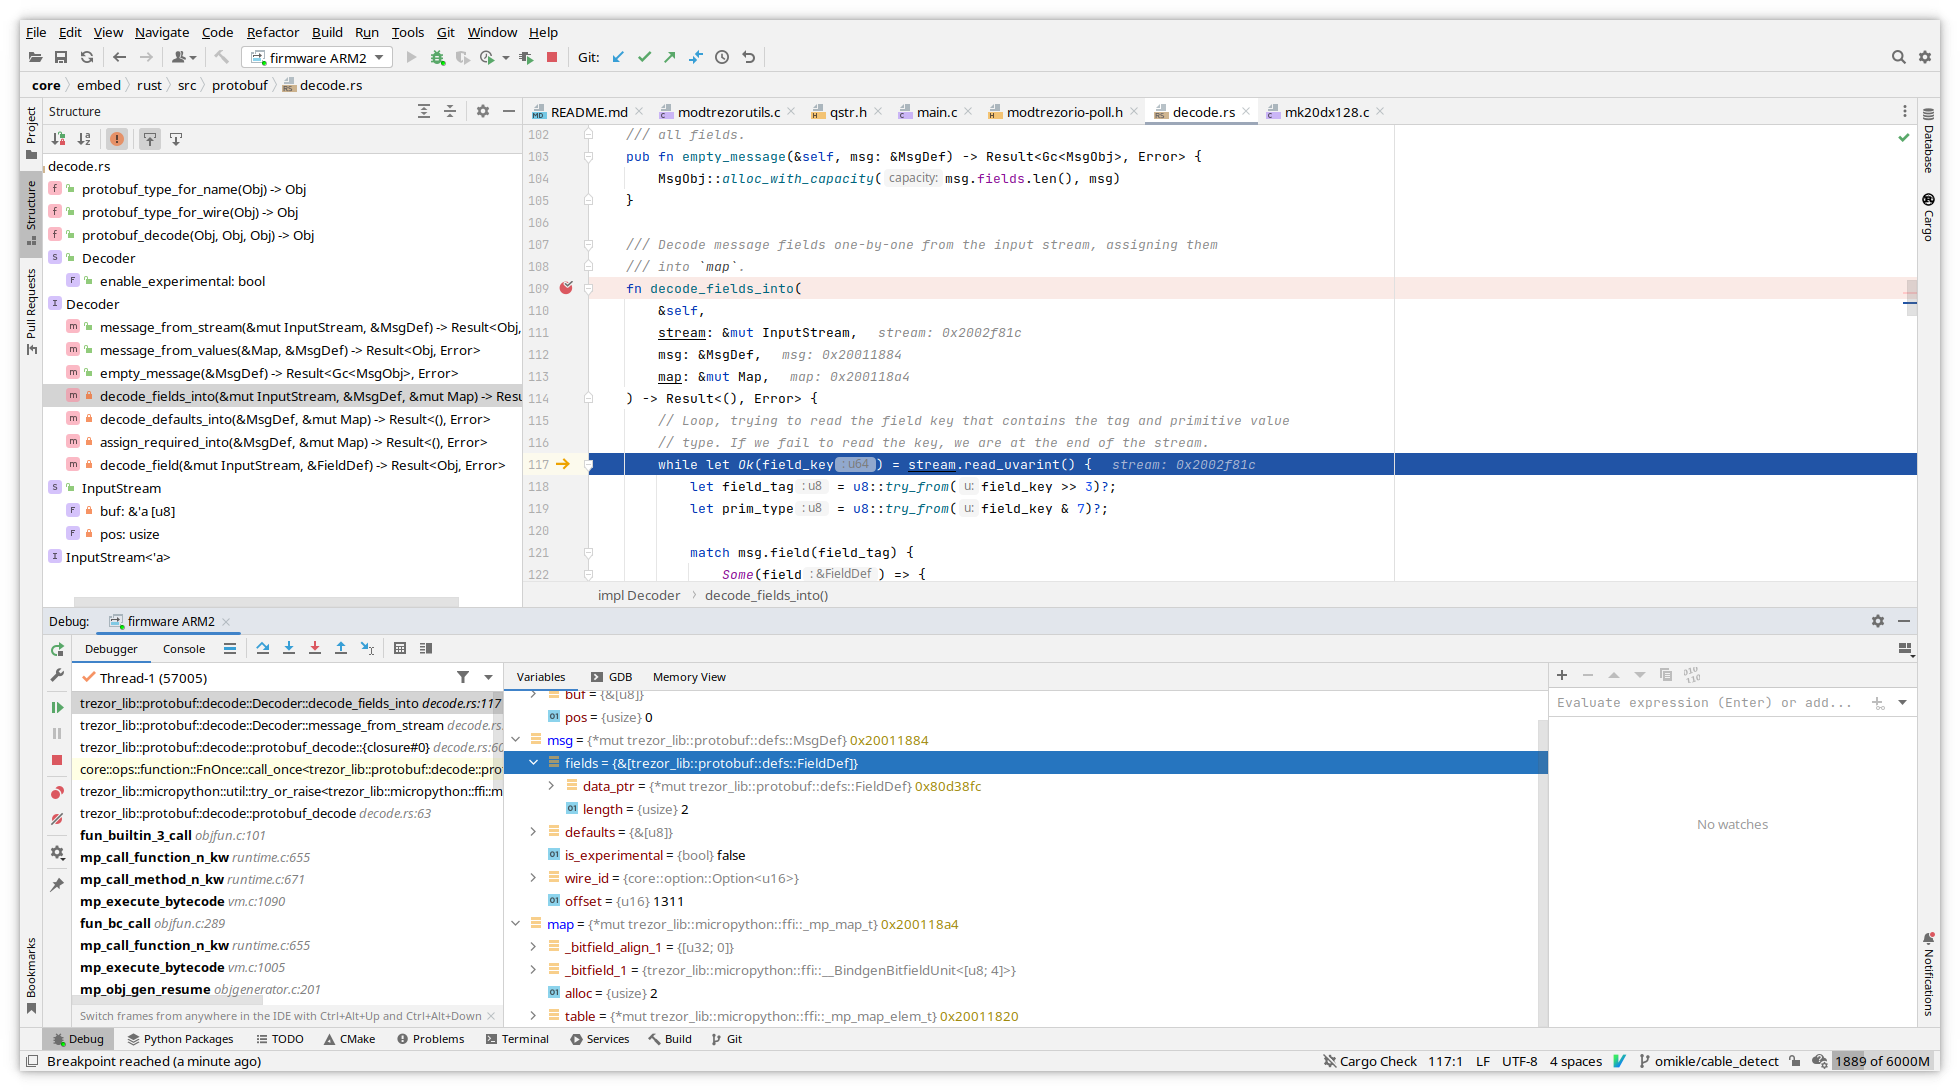
For pointers you can use memory view from variable's context menu.
Known limitations
Rust support is still in progress, so expect bugs sometimes.
Only way so far to get return value of function is to switch to GDB console and
use finish GDB command - unless you assign it to variable. GDB may not always show
it due to optimizations.
Not all trait info is output into debug info, so you will have issue with watching some expressions like this issue or this one.
Try not to put breakpoints on macro calls, since they may internally expand to too many addresses depending on inlining. This manifests when GDB will complain suddenly you have too many HW breakpoints or when JLink starts using flash breakpoints instead of just HW breakpoints.
Other ideas not thoroughly tested
You can define custom optimization level by choosing the -fxx options for C compiler and
similar ones for Rust with llvm-args that target LLVM passes.
Note that these change with compiler versions, LLVM 13 has
new pass manager.
The point would be to make a optimization level producing somewhat slower code, less inlining, but better debug experience.
Rust does not have equivalent of -Og level, this would be only way to make something similar.
The idea is generally to take an existing optimization level and change/remove some options that affect code size or optimize variables away, force them to stay in memory instead of registers. To look at what is used in passes you can print them out with:
llvm-as < /dev/null | opt -Oz -disable-output -debug-pass=Arguments
The -O0 level often generates too big code to fit in flash which is why this experiment
in customizing optimization level exists.
Additional notes on making CLion understand and parse code correctly
Note: Creating a project in CLion doesn't seem necessary for running debug like described above.
CLion remote debugger bindings will gather most information from debug info after connecting to external debugger (JLink or openocd GDB server), but it may be handy for general edit/completion/following definitions and so on.
Since we don't keep a CMakeLists.txt for core because everyone is using different
editor/IDE, here is a trick for creating it so that CLion will parse code without having
to run the debugger with debug info.
First, clone the repo and build both emulator and embedded code:
  make build_unix
  make build_embed
Now rename Makefile under core to something else, like Makefile.orig. Open the
core directory as new project in CLion.
Open any .c file, e.g. embed/projects/firmware/main.c.
At this point since CLion does not see Makefile or CMakeLists.txt, it will
suggest creating CMakeLists for you based on existing files.
Let it autogenerate one, then add following defines that are taken from build (there are more that should be added, but this suffices for most code including micropython stm32lib):
  add_definitions(
          -DFF_FS_READONLY=0
          -DFF_FS_MINIMIZE=0
          -DFF_USE_STRFUNC=0
          -DFF_USE_FIND=0
          -DFF_USE_FASTSEEK=0
          -DFF_USE_EXPAND=0
          -DFF_USE_CHMOD=0
          -DFF_USE_LABEL=0
          -DFF_USE_FORWARD=0
          -DFF_USE_REPAIR=0
          -DFF_CODE_PAGE=437
          -DFF_USE_LFN=1
          -DFF_LFN_UNICODE=2
          -DFF_STRF_ENCODE=3
          -DFF_FS_RPATH=0
          -DFF_VOLUMES=1
          -DFF_STR_VOLUME_ID=0
          -DFF_MULTI_PARTITION=0
          -DFF_USE_TRIM=0
          -DFF_FS_NOFSINFO=0
          -DFF_FS_TINY=0
          -DFF_FS_EXFAT=0
          -DFF_FS_NORTC=1
          -DFF_FS_LOCK=0
          -DFF_FS_REENTRANT=0
          -DFF_USE_MKFS=1

          -DSTM32_HAL_H=<stm32f4xx.h>

          -DTREZOR_MODEL=T2T1
          -DTREZOR_MODEL_T2T1=1
          -DSTM32F427xx
          -DUSE_HAL_DRIVER
          -DSTM32_HAL_H="<stm32f4xx.h>"
          -DAES_128 -DAES_192
          -DRAND_PLATFORM_INDEPENDENT
          -DUSE_KECCAK=1
          -DUSE_ETHEREUM=1
          -DUSE_MONERO=1
          -DUSE_CARDANO=1
          -DUSE_NEM=1
          -DUSE_EOS=1
          -DSECP256K1_BUILD
          -DUSE_ASM_ARM
          -DUSE_NUM_NONE
          -DUSE_FIELD_INV_BUILTIN
          -DUSE_SCALAR_INV_BUILTIN
          -DUSE_EXTERNAL_ASM
          -DUSE_FIELD_10X26
          -DUSE_SCALAR_8X32
          -DUSE_ECMULT_STATIC_PRECOMPUTATION
          -DUSE_EXTERNAL_DEFAULT_CALLBACKS
          -DECMULT_WINDOW_SIZE=8
          -DENABLE_MODULE_GENERATOR
          -DENABLE_MODULE_RANGEPROOF
          -DENABLE_MODULE_RECOVERY
          -DENABLE_MODULE_ECDH
          -DTREZOR_FONT_BOLD_ENABLE
          -DTREZOR_FONT_NORMAL_ENABLE
          -DTREZOR_FONT_MONO_ENABLE
          -DTREZOR_FONT_MONO_BOLD_ENABLE
  )

  include_directories(vendor/micropython)
  include_directories(build/firmware/genhdr/)
  include_directories(vendor/micropython/lib/stm32lib/STM32L4xx_HAL_Driver/Inc)
Rename the Makefile.orig back to Makefile. This is clumsy, but AFAIK there is no
explicit option to autogenerate CMakeLists.txt otherwise.
To make Rust code part of the project, right click embed/rust/Cargo.toml and
choose "Attach Cargo Project"
Debugging events with SystemView and Real-time Terminal (Trezor T only)
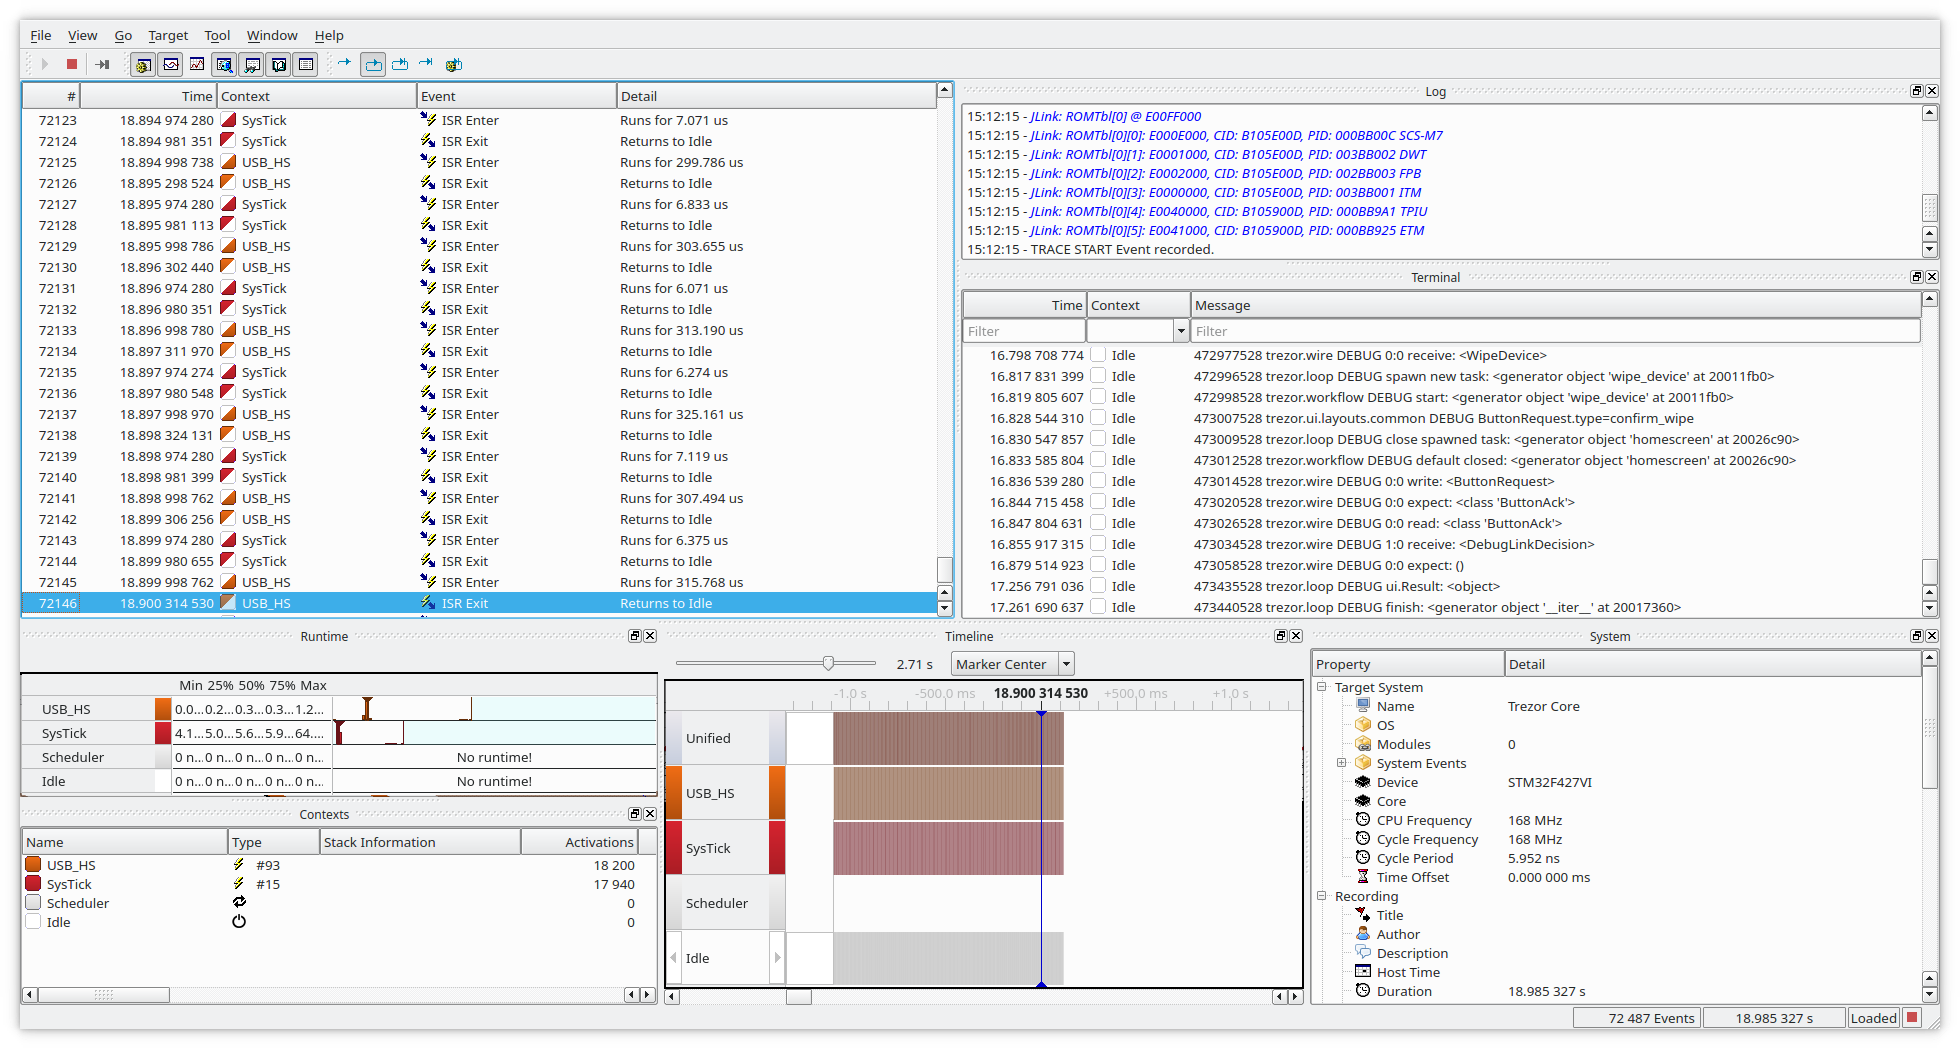
Systemview is an utility to debug interrupts or other events, counters, logs which does not require any extra pin (except the SWD pins attached to CPU).
An example showing two interrupts, and debug log passed via memory instead of UART.
Second example is RTT with color logging (kind of subset what SystemView can do, sans the colors).
Compared to UART the speed of counters or messages is enormously faster as SystemView does trick where it stores all in a small location in RAM (cyclic buffer)
This requires JLink/JTrace adapter and SystemView installed. SystemView is available as free/educational or commercial licensed.
Building with SystemView enabled
Clean build in core:
make clean
Enable SYSTEM_VIEW
Change in SConscript.firmware: PYOPT to 0 (not strictly necessary, but you won't see
debug messages otherwise, though this enables to use it also on non-debug build).
Then it's suggested to change OPTIMIZE to -Og instead of -Os which will still
does optimizations, but only a subset that does hinder debug by reordering
instructions.
PYOPT = ARGUMENTS.get('PYOPT', '0')
COPT=os.getenv('OPTIMIZE', '-Og')
Then enable the SYSTEM_VIEW feature in FEATURE_FLAGS:
FEATURE_FLAGS = {
    "RDI": True,
    "SECP256K1_ZKP": False,
    "SYSTEM_VIEW": True,
}
Then in core/src/trezor/log.py change color to False, SystemView does not support
colorful messages (lines will be garbled), but if you want colors you can also use
Real-time terminal (RTT, see below)
set color = False
Then build with (change PYOPT or BITCOIN_ONLY as needed):
V=1 VERBOSE=1 PYOPT=0 BITCOIN_ONLY=1 SYSTEM_VIEW=1 make build_embed
After flashing with:
make flash_firmware_jlink
You should be able to conect with SystemView or RTT and collect the data and analyze them.
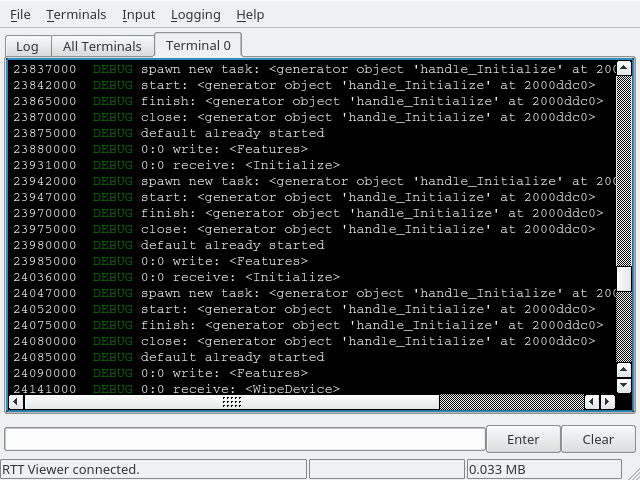
Sending data to RTT instead of SystemView
There are two mutually exclusive macros, first one is turned on by default and sends data to SystemView. Changing data sending to RTT is just undefining first and defining second (in theory it could be able to send to both destinations, but never tried it.)
SYSTEMVIEW_DEST_SYSTEMVIEWSYSTEMVIEW_DEST_RTT
Now when you run JLinkRTTViewerExe you should see data in the terminal:
It is possible to extend this mechanism to include multiple streams/terminals. Terminals work like a usual terminal, so you can use it in debugging also for user input.
Combining SystemView/RTT with other debug tools
In general you can use SystemView along with GDB/CLion/Ozone or other debugger at the same time, it's just advised that you keep all connections at the same frequency, otherwise it may lead to unexpected behavior, weird resets, etc.
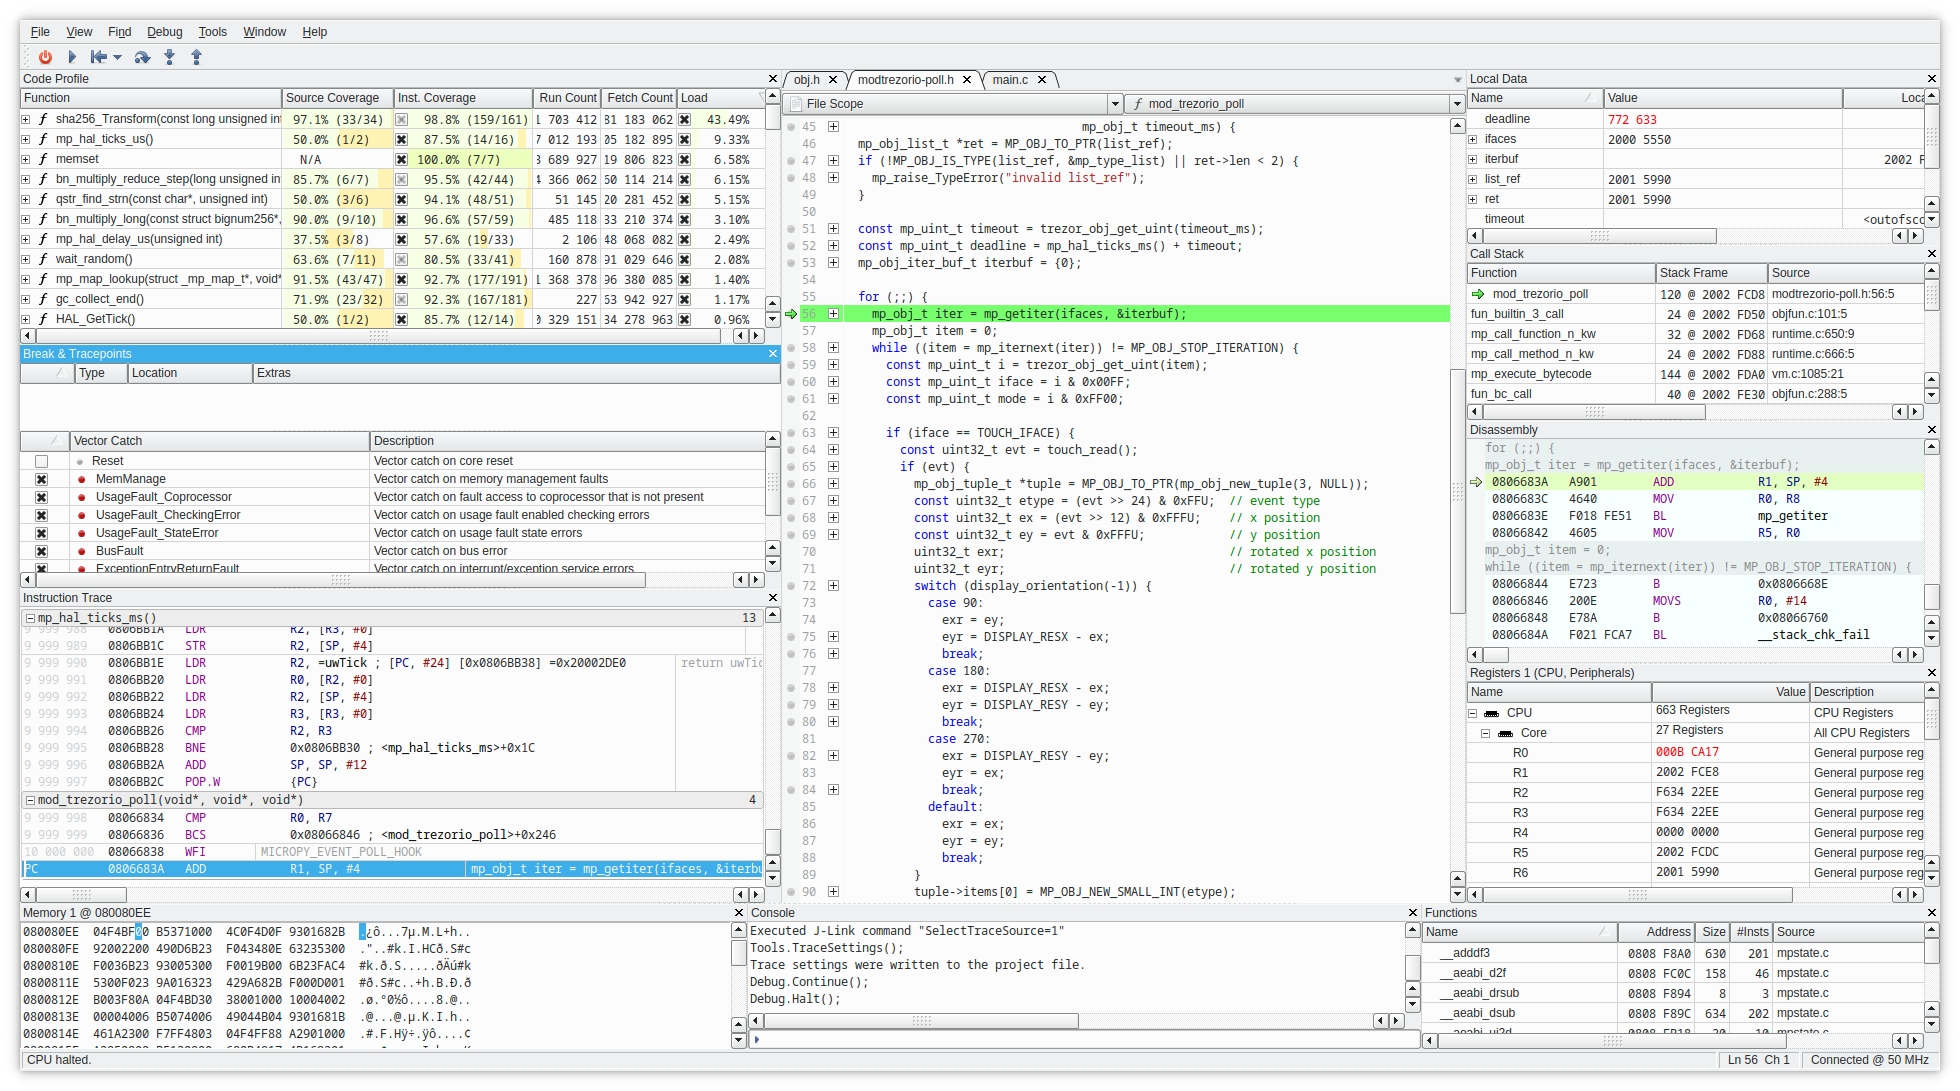
So e.g. you can profile the interrupts, DMA in SystemView while also profiling it on instruction-level scale in Ozone:
Miscellaneous
Topics that do not fit elsewhere:
- Code style
- SLIP-39 in Core
- Exceptions usage
- Memory fragmentation management
- Running Trezor firmware on STM32F429I-DISC1
- Translation data format
- Optiga configuration
Trezor Core Boot Stages
Trezor T initialization is split into two stages. See Memory Layout for info about in which sectors each stage is stored.
First stage (boardloader) is stored in write-protected area, which means it is non-upgradable. Only second stage (bootloader) update is allowed.
First Stage - Boardloader
First stage checks the integrity and signatures of the second stage and runs it if everything is OK.
If first stage boardloader finds a valid second stage bootloader image on the SD card (in raw format, no filesystem), it will replace the internal second stage, allowing a second stage update via SD card.
The boardloader is special in that it is the device's write protected embedded code. The primary purpose for write protecting the boardloader is to make it the immutable portion that can defend against code-based attacks (e.g.- BadUSB) and bugs that would reprogram any/all of the embedded code. It assures that only verified signed embedded code is run on the device (and that the intended code is run, and not skipped). The write protection also provides some defense against attacks where the attacker has physical control of the device.
The boardloader must include an update mechanism for later stage code because if it did not, then a corruption/erasure of later stage flash memory would leave the device unusable (only the boardloader could run and it would not pass execution to a later stage that fails signature validation).
Developer note:
A microSD card can be prepared with the following. Note that the bootloader is allocated 128 KiB.
WARNING: Ensure that you want to overwrite and destroy the contents of /dev/mmcblk0 before running these commands.
Likewise, /dev/mmcblk0 may be replaced by your own specific destination.
-
sudo dd if=/dev/zero of=/dev/mmcblk0 bs=512 count=256 conv=fsync -
sudo dd if=build/bootloader/bootloader.bin of=/dev/mmcblk0 bs=512 conv=fsync
Second Stage - Bootloader
Second stage checks the integrity and signatures of the firmware and runs it if everything is OK.
If second stage bootloader detects a pressed finger on the display or there is no firmware loaded in the device, it will start in a firmware update mode, allowing a firmware update via USB.
Common notes
- Hash function used for computing data digest for signatures is BLAKE2s.
- Signature system is Ed25519 (allows combining signatures by multiple keys into one).
- All multibyte integer values are little endian.
- There is a tool called headertool.py which checks validity of the bootloader/firmware images including their headers.
Bootloader Format
Trezor Core (second stage) bootloader consists of 2 parts:
- bootloader header
- bootloader code
Bootloader Header
Total length of bootloader header is always 1024 bytes.
| offset | length | name | description |
|---|---|---|---|
| 0x0000 | 4 | magic | firmware magic TRZB |
| 0x0004 | 4 | hdrlen | length of the bootloader header |
| 0x0008 | 4 | expiry | valid until timestamp (0=infinity) |
| 0x000C | 4 | codelen | length of the bootloader code (without the header) |
| 0x0010 | 1 | vmajor | version (major) |
| 0x0011 | 1 | vminor | version (minor) |
| 0x0012 | 1 | vpatch | version (patch) |
| 0x0013 | 1 | vbuild | version (build) |
| 0x0014 | 1 | fix_vmajor | version of last critical bugfix (major) |
| 0x0015 | 1 | fix_vminor | version of last critical bugfix (minor) |
| 0x0016 | 1 | fix_vpatch | version of last critical bugfix (patch) |
| 0x0017 | 1 | fix_vbuild | version of last critical bugfix (build) |
| 0x0018 | 8 | reserved | not used yet (zeroed) |
| 0x0020 | 32 | hash1 | hash of the first code chunk (128 - 1 KiB), this excludes the header |
| 0x0040 | 32 | hash2 | hash of the second code chunk (128 KiB), zeroed if unused |
| ... | ... | ... | ... |
| 0x0200 | 32 | hash16 | hash of the last possible code chunk (128 KiB), zeroed if unused |
| 0x0220 | 415 | reserved | not used yet (zeroed) |
| 0x03BF | 1 | sigmask | SatoshiLabs signature indexes (bitmap) |
| 0x03C0 | 64 | sig | SatoshiLabs aggregated signature of the bootloader header |
Firmware Format
Trezor Core firmware consists of 3 parts:
- vendor header
- firmware header
- firmware code
Vendor Header
Total length of vendor header is 84 + 32 * (number of pubkeys) + (length of vendor string rounded up to multiple of 4) + (length of vendor image) bytes rounded up to the closest multiple of 512 bytes.
| offset | length | name | description |
|---|---|---|---|
| 0x0000 | 4 | magic | firmware magic TRZV |
| 0x0004 | 4 | hdrlen | length of the vendor header (multiple of 512) |
| 0x0008 | 4 | expiry | valid until timestamp (0=infinity) |
| 0x000C | 1 | vmajor | version (major) |
| 0x000D | 1 | vminor | version (minor) |
| 0x000E | 1 | vsig_m | number of signatures needed to run the firmware from this vendor |
| 0x000F | 1 | vsig_n | number of different pubkeys vendor provides for signing |
| 0x0010 | 2 | vtrust | level of vendor trust (bitmap) |
| 0x0012 | 14 | reserved | not used yet (zeroed) |
| 0x0020 | 32 | vpub1 | vendor pubkey 1 |
| ... | ... | ... | ... |
| ? | 32 | vpubn | vendor pubkey n |
| ? | 1 | vstr_len | vendor string length |
| ? | ? | vstr | vendor string |
| ? | ? | vstrpad | padding to a multiple of 4 bytes |
| ? | ? | vimg | vendor image (120x120 pixels in TOIf format) |
| ? | ? | reserved | padding to an address that is -65 modulo 512 (zeroed) |
| ? | 1 | sigmask | SatoshiLabs signature indexes (bitmap) |
| ? | 64 | sig | SatoshiLabs aggregated signature of the vendor header |
Vendor Trust
Vendor trust is stored as bitmap where unset bit means the feature is active.
| bit | hex | meaning |
|---|---|---|
| 0 | 0x0001 | wait 1 second |
| 1 | 0x0002 | wait 2 seconds |
| 2 | 0x0004 | wait 4 seconds |
| 3 | 0x0008 | wait 8 seconds |
| 4 | 0x0010 | use red background instead of black one |
| 5 | 0x0020 | require user click to continue |
| 6 | 0x0040 | show vendor string (not just the logo) |
| 7 | 0x0080 | allow access to pairing secret |
| 8 | 0x0100 | disable access to pairing secret |
Bits 0 to 6 represent vendor screen settings. The wait times are additive.
Two bits are used for access to the pairing secret for historical reasons. On T2B1 only bit 7 is evaluated. On newer models, both bits 7 and 8 are evaluated.
Firmware Header
Total length of firmware header is always 1024 bytes.
| offset | length | name | description |
|---|---|---|---|
| 0x0000 | 4 | magic | firmware magic TRZF |
| 0x0004 | 4 | hdrlen | length of the firmware header |
| 0x0008 | 4 | expiry | valid until timestamp (0=infinity) |
| 0x000C | 4 | codelen | length of the firmware code (without the header) |
| 0x0010 | 1 | vmajor | version (major) |
| 0x0011 | 1 | vminor | version (minor) |
| 0x0012 | 1 | vpatch | version (patch) |
| 0x0013 | 1 | vbuild | version (build) |
| 0x0014 | 1 | fix_vmajor | version of last critical bugfix (major) |
| 0x0015 | 1 | fix_vminor | version of last critical bugfix (minor) |
| 0x0016 | 1 | fix_vpatch | version of last critical bugfix (patch) |
| 0x0017 | 1 | fix_vbuild | version of last critical bugfix (build) |
| 0x0018 | 8 | reserved | not used yet (zeroed) |
| 0x0020 | 32 | hash1 | hash of the first code chunk excluding both the firmware and the vendor header (128 - 1 - [vendor header length] KiB) |
| 0x0040 | 32 | hash2 | hash of the second code chunk (128 KiB), zeroed if unused |
| ... | ... | ... | ... |
| 0x0200 | 32 | hash16 | hash of the last possible code chunk (128 KiB), zeroed if unused |
| 0x0220 | 415 | reserved | not used yet (zeroed) |
| 0x03BF | 1 | sigmask | vendor signature indexes (bitmap) |
| 0x03C0 | 64 | sig | vendor aggregated signature of the firmware header |
Trezor Core coding style
Python coding style
Run make pystyle from repository root to perform all style checks and auto-format
where possible.
General style notes
See rules for exceptions in the Exceptions documentation.
Type annotations
We prefer Python 3.10 style annotations:
- instead of
List[int], uselist[int], ditto forTuple,DictandSet - instead of
Optional[int], useint | None - instead of
Union[int, str], useint | str
This also applies inside if TYPE_CHECKING branches.
[!NOTE] For existing Python code, for example in
trezorlib, style checkers will complain that newer Python is required for the preferred annotation style. To avoid this issue, usefrom __future__ import annotations.
Type-checking imports
At run-time, the typing module is not available. There is compile-time magic that
removes all from typing imports and contents of if TYPE_CHECKING branches.
It is important to put typing-only imports into if TYPE_CHECKING, to make sure that
these modules are not needlessly pulled in at run-time.
Due to the compile-time magic, it is always possible to put a from typing import
at top level. The style for doing that are as follows:
- If the module needs to import other modules, create type aliases, TypeVars or
Protocols, the only top-level import should be
TYPE_CHECKING. Everything else (including other items fromtypingmodule) should be imported in theTYPE_CHECKINGbranch:from typing import TYPE_CHECKING if TYPE_CHECKING: from typing import Any, TypeVar, Union from trezor.messages import SomeMessage TypeAlias = Union[int, str] T = TypeVar("T") - If the module only needs items from
typing, you should not create aTYPE_CHECKINGbranch, and instead import all required items on top level:from typing import Any, Iterator, Sequence
Tools
Configurations of specific Python style tools (isort, flake8, pylint) can be found
in root setup.cfg.
Formatting
We are auto-formatting code with black and use the black code
style.
We use isort to organize imports.
Linting
We use flake8 lints, disabling only those that conflict with black code style.
We use a select subset of pylint checks that are hard-enforced.
Type checking
We use pyright for type-checking. The codebase is fully type-checked, except for
the Monero app (as of 2022-01).
C coding style
Formatting is done by clang-format. We are using the Google code
style.
Run make cstyle from repository root to auto-format.
Rust coding style
Formatting is done by rustfmt. We are using the Rust
style.
Run make ruststyle from repository root to auto-format.
Trezor firmware on STM32F429I-DISC1
The STM32F429I-DISC1 evaluation board has similar MCU to Trezor Model T as well as compatible touchscreen.
On the board, mini-USB is used to flash the firmware using the integrated ST-Link, as well as power the board. The micro-USB connector is used by the firmware to communicate with the trezor client. I.e. normally you need both cables connected.
Make sure JP1, JP2, JP3, and CN4 are fitted with jumpers (board is in this state by default).
Building and flashing
Follow the normal build instructions however pass
TREZOR_MODEL=DISC1 to make:
# build firmware images
make build_boardloader build_bootloader build_firmware TREZOR_MODEL=DISC1
# use openocd to flash everything through st-link
make flash
Reset board after command finishes.
DISC 2
DISC2 is an evaluation board STM32U5G9J used for firmware development of Trezor models with the STM32U5.
The kit has accessible pins, a display, and an embedded ST-Link.
To build and flash firmware to the DISC2 target, follow these instructions:
- Compile the firmware for the target with TREZOR_MODEL=DISC2 and BOOTLOADER_DEVEL=1
cd core
TREZOR_MODEL=DISC2 BOOTLOADER_DEVEL=1 make vendor build_boardloader build_bootloader build_firmware
-
Ensure that TrustZone is enabled on the DISC2 device, as explained here.
-
Connect the DISC2 ST-Link to the PC using a micro-USB cable (connector CN5).
-
Erase the DISC2 flash.
TREZOR_MODEL=DISC2 make flash_erase
- Flash the freshly compiled firmware from step 1.
TREZOR_MODEL=DISC2 make flash
- Reset the device (you may need to do this a couple of times) until it boots up.
Exceptions in Core
From version 2.3.0 we try to follow few rules about how we use exceptions. All new code MUST follow these.
Usage
You MAY use any exceptions in Core's logic. Exceptions from wire.errors SHOULD be
the final exceptions that are thrown and SHOULD NOT be caught. Note that wire.Error
is a type of exception that is intended to be sent out over the wire. It should only
be used in contexts where that behavior is appropriate.
Custom exception type hierarchies SHOULD always be derived directly from Exception. They SHOULD NOT be derived from other built-in exceptions (such as ValueError, TypeError, etc.)
Deriving a custom exception type signals an intention to catch and handle it somewhere in the code. For this reason, custom exception types SHOULD NOT be derived from wire.Error and subclasses.
Exception strings, including in internal exceptions, SHOULD only be used in cases
where the text is intended to be shown on the host. Exception strings MUST NOT
contain any sensitive information. An explanation of an internal exception MAY be
placed as a comment on the raise statement, to aid debugging. If an exception is
thrown with no arguments, the exception class SHOULD be thrown instead of a new
object, i.e., raise CustomError instead of raise CustomError().
Tl;dr
- Do not use
wire.errorsfortry-catchstatements, use other exceptions. - Use
wire.errorssolely as a way to communicate errors to the Host, do not include them somewhere deep in the stack. - Do not put sensitive information in exception's message. If you are not sure, do not
add any message and provide a comment next to the
raisestatement. - Use
raise CustomErrorinstead ofraise CustomError()if you are omitting the exception message.
Memory fragmentation management
Trezor-core memory is managed by a mark-and-sweep garbage collector. Throughout the run-time of the firmware, the memory space gets increasingly fragmented as the GC sweep is initiated at arbitrary points.
To combat fragmentation, we attempt to thoroughly clear the memory space after finishing every workflow, and keep only a limited set of modules alive at all times. These must take care to not hold external references.
Always active modules
The following modules are kept loaded at all times:
trezortrezor.utilsstoragestorage.commonstorage.cachestorage.devicestorage.fido2trezor.pin- held alive because the functionshow_pin_timeoutis registered as a callback fortrezorconfigand storage unlock operationsusb
The above modules are only allowed to import C modules (trezorconfig, trezorutils,
trezorcrypto, etc.) or each other. We currently do not have any automation to enforce
this, so please be careful when editing them.
Presizing
To save storage, Micropython only preallocates 1 slot in a module dict. Most of our modules use more slots than that. This means that the dict is reallocated, possibly several times. This is inconvenient at most times, but especially undesirable when it would happen to an always-active module at some point at run-time. The allocator would put the newly reallocated dict somewhere in the middle of the GC arena, and it would stay there.
This does happen in practice: e.g., when you import trezor.strings, a new reference
strings is inserted into the trezor module.
For this reason, we call utils.presize_module on trezor and storage at first
import time. The sizes are determined empirically and it might be necessary to raise
them in the future.
The backing storage for sys.modules can also be reallocated at run-time. We configure
Micropython to preallocate 160 slots in mpconfigport.h variable
MICROPY_LOADED_MODULES_DICT_SIZE. This is asserted at the end of unimport in
trezor.utils, so if we ever need more modules than that, the test suite should catch
it.
Presizing is also applied to __main__ module by setting MICROPY_MAIN_DICT_SIZE.
Top-level and function-local imports
In order to keep the imported image size in check, in certain places we avoid importing something at top-level, and instead import it in a function which actually needs the functionality. That way the module can be imported without immediately pulling in all of its possible dependencies.
The following imports trezor.ui at import time - when importing module, trezor.ui
is always imported, regardless of whether anyone calls the function draw_foo:
# module.py
import trezor.ui

def draw_foo():
    trezor.ui.display.draw_text("Foo")
The following defers the import until the function is called:
# module.py

def draw_foo():
    import trezor.ui

    trezor.ui.display.draw_text("Foo")
The general rules of thumb are as follows:
C modules can always be imported.
These do not take any space in RAM.
Always-active modules can always be imported.
They are always active, so we do not need to worry about allocating.
In apps.*, we prefer clarity over optimization.
It might still be useful to, e.g., avoid importing trezor.ui.layouts for operations
that are sometimes silent, but it is not too important. All of the application code is
scrubbed from memory when the workflow exits.
In system modules, we are extra careful.
This means apps.base, apps.common, and everything outside the apps namespace.
A module should only import on top-level if the import is either:
- C module or an always active module,
- a module that is expected to already be imported when this module is loaded
(this is often the case in
apps.common-- e.g.,trezor.workflowis not always active, but is presumed active as soon assessionis up), - small module without further dependencies,
- something without which the whole module doesn't make sense (this is usually the case
with layout code:
apps.common.confirmdoesn't make sense without importingtrezor.ui)
Avoid importing trezor.ui.
The trezor.ui namespace is one of the largest in the codebase, not counting
application code. Importing the trezor.ui module alone is not a big problem, but
pulling in anything from trezor.ui.layouts or trezor.ui.components usually means
loading the full UI machinery. We only want to do that if we are sure that whoever is
importing us is going to be drawing things.
Trezor T Memory Layout
Flash
| sector | range | size | function |
|---|---|---|---|
| Sector 0 | 0x08000000 - 0x08003FFF | 16 KiB | boardloader (1st stage) (write-protected) |
| Sector 1 | 0x08004000 - 0x08007FFF | 16 KiB | boardloader (1st stage) (write-protected) |
| Sector 2 | 0x08008000 - 0x0800BFFF | 16 KiB | boardloader (1st stage) (write-protected) |
| Sector 3 | 0x0800C000 - 0x0800FFFF | 16 KiB | unused |
| Sector 4 | 0x08010000 - 0x0801FFFF | 64 KiB | storage area #1 |
| Sector 5 | 0x08020000 - 0x0803FFFF | 128 KiB | bootloader (2nd stage) |
| Sector 6 | 0x08040000 - 0x0805FFFF | 128 KiB | firmware |
| Sector 7 | 0x08060000 - 0x0807FFFF | 128 KiB | firmware |
| Sector 8 | 0x08080000 - 0x0809FFFF | 128 KiB | firmware |
| Sector 9 | 0x080A0000 - 0x080BFFFF | 128 KiB | firmware |
| Sector 10 | 0x080C0000 - 0x080DFFFF | 128 KiB | firmware |
| Sector 11 | 0x080E0000 - 0x080FFFFF | 128 KiB | firmware |
| Sector 12 | 0x08100000 - 0x08103FFF | 16 KiB | unused |
| Sector 13 | 0x08104000 - 0x08107FFF | 16 KiB | unused |
| Sector 14 | 0x08108000 - 0x0810BFFF | 16 KiB | unused |
| Sector 15 | 0x0810C000 - 0x0810FFFF | 16 KiB | unused |
| Sector 16 | 0x08110000 - 0x0811FFFF | 64 KiB | storage area #2 |
| Sector 17 | 0x08120000 - 0x0813FFFF | 128 KiB | firmware extra |
| Sector 18 | 0x08140000 - 0x0815FFFF | 128 KiB | firmware extra |
| Sector 19 | 0x08160000 - 0x0817FFFF | 128 KiB | firmware extra |
| Sector 20 | 0x08180000 - 0x0819FFFF | 128 KiB | firmware extra |
| Sector 21 | 0x081A0000 - 0x081BFFFF | 128 KiB | firmware extra |
| Sector 22 | 0x081C0000 - 0x081DFFFF | 128 KiB | firmware extra |
| Sector 23 | 0x081E0000 - 0x081FFFFF | 128 KiB | firmware extra |
OTP
| block | range | size | function |
|---|---|---|---|
| block 0 | 0x1FFF7800 - 0x1FFF781F | 32 B | device batch: {MODEL_IDENTIFIER}-YYMMDD |
| block 1 | 0x1FFF7820 - 0x1FFF783F | 32 B | bootloader downgrade protection |
| block 2 | 0x1FFF7840 - 0x1FFF785F | 32 B | vendor keys lock |
| block 3 | 0x1FFF7860 - 0x1FFF787F | 32 B | entropy/randomness |
| block 4 | 0x1FFF7880 - 0x1FFF789F | 32 B | device variant information |
| block 5 | 0x1FFF78A0 - 0x1FFF78BF | 32 B | unused |
| block 6 | 0x1FFF78C0 - 0x1FFF78DF | 32 B | unused |
| block 7 | 0x1FFF78E0 - 0x1FFF78FF | 32 B | unused |
| block 8 | 0x1FFF7900 - 0x1FFF791F | 32 B | unused |
| block 9 | 0x1FFF7920 - 0x1FFF793F | 32 B | unused |
| block 10 | 0x1FFF7940 - 0x1FFF795F | 32 B | unused |
| block 11 | 0x1FFF7960 - 0x1FFF797F | 32 B | unused |
| block 12 | 0x1FFF7980 - 0x1FFF799F | 32 B | unused |
| block 13 | 0x1FFF79A0 - 0x1FFF79BF | 32 B | unused |
| block 14 | 0x1FFF79C0 - 0x1FFF79DF | 32 B | unused |
| block 15 | 0x1FFF79E0 - 0x1FFF79FF | 32 B | unused |
RAM
| region | range | size | function |
|---|---|---|---|
| CCMRAM | 0x10000000 - 0x1000FFFF | 64 KiB | Core Coupled Memory |
| SRAM1 | 0x20000000 - 0x2001BFFF | 112 KiB | General Purpose SRAM |
| SRAM2 | 0x2001C000 - 0x2001FFFF | 16 KiB | General Purpose SRAM |
| SRAM3 | 0x20020000 - 0x2002FFFF | 64 KiB | General Purpose SRAM |
TrustZone
New Trezor models are built on the STM32U5 series microcontrollers, which are based on the ARM Cortex-M33 and provide advanced security features, such as TrustZone.
When building firmware for such a device (Blank Trezor device or DISC2 evaluation kit), you need to ensure that TrustZone is enabled in the STM32 microcontroller’s option bytes.
Enable TrustZone in STM32 Option Bytes
-
Download and install STM32CubeProgrammer.
-
Connect the device via ST-Link (DISC2 has an embedded ST-Link; for Trezor devices, use an external one).
-
Power on the device (connect via USB).
-
Open STM32CubeProgrammer and connect to the device.
-
Open the Option Bytes (OB) tab.
-
In the User Configuration tab, enable TZEN, then press Apply.
-
In the Boot Configuration tab, change the SECBOOTADD0 address to 0x0C004000, then press Apply.
-
Disconnect the ST-Link and reset the device.
Use of SLIP-39 in trezor-core
SLIP-39 describes a way to securely back up a secret value using Shamir's Secret Sharing scheme.
The secret value, called a Master Secret (MS) in SLIP-39 terminology, is first encrypted by a passphrase, producing an Encrypted Master Secret (EMS). The EMS is then split into a number of shares, which are encoded as a set of mnemonic words. Afterwards, it is possible to recombine some or all of the shares to obtain back the EMS, and when the correct passphrase is provided, decrypt the original Master Secret.
This does not quite match Trezor's use of the "passphrase protection" feature, namely that any passphrase is valid, and using any passphrase will yield a working wallet.
SLIP-39 enables this usage by specifying that passphrases are not validated in any way. Decrypting an EMS with any passphrase will produce data usable as the Master Secret, regardless of whether it is the original data or not.
Seed handling in Trezor
Trezor stores a mnemonic secret in a storage field _MNEMONIC_SECRET. This is the
input for the root node derivation process: mnemonic.get_seed(passphrase) takes the
user-provided passphrase as an argument, and derives the appropriate root node from the
mnemonic secret.
With BIP-39, the recovery phrase itself is the mnemonic secret. During device
initialization, the raw recovery phrase is given to the user, and also directly stored
in the _MNEMONIC_SECRET field. Whenever the root node is required, it is derived by
applying PBKDF2 to the mnemonic secret plus passphrase.
For SLIP-39 it is not practical to store the raw data of the recovery shares. During
device initialization, a random Encrypted Master Secret is generated and stored as
_MNEMONIC_SECRET. SLIP-39 encryption parameters (a random identifier, extendable backup
flag and an iteration exponent) are stored alongside the mnemonic secret in their own
storage fields. Whenever the root node is required, it is derived by "decrypting" the
stored mnemonic secret with the provided passphrase.
SLIP-39 implementation
The reference implementation of SLIP-39 provides the following high-level API:
generate_mnemonics(group parameters, master_secret, passphrase): Encrypt Master Secret with the provided passphrase, and split into a number of shares defined via the group parameters. Implemented using the following:encrypt(master_secret, passphrase, iteration_exponent, identifier, extendable): Encrypt the Master Secret with the given passphrase and parameters.split_ems(group parameters, identifier, extendable, iteration_exponent, encrypted_master_secret): Split the encrypted secret and encode the metadata into a set of shares defined via the group parameters.
combine_mnemonics(set of shares, passphrase): Combine the given set of shares to reconstruct the secret, then decrypt it with the provided passphrase. Implemented using the following:recover_ems(set of shares): Combine the given set of shares to obtain the encrypted master secret, identifier, extendable backup flag and iteration exponent.decrypt(encrypted_master_secret, passphrase, iteration_exponent, identifier, extendable): Decrypt the secret with the given passphrase and parameters, to obtain the original Master Secret.
Only the functions denoted in bold are implemented in trezor-core. Recovery shares
are generated with split_ems and combined with recover_ems. Passphrase decryption is
done with decrypt. There is never an original "master secret" to be encrypted, so the
encrypt function is also omitted.
Step-by-step
Device initialization
This process does not use passphrase.
- Generate the required number of random bits (128 or 256), and store as
_MNEMONIC_SECRET. - Translate the host-specified backup type to an extendable backup type and store it as
_BACKUP_TYPE. - Store the default iteration exponent
1as_SLIP39_ITERATION_EXPONENT. - The storage now contains all parameters required for seed derivation.
Seed derivation
This is the only process that uses passphrase.
- If passphrase is enabled, prompt user for passphrase. Otherwise use empty string.
- Use
slip39.decrypt(_MNEMONIC_SECRET, passphrase, _SLIP39_ITERATION_EXPONENT, _SLIP39_IDENTIFIER)to "decrypt" the root node that matches the provided passphrase.
Seed backup
This process does not use passphrase.
- Prompt user for group parameters (number of groups, number of shares per group, etc.).
- Use
slip39.split_ems(group parameters, _SLIP39_IDENTIFIER, _SLIP39_ITERATION_EXPONENT, _MNEMONIC_SECRET)to split the secret into the given number of shares.
Seed recovery
This process does not use passphrase.
- Prompt the user to enter enough shares.
- Use
slip39.recover_ems(shares)to combine the shares and get metadata. - Store the Encrypted Master Secret as
_MNEMONIC_SECRET. - Infer the backup type and store it as
_BACKUP_TYPE. - If the backup type is not extendable, then store the identifier as
_SLIP39_IDENTIFIER. - Store the iteration exponent as
_SLIP39_ITERATION_EXPONENT. - The storage now contains all parameters required for seed derivation.
Translations
Overview
Trezor stores translated strings in .json files in core/translations directory - e.g. de.json.
When no foreign-language is present, the English version is used - en.json.
Translations files contain the translated strings and also all the special font characters as a link to .json files in fonts directory. Font files are not needed for english, which uses just default/built-in ASCII characters.
Generating blobs
To generate up-to-date blobs, use python core/translations/cli.py gen - they will appear in core/translations as translations-*.bin files. The files contain information about the specific hardware model, language and device version.
Uploading blobs
To upload blobs with foreign-language translations, use trezorctl set language <blob_location> command.
To switch the language back into english, use trezorctl set language -r.
Translations blob format (v1)
| offset | length | name | description | hash |
|---|---|---|---|---|
| 0x0000 | 6 | magic | blob magic TRTR01 | |
| 0x0006 | 4 | container_len | total length (up to padding) | |
| 0x000A | 2 | header_len | header length | |
| 0x000C | 2 | header_magic | header magic TR | |
| 0x000E | 8 | language_tag | BCP 47 language tag (e.g. cs-CZ, en-US, ...) | header |
| 0x0016 | 4 | version | 4 bytes of version (major, minor, patch, build) | header |
| 0x001A | 4 | data_len | length of the raw data, i.e. translations + fonts | header |
| 0x001E | 32 | data_hash | SHA-256 hash of the data | header |
| 0x003E | header_len - 46 | ignored | reserved for forward compatibility | header |
| ? | 2 | proof_len | length of merkle proof and signature in bytes | |
| ? | 1 | proof_count | number of merkle proof items following | |
| ? | proof_count * 20 | proof | array of SHA-256 hashes | |
| ? | 1 | sig_mask | CoSi signature mask | |
| ? | 64 | sig | ed25519 CoSi signature of merkle root | |
| ? | 2 | translations_chunks_count | number of translated strings chunks | data |
| ? | 2 | 1st_translations_chunk_len | length of the 1st translated strings chunk | data |
| ? | 1st_translations_chunk_len | 1st_translations_chunk | 1st translated string chunk data | data |
| ? | 2 | 2nd_translations_chunk_len | length of the 2nd translated strings chunk | data |
| ? | 2nd_translations_chunk_len | 2nd_translations_chunk | 2nd translated string chunk data | data |
| ? | ... | ... | ... | data |
| ? | 2 | last_translations_chunk_len | last translated string chunk data | data |
| ? | last_translations_chunk_len | last_translations_chunk | length of the last translated strings chunk | data |
| ? | 2 | fonts_len | length of the font data | data |
| ? | fonts_len | fonts | font data | data |
| ? | ? | padding | 0xff bytes padding to flash sector boundary |
Translation data
Offsets refer to the strings field, up to the following offset. First offset is always 0, following offset must always be equal or greater (equal denotes empty string).
| offset | length | name | description |
|---|---|---|---|
| 0x0000 | 2 | count | number of offsets, excluding the sentinel |
| 0x0002 | 2 | offset[0] | offset of string id 0 in the strings field |
| ... | 2 | ... | |
| ? | 2 | offset[count - 1] | offset of string id count - 1 in the strings field |
| ? | 2 | offset[count] | offset past the last element |
| ? | translations_len - 2 * (count + 2) | strings | concatenation of UTF-8 strings |
Fonts
Ids must be in increasing order, offsets must be in non-decreasing order. First offset must be 0.
| offset | length | name | description |
|---|---|---|---|
| 0x0000 | 2 | count | number of items in the offset table, excluding the sentinel |
| 0x0002 | 2 | id[0] | numeric id of the first font |
| 0x0004 | 2 | offset[0] | offset of the first font in the fonts field |
| ... | ... | ... | |
| ? | ? | id[count - 1] | numeric id of the last font |
| ? | ? | offset[count - 1] | offset of the last font in the fonts field |
| ? | ? | sentinel_id | sentinel 0xffff |
| ? | ? | sentinel_offset | offset past the end of last element |
| ? | fonts | concatenation of fonts, format defined in the next section | |
| ? | 0-3 | padding | padding (any value) for alignment purposes |
Font data
The format is exactly the same as the previous table, the only difference is the interpretation of the payload.
| offset | length | name | description |
|---|---|---|---|
| 0x0000 | 2 | count | number of items in the offset table, excluding the sentinel |
| 0x0002 | 2 | id[0] | id (Unicode code point) of the first glyph |
| 0x0004 | 2 | offset[0] | offset of the first glyph in the glyphs field |
| ... | ... | ... | |
| ? | ? | id[count - 1] | id (Unicode code point) of the last glyph |
| ? | ? | offset[count - 1] | offset of the last glyph in the glyphs field |
| ? | ? | sentinel_id | sentinel 0xffff |
| ? | ? | sentinel_offset | offset past the end of last element |
| ? | glyphs | concatenation of glyph bitmaps | |
| ? | 0-3 | padding | padding (any value) for alignment purposes |
Previous versions
Translations blob format (v0)
| offset | length | name | description | hash |
|---|---|---|---|---|
| 0x0000 | 6 | magic | blob magic TRTR00 | |
| 0x0006 | 2 | container_len | total length (up to padding) | |
| 0x0008 | 2 | header_len | header length | |
| 0x000A | 2 | header_magic | header magic TR | |
| 0x000C | 8 | language_tag | BCP 47 language tag (e.g. cs-CZ, en-US, ...) | header |
| 0x0014 | 4 | version | 4 bytes of version (major, minor, patch, build) | header |
| 0x0018 | 2 | data_len | length of the raw data, i.e. translations + fonts | header |
| 0x001A | 32 | data_hash | SHA-256 hash of the data | header |
| 0x003A | header_len - 48 | ignored | reserved for forward compatibility | header |
| ? | 2 | proof_len | length of merkle proof and signature in bytes | |
| ? | 1 | proof_count | number of merkle proof items following | |
| ? | proof_count * 20 | proof | array of SHA-256 hashes |
UI Layout Lifecycle
Overview
There can be at most one UI layout running. The running layout is stored in
ui.CURRENT_LAYOUT. The value of this attribute must only be managed internally by the
layout objects themselves.
There are two kinds of layouts. The Layout class represents the normal kind of layout
which can accept user interaction or timer events. Such layout can return a result
of the interaction, retrievable from the Layout.get_result() async method. Typically,
calling code will block on an await for the result.
ProgressLayout represents loaders for long-running operations. It does not respond to
events and cannot return a result. Calling code will start the progress layout in the
background, call to it to update progress via ProgressLayout.report(), and then stop
it when done.
Python layout object lifecycle
A newly created layout object is in READY state. It does not accept events, has no background tasks, does not draw on screen.
When started, it moves into RUNNING state. It is drawn on screen (with backlight
on), accepts events, and runs background tasks. The value of ui.CURRENT_LAYOUT is set
to the running layout object.
(This implies that at most one layout can be in RUNNING state.)
Layout in RUNNING state may stop and return a result, either in response to a user interaction event (touch, button click, USB) or an internal timer firing. This moves it into a FINISHED state. It is no longer shown on screen (backlight is off unless another layout turns it on again), does not accept events, and does not run background tasks.
A layout in a FINISHED state has a result value, available for pickup by
awaiting get_result().
Stopping a layout before returning a result, or retrieving a result of a FINISHED layout, will move it back to READY state.
State transitions
+-------+    start()   +-----------+    <event>    +------------+
| READY | -----------> |  RUNNING  | ------------> |  FINISHED  |
+-------+              +-----------+               +------------+
  ^   ^                      |                           |
  |   |                      |                           |
  |   +------- stop() -------+                           |
  |                                                      |
  +--------------------- get_result() -------------------+
Calling start() checks if other layout is running, and if it is, stops it first. Then
it performs the setup and moves layout into RUNNING state.
(At most one layout can be in RUNNING state at one time. That means that before a layout moves to RUNNING, the previously running layout must move out.)
When layout is in RUNNING state, calling start() is a no-op. When layout is in
FINISHED state, calling start() fails an assertion.
After start() returns, the layout is in RUNNING state. It will stay in this state
until it returns a result, or is stopped.
Calling stop() on a READY or FINISHED layout is a no-op. Calling stop() on a
RUNNING layout will shut down any tasks waiting on the layout's result, and move to
READY state.
After stop() returns, the layout is not in RUNNING state and the current layout is
no longer this layout.
Awaiting get_result() will resume the lifecycle from its current stage, that is:
- in READY state, starts the layout and waits for its result
- in RUNNING state, waits for the result
- in FINISHED state, returns the result
After get_result() returns, the layout is in READY state.
All state transitions are synchronous -- so, in terms of trezor-core's cooperative multitasking, effectively atomic.
Global layout lifecycle
When Trezor boots, ui.CURRENT_LAYOUT is None. The screen backlight is on and displays
the "filled lock" welcome screen with model name.
When a layout is started, the backlight is turned on and the layout is drawn on screen.
ui.CURRENT_LAYOUT is the instance of the layout.
When a layout is stopped, the backlight is turned off and ui.CURRENT_LAYOUT is set to
None.
Between two different layouts, there is always an interval where backlight is off and
the value of ui.CURRENT_LAYOUT is None. This state may not be visible from the
outside; it is possible to synchronously go from A -> None -> B. However, there MUST
be a None inbetween in all cases.
Rust layout object lifecycle
A layout on the Rust side is represented by the trait Layout, whose event() method
returns a value of type Option<LayoutState>. If this event caused a state transition,
the new state is returned.
Layout can be in one of four states:
Initial: the layout is freshly constructed. This is never returned as a result ofevent().Attached: the layout is running. Its timers have been started and it is accepting events. The state transition carries anOption<ButtonRequest>. If set, this is the ButtonRequest that should be sent to the host, as an indication that the layout is ready.Transitioning: the layout is running, but not ready to receive events; either a transition-in or a transition-out animation is running.
The enum value carries anAttachType, indicating which direction the transition is going. If this is an outgoing transition, the runtime is supposed to pass the attach type to the next layout, so that it can properly transition-in.Done: the layout has finished running. All its timers should be stopped, and there is a return value available via thevalue()method.
We currently do not keep precise track of transitioning animations; it would be a lot of effort to factor the code properly, while the only use case is debuglink state tracking, which works well enough as-is.
Simple layouts
Layouts that are not flows (i.e., have only one screen) are implemented as Components
with a ComponentMsgObj implementation. They are wrapped in a RootComponent struct
which essentially simulates the layout lifecycle, in the following manner:
- At start, the layout is
Initial. - After processing the
Attachevent, the layout isAttached. The ButtonRequest value is picked up fromctx.button_request(). - When
Component::event()returns non-Nonevalue, the layout isDone. The return value is converted toObjviaComponentMsgObj::msg_try_into_obj()and cached asvalueon theRootComponent.
Flows
Flow layouts in Delizia are implemented as a SwipeFlow struct, which implements
Layout directly.
A flow lifecycle works like this:
- At start, the layout is
Initial. - After processing the
Attachevent, the layout isAttached. The ButtonRequest value is picked up fromctx.button_request(). - When the flow controller returns a transition from a swipe event, the layout goes
directly to
Attachedstate. This is because at that point the transition animation is already finished. - When the flow controller returns a transition from a non-swipe event (e.g., a
button click), the flow controller starts an automatic transition-out animation, and
the layout goes to
Transitioningstate, with the transition direction set to the swipe animation direction. - When the flow controller returns a
Returndecision, the layout goes toDone.
Transition-in animations are currently not tracked properly. This is fine for tests because animations are disabled there, but it may break at some point. Correctly tracking transitions would require a more significant refactor of the flow controllers.
Transition-out animations are partially tracked, when the animation is directed by the
FlowState object. In some cases (such as when a swipe is triggered), the animation is
instead controlled by the destination screen, in which case they are not tracked.
Button requests
A ButtonRequest MUST be sent while the corresponding layout is already in RUNNING
state. That is, in particular, the value of ui.CURRENT_LAYOUT is of the corresponding
layout.
The best choice is to always use the interact() function to take care of
ButtonRequests. Explicitly sending ButtonRequests is not supported.
There are two mechanisms for sending ButtonRequests:
-
From Python: The
interact()function passes theButtonRequestinside the layout. This enqueues the request so that when the respective Rust layout transitions toAttachedstate, the providedButtonRequestis sent. -
From Rust: A
Componentcan be wrapped inSendButtonRequest, which sends theButtonRequestwhen the component receives anEvent::Attach.
Both mechanisms ensure that ButtonRequests are only sent when the layout is already
in RUNNING state and the Rust layout is Attached.
Debuglink
We assume that only one caller is using the debuglink and that debuglink commands are strongly ordered on the caller side. On the firmware side, we impose strong ordering on the received debuglink calls based on the time of arrival.
There are two layout-relevant debuglink commands.
DebugLinkDecision
Caller can send a decision to the RUNNING and Attached layout. This injects an
event into the layout. In response, the layout can move to a FINISHED state.
If a DebugLinkDecision is received while a layout is not RUNNING or not
Attached, debuglink pauses until some layout becomes ready to receive decisions.
A next debug command is read only after a DebugLinkDecision is fully processed. This
means that:
- if the decision caused the layout to stop, subsequent debug commands will be received by the next layout up,
- if the decision caused the layout to transition, subsequent debug commands will be received by the respective layout when the transition is done, and
- if the decision did not cause the layout to change state, subsequent debug commands will be received by the same layout.
DebugLinkGetState
Caller can read the contents of the RUNNING layout.
There are three available waiting behaviors:
IMMEDIATE(default) returns the contents of the layout that is currently RUNNING, or empty response if no layout is running. Rust layout lifecycle state is not taken into account.NEXT_LAYOUTwaits for the layout to change before returning -- that is, waits until the next time a RUNNING layout transitions into anAttachedstate:- If no layout is running, waits until one is started.
- If a layout is running but not attached, waits until it is attached.
- If a layout is running and attached, waits until the layout stops or becomes attached again.
CURRENT_LAYOUTwaits until a layout is running and attached, and returns its contents. If no layout is running or it is not attached, the behavior is the same asNEXT_LAYOUT. If a layout is running and attached, the behavior is the same asIMMEDIATE.
When received after a ButtonRequest has been sent, the modes guarantee the following:
IMMEDIATEandCURRENT_LAYOUT: return the contents of the layout corresponding to the button request (unless the layout has already been terminated by a timer event or user interaction, in which case the result is undefined).NEXT_LAYOUT: waits until the layout corresponding toButtonRequestchanges.
When received after a DebugLinkDecision has been received, the behavior is:
IMMEDIATE: If the layout did not shut down (e.g., when paginating), returns the contents of the layout as modified by the decision. If the layout shut down, the result is not guaranteed.CURRENT_LAYOUT: Returns the layout that is the result of the decision.NEXT_LAYOUT: No guarantees.
While DebugLinkGetState is waiting, no other debug commands are processed. In
particular, it is impossible to start waiting and then send a DebugLinkDecision to
cause the layout to change. Doing so will result in a deadlock.
(TODO it might be possible to lift this restriction.)
If a layout is shut down by a DebugLinkDecision, and the firmware expects more
messages, a new layout might not come up until those messages are exchanged. Calling
DebugLinkGetState except in IMMEDIATE mode will block the debuglink until the new
layout comes up. If the calling code is waiting for a DebugLinkGetState to return, it
will deadlock.
(Firmware tries to detect the above condition and sends an error over debuglink if the
wait state is CURRENT_LAYOUT and there is no current layout for more than 3 seconds.)
Synchronizing
ButtonRequest is a synchronization event. After a ButtonRequest has been sent from
firmware, all debug commands are guaranteed to hit the layout corresponding to the
ButtonRequest (unless the layout is terminated by a timer event or user interaction).
DebugLinkDecision is also a synchronization event. After a DebugLinkDecision has
been received by the firmware, all debug commands are guaranteed to hit the layout
that is the "result" of the decision.
In order to synchronize on a homescreen, it is possible to either:
- invoke any workflow that triggers a
ButtonRequest, and follow it until end (Ping(button_protection=True)would work fine), or - poll
DebugLinkGetStateuntil the layout isHomescreen. Typically, runningDebugLinkGetState(wait_layout=CURRENT_LAYOUT)will work on the first try if you are close enough to homescreen (such as after completing a workflow).
wait_layout=NEXT_LAYOUT cannot be used for synchronization, because it always
returns the next layout. If the current one is already homescreen, it will wait
forever.
Optiga data object configuration
The following table outlines the Optiga data object configuration used in Trezor Safe 3 and Trezor Safe 5.
| OID | Name | Read | Write | Execute | Type/Usage | Size (bytes) | Notes | Storage version |
|---|---|---|---|---|---|---|---|---|
| E0E0 | CERT_INF | Always | Never | Always | DEVCERT | Infineon certificate. | ||
| E0E1 | CERT_DEV | Always | Never | Always | DEVCERT | Device certificate chain. | ||
| E0E2 | CERT_FIDO | Always | Never | Always | DEVCERT | FIDO attestation certificate. | ||
| E0E3 | DEVCERT | ≤ 1728 | Unused public key certificate. | |||||
| E0E8 | TA | ≤ 1200 | Unused root CA public key certificate. | |||||
| E0E9 | TA | ≤ 1200 | Unused root CA public key certificate. | |||||
| E0F0 | KEY_DEV | Never | Never | Conf(KEY_PAIRING) | Sign | NIST P-256 device private key. | ||
| E0F1 | Unused private ECC key. | |||||||
| E0F2 | KEY_FIDO | Never | Never | Conf(KEY_PAIRING) | Sign | NIST P-256 FIDO attestation private key. | ||
| E0F3 | PIN_ECDH | Never | Always | Luc(PIN_TOTAL_CTR) | KeyAgree | NIST P-256 key for ECDH PIN stretching step. | ≥ 3 | |
| E120 | STRETCHED_PIN_CTR | Always | Auto(PIN_SECRET) | Always | UPCTR | 8 | Counter which limits the guesses at STRETCHED_PIN. Limit set to 16. | ≥ 3 |
| E121 | PIN_TOTAL_CTR | Always | Never | Always | UPCTR | 8 | Counter which limits the total number of PIN stretching operations over the lifetime of the device. Limit set to 600000, meaning 150000 unlock attempts. | ≥ 3 |
| E122 | PIN_HMAC_CTR | Always | Auto(STRETCHED_PIN) | Always | UPCTR | 8 | Counter which limits the use of PIN_HMAC. Limit set to 16. | ≥ 5 |
| E123 | UPCTR | 8 | Unused monotonic counter. | |||||
| E140 | KEY_PAIRING | Never | Never | Always | PTFBIND | 32 | Shared platform binding secret. | |
| E200 | PIN_CMAC | Never | Always | Luc(PIN_TOTAL_CTR) | Enc | 32 | Key for AES-CMAC PIN stretching step. | ≥ 3 |
| F1D0 | PIN_SECRET | Auto(STRETCHED_PIN) | Always | Always | AUTOREF | 32 | Counter-protected PIN secret and reset key for STRETCHED_PIN_CTR. | ≥ 3 |
| F1D1 | PIN_HMAC_V4 | Never | Never | Luc(PIN_TOTAL_CTR) | PRESSEC | 32 | Deprecated key for HMAC-SHA256 PIN stretching step. | 3, 4 |
| F1D2 | ≤ 140 | Unused data object. | ||||||
| F1D3 | ≤ 140 | Unused data object. | ||||||
| F1D4 | STRETCHED_PIN | Never | Auto(PIN_SECRET) | Luc(STRETCHED_PIN_CTR) | AUTOREF | 32 | Digest of the stretched PIN. | ≥ 3 |
| F1D5 | ≤ 140 | Unused data object. | ||||||
| F1D6 | ≤ 140 | Unused data object. | ||||||
| F1D7 | ≤ 140 | Unused data object. | ||||||
| F1D8 | PIN_HMAC | Never | Auto(STRETCHED_PIN) | Luc(PIN_HMAC_CTR) | PRESSEC | 32 | Counter-protected key for HMAC-SHA256 PIN stretching step. | ≥ 5 |
| F1D9 | ≤ 140 | Unused data object. | ||||||
| F1DA | ≤ 140 | Unused data object. | ||||||
| F1DB | ≤ 140 | Unused data object. | ||||||
| F1E0 | ≤ 1500 | Unused data object. | ||||||
| F1E1 | ≤ 1500 | Unused data object. |
Optiga PIN protection
The diagram below summarizes the main relationships between the data objects that play a role in PIN protection. An arrow from X to Y indicates that X authorizes the specified operation on Y.
- If X is a monotonic counter, then the specified operation on Y is allowed only if the counter value is below the threshold. The operation causes X to be incremented.
- If X is a secret, then the specified operation on Y is allowed only if the host MCU proves knowledge of the value stored in X.
- If X is Always, then the specified operation is always allowed.
graph LR
Always -- Write --> PIN_SECRET
PIN_SECRET -- Write --> STRETCHED_PIN
PIN_SECRET -- Write --> STRETCHED_PIN_CTR
STRETCHED_PIN_CTR -- Execute --> STRETCHED_PIN
STRETCHED_PIN -- Read --> PIN_SECRET
STRETCHED_PIN -- Write --> PIN_HMAC_CTR
PIN_HMAC_CTR -- Execute --> PIN_HMAC
STRETCHED_PIN -- Write --> PIN_HMAC
Stretching pattern
The Optiga's role in PIN protection is to add a series of PIN stretching steps to the process of computing the storage key encryption key (KEK). All stretching operations are limited either by the global counter PIN_TOTAL_CTR or by one of the PIN attempt counters PIN_HMAC_CTR and STRETCHED_PIN_CTR. Each stretching step is wrapped in the following pattern:
digest = hmac_sha256(stretched_pin, "")
output = optiga_operation(..., digest)
stretched_pin = hmac_sha256(stretched_pin, output)
In this pattern, the stretched PIN is first processed using a one-way function before sending it to the Optiga. This ensures that in the unlikely case of an attacker recording communication between the MCU and Optiga or extracting the secret in STRETCHED_PIN, they will not gain knowledge of the stretched PIN, only its digest. Second, the digest is sent to the Optiga which uses it to generate an output. That output is then used to stretch the PIN. This method ensures that if the user chooses a high-entropy PIN or if at least one of the preceding stretching operations remains secure, then even if the communication link or the Optiga is completely compromised, possibly even malicious, it will not reduce the security of the Trezor any more than if the Optiga was not integrated into the Trezor in the first place.
Optiga stretching process
The following pseudocode outlines the process of stretching the PIN by Optiga.
optiga_pin_verify(stretched_pin):
    # Stretch the PIN with the secrets in PIN_CMAC and PIN_ECDH.
    PIN_STRETCH_ITERATIONS = 2
    for _ in range(PIN_STRETCH_ITERATIONS):
        # Stretch the PIN with PIN_CMAC and PIN_ECDH secrets in the Optiga.
        digest = hmac_sha256(stretched_pin, "")
        cmac_out = encrypt_sym(SYM_MODE_CMAC, PIN_CMAC, digest)
        point = hash_to_curve(digest)
        ecdh_out = calc_ssec(CURVE_P256, PIN_ECDH, point)
        stretched_pin = hmac_sha256(stretched_pin, cmac_out + ecdh_out)

    # Stretch the PIN with the secret in PIN_HMAC.
    digest = hmac_sha256(stretched_pin, "")
    hmac_buffer = encrypt_sym(SYM_MODE_HMAC_SHA256, PIN_HMAC, digest)
    stretched_pin = hmac_sha256(stretched_pin, hmac_buffer)

    # Authorise using STRETCHED_PIN so that we can read from PIN_SECRET and reset PIN_HMAC_CTR.
    digest = hmac_sha256(stretched_pin, "")
    if not set_auto_state(STRETCHED_PIN, digest):
        raise InvalidPinError
    pin_secret = get_data_object(PIN_SECRET)
    stretched_pin = hmac_sha256(stretched_pin, pin_secret)
    set_data_object(PIN_HMAC_CTR, COUNTER_RESET)

    # Authorise using PIN_SECRET so that we can reset STRETCHED_PIN_CTR.
    set_auto_state(PIN_SECRET, pin_secret)
    set_data_object(STRETCHED_PIN_CTR, COUNTER_RESET)

    return stretched_pin
The first step of the stretching process hardens the PIN protection in case a vulnerability is discovered that allows the extraction of the secret value of a data object in Optiga that has a particular configuration, but does not allow extraction for other kinds of data objects. An attacker would need to be able to extract each of the secrets in PIN_CMAC, PIN_ECDH, PIN_HMAC and PIN_SECRET to conduct an offline brute-force search for the PIN. Thus it reduces the number of PIN values that the attacker can test in a unit of time by forcing them to involve the Optiga in each attempt, and restricts the overall number of attempts using PIN_TOTAL_CTR.
The rest of the process makes use of the data objects that are depicted in the diagram. The configuration of these data objects is designed with the goal of making the system resettable under all circumstances, i.e. even if the previous PIN is forgotten, flash storage is wiped and counters are depleted. There are two PIN attempt counters STRETCHED_PIN_CTR and PIN_HMAC_CTR, which both have a limit of 16 attempts and have identical values under normal circumstances.
PIN_HMAC_CTR limits the number of possible PIN attempts, but together with PIN_HMAC it also serves to mitigate a so called PIN-only attack. Without this counter it would be possible to partially reset the system by overwriting PIN_SECRET and resetting STRETCHED_PIN_CTR to gain an unlimited number of attempts at checking for the correct PIN, but without the possibility to derive the correct storage key encryption key, since the PIN_SECRET is overwritten. This attack is dangerous in case a user has two devices with the same PIN, because one of the devices could be used to determine the correct PIN and the other could then be unlocked. Note that in order for the mitigation to be effective, write access to PIN_HMAC_CTR must be authorized by STRETCHED_PIN. This implies that the attacker cannot reset PIN_HMAC_CTR without first overwriting STRETCHED_PIN, thus ruining the ability of checking for the correct PIN.
STRETCHED_PIN_CTR also limits the number of possible PIN attempts. Its presence is actually not necessary, but serves as an additional countermeasure in case a vulnerability is discovered that allows an attacker to read data objects of type PRESSEC, specifically PIN_HMAC. In that case, the attacker would still be restricted by the STRETCHED_PIN_CTR in the number of PIN attempts they can make. After they depleted the counter, the worst they could do is overwrite PIN_SECRET to execute the aforementioned PIN-only attack.
PIN_SECRET and STRETCHED_PIN play an essential role in making the system resettable, yet secure. Since PIN_SECRET is used in the last PIN stretching step, there needs to be a data object that grants read access to PIN_SECRET, which is why STRETCHED_PIN is needed in the system. Anyone attempting to reset the system must first overwrite PIN_SECRET thus losing the value that is necessary to complete the PIN stretching. Suppose there was no PIN_SECRET in the system and the PIN, stretched by PIN_HMAC, was used directly as the storage key encryption key. Then STRETCHED_PIN would have to be writable always, and an attacker could rewrite STRETCHED_PIN, reset the PIN_HMAC_CTR, and gain an unlimited number of attempts to guess the PIN.
Logging for debugging purposes
Logging in the Trezor firmware is centralized so that all log records from all firmware components (bootloaders, prodtest, kernel, coreapp, Rust code, micropython code) are processed by a single routine. This ensures that the log format is always consistent:
{sec.msec} {module_name} {log_level} {message}
All log records are written to the debug console, which can be configured using the DBG_CONSOLE argument when building the firmware. If the debug console is disabled, all logging is disabled as well (i.e. in production builds).
Example:
make build_firmware TREZOR_MODEL=T3W1 DBG_CONSOLE=VCP
The following options are supported for the DBG_CONSOLE argument:
- VCP - outputs logs to the USB VCP console
- SWO - outputs logs to the SWO interface (requires STLink)
- SYSTEMVIEW - outputs logs using JLink and Segger SystemView
In the firmware emulator, all these logging backends are replaced with regular stderr output.
Runtime filtering
Log records can be filtered at runtime using a simple filter. This filter can include or exclude messages from specific modules or severity levels.
In the firmware (or emulator), the filter can be configured using the trezorctl debug set-log-filter command:
Example:
trezorctl debug set-log-filter -- +1*+session*
(This filter keeps error messages from all modules and enables all messages for modules whose names start with "session".)
In prodtest (if logging is enabled), the filter can be configured using the log-filter command:
Example:
log-filter +1*+session
See syslog_set_filter() in sys/syslog.h for more details about the filter grammar.
Logging from C code
Logging in C requires some setup, but the approach enables flexible compilation and reduces the resulting binary size.
To enable logging from C code, the .c file must:
- Include the logging header.
- Declare the logging module (the common module name).
Example in my_module.c:
#include <sys/logging.h>

LOG_DECLARE(my_module)
In syslog_config.h, define the default logging level for the module if it is not defined yet:
#ifndef SYSLOG_my_module_MAX_LOG_LEVEL
#define SYSLOG_my_module_MAX_LOG_LEVEL SYSLOG_DEFAULT_LOG_LEVEL
#endif
After this setup, you can use the printf-like logging macros LOG_ERR, LOG_WARN, LOG_INF, and LOG_DBG:
LOG_ERR("operation failed (errcode=%d)", errcode);
Logging from C code is disabled by default. To enable logs, configure them manually in syslog_config.h. There are two options, which can also be used together:
- Change the default logging level for all modules:
#define SYSLOG_DEFAULT_LOG_LEVEL LOG_LEVEL_OFF
- Change the logging level for a specific module:
#define SYSLOG_xxx_module_MAX_LOG_LEVEL SYSLOG_DEFAULT_LOG_LEVEL
Instead of LOG_LEVEL_OFF or SYSLOG_DEFAULT_LOG_LEVEL, use one of LOG_LEVEL_ERR, LOG_LEVEL_WARN, LOG_LEVEL_INF, or LOG_LEVEL_DBG.
These settings determine which modules and log levels are compiled into the firmware binary.
Notes on non-blocking behavior
When the logging backend is configured to use USB VCP (DBG_CONSOLE=VCP), all writes to the debug console are non-blocking by default. This may result in partial or lost messages, because the USB VCP internal buffer can fill quickly when the logging rate is high.
This default behavior can be overridden by setting the BLOCK_ON_VCP build argument. However, when logging from an interrupt context, writes to USB VCP remain non-blocking regardless of this setting.
When the logging backend is set to SWO or SYSTEMVIEW, writes are always blocking, ensuring that messages are never lost.
Trezor One Bootloader and Firmware
Building for Trezor Model T? See the core documentation.
Building with Docker
Ensure that you have Docker installed. You can follow Docker's installation instructions.
Clone this repository, then use build-docker.sh to build all images:
git clone --recurse-submodules https://github.com/trezor/trezor-firmware.git
cd trezor-firmware
./build-docker.sh
When the build is done, you will find the current firmware in build/legacy/firmware/firmware.bin.
Running with sudo
It is possible to run build-docker.sh if either your Docker is configured in rootless mode,
or if your user is a member of the docker group; see Docker documentation
for details.
If you don't satisfy the above conditions, and run sudo ./build-docker.sh, you might receive a Permission denied
error. To work around it, make sure that the directory hierarchy in build/ directory
is world-writable - e.g., by running chmod -R a+w build/.
Building older versions
For firmware versions 1.8.1 and newer, you can checkout the respective tag locally.
To build firmware 1.8.2, for example, run git checkout legacy/v1.8.2 and then use
the instructions below.
Note that the unified Docker build was added after version 1.8.3, so it is not available for older versions.
For firmwares older than 1.8.1, please clone the archived trezor-mcu repository and follow the instructions in its README.
Local development build
Make sure you have Python 3.10 or later and uv installed.
If you want to build device firmware, also make sure that you have the GNU ARM Embedded toolchain installed. See Dockerfile for up-to-date version of the toolchain.
The build process is configured via environment variables:
EMULATOR=1specifies that an emulator should be built, instead of the device firmware.DEBUG_LINK=1specifies that DebugLink should be available in the built image.PRODUCTION=0disables memory protection. This is necessary for installing unofficial firmware.DEBUG_LOG=1enables debug messages to be printed on device screen.BITCOIN_ONLY=1specifies Bitcoin-only version of the firmware.
To run the build process, execute the following commands:
# enter the legacy subdirectory
cd legacy
# set up uv
uv sync
# set up environment variables. For example, to build emulator with debuglink:
export EMULATOR=1 DEBUG_LINK=1
# clear build artifacts
uv run ./script/setup
# run build process
uv run ./script/cibuild
A built device firmware will be located in legacy/firmware/trezor.bin. A built emulator will be
located in legacy/firmware/trezor.elf.
⚠️ Disclaimer ⚠️
The emulator is for development purposes only. It uses a pseudo random number generator, and thus no guarantee on its entropy is made. No security or hardening efforts are made here. It is, and will continue to be, intended for development purposes only. Security and hardening efforts are only made available on physical Trezor hardware.
Any other usage of the emulator is discouraged. Doing so runs the risk of losing funds.
Common errors
-
"Exception: bootloader has to be smaller than 32736 bytes": if you didn't modify the bootloader source code, simply make sure you always run
./script/setupbefore runnning./script/cibuild -
"error adding symbols: File in wrong format": This happens when building emulator after building the firmware, or vice-versa. Execute the following command to fix the problem:
find -L vendor -name "*.o" -delete
You can launch the emulator using ./firmware/trezor.elf. To use trezorctl with the emulator, use
trezorctl -p udp (for example, trezorctl -p udp get_features).
You can use TREZOR_OLED_SCALE environment variable to make emulator screen bigger.
How to get fingerprint of firmware signed and distributed by SatoshiLabs?
- Pick version of firmware binary listed on https://data.trezor.io/firmware/1/releases.json
- Download it:
wget -O trezor.signed.bin https://data.trezor.io/firmware/1/trezor-1.9.4.bin - Use
trezorctldry-run mode to get the firmware fingerprint:trezorctl firmware update -n -f trezor.signed.bin
Step 3 should produce the same fingerprint like your local build (for the same version tag).
How to install custom built firmware?
WARNING: This will erase the recovery seed stored on the device! You should never do this on Trezor that contains coins!
Build with PRODUCTION=0 or you will get a hard fault on your device.
Switch your device to bootloader mode, then execute:
trezorctl firmware update -f build/legacy/firmware/firmware.bin
Combining bootloader and firmware with various PRODUCTION settings, signed/unsigned
This is an issue before firmware 1.11.2, historical versions need to be built according to this table.
Not all combinations of bootloader and firmware will work. This depends on 3 variables: PRODUCTION of bootloader, PRODUCTION of firmware, whether firmware is signed
This table shows the result for bootloader 1.8.0+ and 1.9.1+:
| Bootloader PRODUCTION | Firmware PRODUCTION | Is firmware officially signed? | Result |
|---|---|---|---|
| 1 | 1 | yes | works, official configuration |
| 1 | 1 | no | hardfault in startup.S when setting VTOR and stack |
| 0 | 1 | no | works, but don't forget to comment out check_and_replace_bootloader, otherwise it'll get overwritten |
| 0 | 0 | no | hard fault because startup.S doesn't set VTOR and stack right |
| 1 | 0 | no | works |
The other three possibilities with signed firmware and PRODUCTION!=0 for bootloader/firmware don't exist.
Parsing existing T1 binary images with ImHex
There is multi-platform hex editor ImHex (another link) that allows for parsing firmware images we distribute such as those from https://github.com/trezor/data/tree/master/firmware
See legacy/imhex/ directory in repo and README.md there how to use it to parse headers from existing images.
Trezor One firmware format
Historically Trezor One has been using 256-byte header (w/ TRZR magic string) followed by the
actual firmware. Since version 1.8.0, different 1024-byte header (w/ TRZF magic string) is in use,
and building firmware from this repository produces firmware image containing such header followed
by firmware code.
Official release firmware contains both these headers for compatibility with old bootloaders. That
means there is a 256-byte TRZR header followed by 1024-byte TRZF header followed by code.
- Hash function used for computing data digest for signatures is SHA256.
- Signature system is ECDSA over SECP256k1.
- All multibyte integer values are little endian.
Legacy Header
Total length of legacy header is always 256 bytes.
| offset | length | name | description |
|---|---|---|---|
| 0x0000 | 4 | magic | firmware magic TRZR |
| 0x0004 | 4 | codelen | length of V2 header + code (length of code before 1.8.0) |
| 0x0008 | 1 | sigindex1 | index of key for sig1 |
| 0x0009 | 1 | sigindex2 | index of key for sig2 |
| 0x000A | 1 | sigindex3 | index of key for sig3 |
| 0x000B | 1 | flags | unused since 1.8.0 (zeroed) |
| 0x000C | 52 | reserved | not used yet (zeroed) |
| 0x0040 | 64 | sig1 | signature #1 |
| 0x0080 | 64 | sig2 | signature #2 |
| 0x00C0 | 64 | sig3 | signature #3 |
Signature verification:
- Calculate SHA256 digest of firmware without this header.
- Verify signature
sig1of the digest against public key with indexsigindex1inV1_BOOTLOADER_KEYS. - Repeat for
sig2andsig3. Indexes must be distinct.
V2 Header
This header has the same format as Model T Firmware Header,
however due to different signature scheme the sigmask and sig fields are zeroed and part of the
reserved space is used for T1-specific fields sig1-sig3, sigindex1-sigindex3. Total length of
v2 header is always 1024 bytes.
| offset | length | name | description |
|---|---|---|---|
| 0x0000 | 4 | magic | firmware magic TRZF |
| 0x0004 | 4 | hdrlen | length of the firmware header |
| 0x0008 | 4 | expiry | valid until timestamp (0=infinity) |
| 0x000C | 4 | codelen | length of the firmware code (without the header) |
| 0x0010 | 1 | vmajor | version (major) |
| 0x0011 | 1 | vminor | version (minor) |
| 0x0012 | 1 | vpatch | version (patch) |
| 0x0013 | 1 | vbuild | version (build) |
| 0x0014 | 1 | fix_vmajor | version of last critical bugfix (major) |
| 0x0015 | 1 | fix_vminor | version of last critical bugfix (minor) |
| 0x0016 | 1 | fix_vpatch | version of last critical bugfix (patch) |
| 0x0017 | 1 | fix_vbuild | version of last critical bugfix (build) |
| 0x0018 | 8 | reserved | not used yet (zeroed) |
| 0x0020 | 32 | hash1 | hash of the first code chunk excluding both the legacy and the v2 header (129792 B) |
| 0x0040 | 32 | hash2 | hash of the second code chunk (128 KiB), zeroed if unused |
| ... | ... | ... | ... |
| 0x0200 | 32 | hash16 | hash of the last possible code chunk (128 KiB), zeroed if unused |
| 0x0220 | 64 | sig1 | signature #1 |
| 0x0260 | 64 | sig2 | signature #2 |
| 0x02A0 | 64 | sig3 | signature #3 |
| 0x02E0 | 1 | sigindex1 | index of key for sig1 |
| 0x02E1 | 1 | sigindex2 | index of key for sig2 |
| 0x02E2 | 1 | sigindex3 | index of key for sig3 |
| 0x02E3 | 220 | reserved | not used yet (zeroed) |
| 0x03BF | 1 | reserved_sigmask | unused in T1 (zeroed) |
| 0x03C0 | 64 | reserved_sig | unused in T1 (zeroed) |
Signature verification:
- Calculate SHA256 digest of the entire header with
sig1-sig3andsigindex1-sigindex3zeroed out. - Verify signature
sig1of the digest against public key with indexsigindex1inV1_BOOTLOADER_KEYS. - Repeat for
sig2andsig3. Indexes must be distinct.
Python
To be documented by @matejcik, see #229.
In the meantime see python/docs and README for the PyPI package.
trezorlib
![]()

Python library and command-line client for communicating with Trezor Hardware Wallet.
See https://trezor.io for more information.
Install
Python Trezor tools require Python 3.9 or higher, and libusb 1.0. The easiest
way to install it is with pip. The rest of this guide assumes you have
a working pip; if not, you can refer to this
guide.
On a typical system, you already have all you need. Install trezor with:
pip3 install trezor
On Windows, you also need to either install Trezor Bridge, or libusb and the appropriate drivers.
Firmware version requirements
Current trezorlib version supports Trezor One version 1.8.0 and up, Trezor T version 2.1.0 and up, and all versions of the Trezor Safe family.
For firmware versions below 1.8.0 and 2.1.0 respectively, the only supported operation is "upgrade firmware".
Trezor One with firmware older than 1.7.0 and bootloader older than 1.6.0 (including pre-2021 fresh-out-of-the-box units) will not be recognized, unless you install HIDAPI support (see below).
Installation options
-
Bluetooth: To support connecting to T3W1 or later models via Bluetooth, additional dependencies are needed. Install with:
pip3 install trezor[ble] -
Ethereum: To support Ethereum signing from command line, additional packages are needed. Install with:
pip3 install trezor[ethereum] -
Stellar: To support Stellar signing from command line, additional packages are needed. Install with:
pip3 install trezor[stellar] -
Firmware-less Trezor One: If you are setting up a brand new Trezor One manufactured before 2021 (with pre-installed bootloader older than 1.6.0), you will need HIDAPI support. On Linux, you will need the following packages (or their equivalents) as prerequisites:
python3-dev,cython3,libusb-1.0-0-dev,libudev-dev.Install with:
pip3 install trezor[hidapi]
To install all four, use pip3 install trezor[ble,hidapi,ethereum,stellar].
Distro packages
Check out Repology to see if your operating system has an up-to-date python-trezor package.
Running from source
Install the uv tool, checkout trezor-firmware from git,
and activate the uv environment:
git clone https://github.com/trezor/trezor-firmware
cd trezor-firmware
git submodule update --init --recursive
uv sync
source .venv/bin/activate
In this environment, trezorlib and the trezorctl tool is running from the live
sources, so your changes are immediately effective.
Command line client (trezorctl)
The included trezorctl python script can perform various tasks such as
changing setting in the Trezor, signing transactions, retrieving account
info and addresses. See the
python/docs/
sub folder for detailed examples and options.
NOTE: An older version of the trezorctl command is available for
Debian Stretch
(and comes pre-installed on Tails OS).
Python Library
You can use this python library to interact with a Trezor and use its capabilities in your application. See examples here in the tools/ sub folder.
Changelog
Visit CHANGELOG.md for the latest changes.
Contributing
If you want to change protobuf definitions, you will need to regenerate definitions in
the python/ subdirectory.
First, make sure your submodules are up-to-date with:
git submodule update --init --recursive
Then, rebuild the protobuf messages by running, from the trezor-firmware top-level
directory:
make gen
Trezor Common
Common contains files shared among Trezor projects.
Coin Definitions
JSON coin definitions and support tables.
External definitions
Description of external definitions for the Ethereum and Solana tokens and the process of their generation. See External definitions.
Communication
We use Protobuf v2 for host-device communication. The communication cycle is simple. Trezor receives a message (request), acts on it, and responds with another one (response). Trezor on its own is incapable of initiating the communication.
Protobuf Definitions
Protobuf messages are defined in the Common project, which is part of this monorepo. This repository is also exported to trezor/trezor-common to be used by third parties, which prefer not to include the whole monorepo. That copy is a read-only mirror and all changes are happening in this monorepo.
Tools
Tools for managing coin definitions and related data.
Message Workflows
Protocol V1
Note: In this section we describe the internal functioning of the old communication protocol. Newer Trezor devices (since 2025) use the Trezor-Host protocol, see Trezor-Host protocol. If you wish to implement Trezor support you should use Connect or python-trezor, which will do all this hard work for you.
Notable topics
Sessions
Trezor has limited support for logical sessions. The main purpose is to enable seamless operation with multiple passphrases.
Warning: Session isolation does not exist. Host software is responsible for maintaining isolation. Running multiple host-side applications at the same time is not recommended.
See "Caveats" section below for details.
Support for isolated sessions is in the works, see #79.
Session lifecycle
After Trezor starts up, no session exists. Any attempt to use session data (i.e., the
seed) will be rejected with InvalidSession error code.
New session is started by calling Initialize with no arguments. The response is a
Features message, which contains a 32-byte session_id. All subsequent commands
happen within the given session.
To resume a previous session (after creating a new one), call Initialize with a stored
session_id as an argument.
Attempt to resume an unknown session ID will transparently allocate a new session ID.
Since firmwares 1.9.4 / 2.3.4, it is possible to destroy the current session via the
EndSession call. The session and all its associated data is wiped from Trezor memory,
and it is impossible to resume the session. Trezor returns to the initial state and
all requests will return InvalidSession.
There is no explicit way to leave a session and keep its data for later resumption.
Instead, you can switch to a new session via Initialize with no arguments.
At the moment, both T1 and TT allow for 10 sessions to exist at the same time. When a new session needs to be allocated and there is no space in the cache, the least recently used session is evicted.
Sessions only exist in RAM and are lost when Trezor is disconnected.
All commands are performed in the context of the current session, until one of the following happens:
- Host calls
EndSession. The current session is destroyed and Trezor returns to the initial state. - Host calls
Initializewith no arguments, or with an unknownsession_id. A new session is allocated and its id returned in theFeaturesmessage. - Host calls
Initializewith a knownsession_id. The specified session is resumed and itssession_idis returned in theFeaturesmessage. - Trezor is disconnected.
Caveats
-
Sessions only exist on the protobuf message level. There is no proper isolation. Multiple host applications can insert commands into each other's sessions.
It is recommended to send
Initializeto resume a session immediately before each flow. However, even this does not guarantee that another application doesn't insert its ownInitializein the time it takes you to send the next command.The reverse is also true: session management does not prevent other applications from inserting commands under the currently active session (and therefore passphrase), without knowledge of the session ID or the passphrase.
-
It is impossible to run complex flows concurrently. If an application is in the middle of Bitcoin signing, sending
Initializewill cancel the signing flow. Resuming the appropriate session later will not continue where it left off.
Examples
Allocate a new session, perform a command, and end the session:
Initialize()
--------->          Features(..., session_id=AAAA)
                       <---------
    ---<now in session AAAA>---
Request
--------->          Response
                       <---------
EndSession()
--------->          Success()
                       <---------
    ---<now in no session>---
Allocate two new sessions, resume the first one later:
Initialize()
--------->          Features(..., session_id=AAAA)
                       <---------
    ---<now in session AAAA>---
Request
--------->          Response
                       <---------

Initialize()
--------->          Features(..., session_id=BBBB)
                       <---------
    ---<now in session BBBB>---
Request
--------->          Response
                       <---------

Initialize(session_id=AAAA)
--------->          Features(..., session_id=AAAA)
                       <---------
    ---<now in session AAAA>---
Request
--------->          Response
                       <---------
Attempt to resume session that is not in the cache:
Initialize()
--------->          Features(..., session_id=AAAA)
                       <---------
    ---<now in session AAAA>---
EndSession()
--------->          Success()
                       <---------
    ---<now in no session>---
Initialize(session_id=AAAA)
--------->          Features(..., session_id=BBBB)
                       <---------
    ---<now in session BBBB>---
Passphrase
As of 1.9.0 / 2.3.0 we have changed how passphrase is communicated between the host and the device. For migration information for existing Hosts communicating with Trezor please see this document.
Passphrase is very tightly coupled with sessions. The reader is encouraged to read on that topic first in the sessions.md section.
Scheme
As soon as Trezor needs the passphrase to do BIP-39/SLIP-39 derivations it prompts the user for passphrase.
GetAddress(...)
--------->          PassphraseRequest()
                       <---------
PassphraseAck
(str passphrase, bool on_device)
--------->          Address(...)
                       <---------
In the default Trezor setting, the passphrase is obtained from the Host. Trezor sends a PassphraseRequest message and awaits PassphraseAck as a response. This message contains field passphrase to transmit it or it has on_device boolean flag to indicate that the user wishes to enter the passphrase on Trezor instead. Setting both passphrase and on_device to true is forbidden.
Note that this has changed as of 2.3.0. In previous firmware versions the on_device flag was in the PassphraseRequest message, since this decision has been made on Trezor. We also had two additional messages PassphraseStateRequest and PassphraseStateAck which were removed.
Example
On an initialized device with passphrase enabled a common communication starts like this:
Initialize()
--------->          Features(..., session_id)
                       <---------
GetAddress(...)
--------->          PassphraseRequest()
                       <---------
PassphraseAck(...)
--------->          Address(...)
                       <---------
The device requested the passphrase since the BIP-39/SLIP-39 seed is not yet cached. After this workflow the seed is cached and the passphrase will therefore never be requested again unless the session is cleared*.
Since we do not have sessions, the Host can not be sure that someone else has not used the device and applied another session id (e.g. changed the Passphrase). To work around this we send the session id again on every subsequent message. See more on that in session.md.
Initialize(session_id)
--------->          Features(..., session_id)
                       <---------
GetPublicKey(...)
--------->          PublicKey(...)
                       <---------
As long as the session_id in Initialize is the same as the one Trezor stores internally, Trezor guarantees the same passphrase is being used.
* There is one exception and that is Cardano. Because Cardano has a different BIP-39/SLIP-39 derivation scheme for passphrase we can not use the cached seed. As a workaround we prompt for the passphrase again in such case and cache the cardano seed in the cardano app directly.
Passphrase always on device
User might want to enforce the passphrase entry on the device every time without the hassle of instructing the Host to do so.
For such cases the user may apply the Passphrase always on device setting. As the name suggests, with this setting the passphrase is prompted on the device right away and no PassphraseRequest/PassphraseAck messages are exchanged. Note that the passphrase is prompted only once for given session id. If the user wishes to enter another passphrase they need to either send Initialize(session_id=None) or replug the device.
Passphrase Redesign In 1.9.0 / 2.3.0
On the T1, passphrase must be entered on the host PC and sent to Trezor. On the TT, the user can choose whether to enter the passphrase on host or on Trezor's touch screen.
In versions 1.9.0 and 2.3.0 we have redesigned how the passphrase is communicated between the Host and the Device. The new design is documented thoroughly in passphrase.md and this document should help with the transition from the old design.
New features
- Passphrase flow is now identical for T1 and TT.
- By keeping track of sessions, it is possible to avoid having to send passphrase repeatedly.
- The choice between entering on Host or Device for TT has been moved from Device to Host.
- Multiple passphrases are cached simultaneously.
Backwards compatibility
T1 1.9.0 is fully backwards-compatible and works with existing Host code.
TT 2.3.0 communicating with old Host software degrades to T1-level features: entering
passphrase on device will not be available, and on-device passphrase caching via the
state field will not be available.
As a workaround, it is possible to use the "passphrase always on device" feature on the new TT firmware. When enabled, the passphrase flow is completely hidden from the Host software, and the Device itself prompts the user to enter the passphrase.
Implementation guide
Protobuf changes
Protobuf has built-in backwards compatibility mechanisms, so a conforming implementation should continue to work with old protobuf definitions.
To restore support for TT on-device passphrase entry, and to make use of the new
features, you will need to update to newer protobuf definitions from trezor-common
(TODO: link to commit in trezor-common).
The gist of the changes is:
PassphraseRequest.on_devicewas deprecated, and renamed to_on_device. New Devices will never send this field.- Corresponding field
PassphraseAck.on_devicewas added. PassphraseAck.statewas deprecated, and renamed to_state. It is retained for code compatibility, but the field should never be set.PassphraseStateRequest/PassphraseStateAckmessages were deprecated, and renamed with aDeprecated_prefix. New Devices will not send or accept these messages.Initialize.statewas renamed toInitialize.session_id.- Corresponding field
Features.session_idwas added. New Devices will always send this field in response toInitializecall. - A new value
Capability_PassphraseEntrywas added to theFeatures.Capabilityenum. This capability will be sent from a Device that supports on-device passphrase entry (currently only TT).
Restoring on-device entry for TT
The Host software reacts to a PassphraseRequest message by prompting the user for a
passphrase and sending it in the PassphraseAck.passphrase field.
A new UI element should be added: when the passphrase prompt is displayed on Host, there
should be an option to "enter passphrase on device". When the user selects this option,
the Host must send a PassphraseAck(passphrase=null, on_device=true).
The "enter passphrase on device" option should be displayed when Features.capabilities
contain the Capability_PassphraseEntry value, regardless of reported Trezor version or
model. Firmwares older than 2.3.0 or 1.9.0 never set this value, so this ensures
forwards and backwards compatibility.
Cross-version compatibility for TT
TT version < 2.3.0 will send PassphraseRequest(_on_device=true) if the user selected
on-device entry. Neither T1 nor TT >= 2.3.0 will ever set this field to true.
If the Host receives PassphraseRequest(_on_device=true), it should immediately respond
with PassphraseAck() with no fields set.
TT version < 2.3.0 will send Deprecated_PassphraseStateRequest(state=[bytes]) after
receiving PassphraseAck. The Host should immediately respond with
Deprecated_PassphraseStateAck() with no fields set. If the Host does session
management, it should store the value of state as the session ID.
Triggering passphrase prompt
Use GetAddress(coin_name="Testnet", address_n=[44'/1'/0'/0/0]) (the first address of
the first account of Testnet) to ensure that the Device asks for a passphrase if
needed, and caches it for future use.
Validating passphrases
You can store the result of the above call, and in the future, compare it to a newly received address. This is a good way to check if the user is using the same passphrase as last time.
Do not store user-entered passphrases for the purpose of validation, even in hashed, encrypted, or otherwise obfuscated format.
Session support
A call to Initialize can include a session_id field. When starting a new user
session, this field should be left empty.
The response Features message will always include a session_id field. The value of
this field should be stored. When calling Initialize again, the stored value should
be sent as session_id. If the received Features.session_id is the same, it means
that session was resumed successfully and the user will not be prompted for passphrase.
--> Initialize()
<-- Features(session_id=0xABCDEF, ...)

--> Initialize(session_id=0xABCDEF)
<-- Features(session_id=0xABCDEF)
# (session resumed successfully)

--> Initialize(session_id=0xABCDEF)
<-- Features(session_id=0x123456)
# (session was not resumed, user will be prompted for passphrase again)
Session support is identical on T1 and TT, and both models support multiple sessions, i.e., it is possible to seamlessly switch between using multiple passphrases.
Cross-version compatible algorithm summary
The following algorithm will ensure that your Host application works properly with both T1 and TT with both older and newer firmwares.
- If you have a session ID stored, call
Initialize(session_id=stored_session_id) - Check the value of
Features.session_id. If it is identical tostored_session_id, the session was resumed and user will not need to be prompted for a passphrase.- If
Features.session_idis not set, you are communicating with an older Device. Do not store the null value as session ID. - Otherwise store the value as
stored_session_id.
- If
- When you receive a
PassphraseRequest(_on_device=true), respond withPassphraseAck()with no fields set. - When you receive a
PassphraseRequest, prompt the user for passphrase.- If
Features.capabilitiescontains valueCapability_PassphraseEntry, display a UI element that allows the user to enter passphrase on-device. - If the user chooses this option, send
PassphraseAck(passphrase=null, on_device=true) - If the user enters the passphrase in your application, send
PassphraseAck(passphrase="user entered passphrase", on_device=false)
- If
- When you receive a
Deprecated_PassphraseStateRequest(state=...), store the value ofstateasstored_session_id, and respond withDeprecated_PassphraseStateAckwith no fields set.
Note: up to 64 bytes may be required to store the session ID. Firmwares < 2.3.0 use a 64-byte value, newer firmwares use a 32-byte value.
Trezor–Host Protocol
This section specifies a secure protocol for encrypted and authenticated communication between a host application, such as Trezor Suite, and new Trezor models (since 2025). This protocol replaces the unencrypted Codec v1 protocol used in earlier Trezor models (see protocol.md).
Notable topics
Trezor–Host Protocol
This document specifies a secure protocol for encrypted and authenticated communication between a host application, such as Trezor Suite, and new Trezor models. This protocol replaces the unencrypted Codec v1 protocol used in earlier Trezor models (see protocol.md).
Intended audience
This document defines the format and internal workings of the communication protocol. It is intended for system integrators and security analysts. Those who wish to integrate Trezor in their application should use Trezor Connect or python-trezor, both of which implement this specification.
Table of contents
- Introduction
- Data transfer layer
- Transport layer
- Secure channel layer
- Other features
- References
Introduction
The purpose of this protocol is to establish a secure communication channel between a host application, such as Trezor Suite, and a Trezor device. When a given host establishes a secure channel with a Trezor for the first time, the two engage in a pairing procedure, which requires the user to complete one of the pairing methods listed in Section Pairing phase. After a successful pairing, the host may request that the Trezor issue a pairing credential. The credential allows reestablishment of the secure channel without user interaction in the future.
This protocol is designed to be compatible with various means of data transfer, such as USB or Bluetooth. It is split into the following layers:
- L1 Data transfer represents either USB or Bluetooth data transfer.
- L2 Transport is responsible for multiplexing transport connections onto the data transfer layer, segmenting of transport payloads, error detection and synchronization. It is divided into five sub-layers, which are described in the Transport layer section (Transport layer).
- L3 Secure channel is responsible for the encryption and the decryption of messages (see Secure channel layer).
- L4 Application handles sessions and the encoding of application messages in Protocol Buffers wire format. It is described in sessions.md

Connection process diagram
sequenceDiagram
  participant host
  participant Trezor
  rect rgb(35, 35, 35)
    Note right of host: Transport layer
    rect rgb(25,25,25)

        host ->> Trezor: ChannelAllocationRequest(nonce)
        Trezor ->> host: ChannelAllocationResponse(nonce, cid, device_properties)
    end
  end
    rect rgb(35, 35, 35)
        Note right of host: Secure channel layer
        rect rgb(25,25,25)
            host ->> Trezor: HandshakeInitiationRequest(host_ephemeral_pubkey)
            Trezor ->> host: HandshakeInitiationResponse(trezor_ephemeral_pubkey, encrypted_trezor_static_pubkey)
            host ->> Trezor: HandshakeCompletionRequest(encrypted_host_static_pubkey, encrypted_payload)
            Trezor ->> host: HandshakeCompletionResponse(encrypted_trezor_state)
            Note over host,Trezor: Pairing [conditional]
            Note over host,Trezor: Credential issuance [optional]
        host ->> Trezor: ThpEndRequest()
        Trezor ->> host: ThpEndResponse()
        end
    end
    Note over host,Trezor: Application layer - Encrypted transport
Data transfer layer
This protocol is designed to be compatible with various data transfer services, such as USB or Bluetooth, which transmit packets of a fixed maximum size. The data transfer service must preserve the order of packets transferred, but does not need to guarantee their delivery or integrity.
USB
All Trezor models support USB communication. To allow web applications to connect to Trezor, WebUSB is used for data transfer:
USB packet size
Trezor utilizes packets with a size of 64 bytes.
Bluetooth
Some Trezor models support Bluetooth. This section briefly describes the technology used and highlights important features.
Supported Bluetooth technology
The Bluetooth technology used is Bluetooth Low-Energy (BLE). The minimum supported version is 5.0. Trezor does not support BLE versions 4.x and below due to a lack of features and security concerns.
BLE Pairing methods
Trezor devices use Secure Simple Pairing with the Numeric Comparison association model. Legacy Pairing methods are not allowed or supported.
Privacy feature
Trezor devices use the LE Privacy feature by default. (LE Privacy)
Bluetooth LE supports a feature that reduces the ability to track a LE device over a period of time by changing the Bluetooth Device Address on a frequent basis.
— Bluetooth Core_v5.3 specification, section 5.4.5, page 275
BLE packet size
Trezor utilizes packets of 244 bytes in size.
Transport layer
The transport layer performs the segmentation of transport payloads into multiple packets that are transmitted over the data transfer layer. It is possible for several applications to communicate with Trezor using distinct transport connections, which are referred to as channels. The transport layer is responsible for the establishment and release of channels, multiplexing channels onto the data transfer layer, and channel synchronization.
Channel identifier
Channels are identified by a 16-bit channel identifier (CID). The CID 0xFFFF is reserved for the broadcast channel, which is used for channel allocation requests and responses. CIDs from 0xFFF0 to 0xFFFE, and 0x0000, are reserved for future use. Trezor allocates the remaining CIDs to individual host applications.
Transport packet structure
Each transport packet starts with a control byte that determines how the packet is processed by the receiver. Certain packet properties are identified using only a subset of the bits in the control byte; the remaining bits may take arbitrary values and MUST be ignored for the purpose of property identification. The recognized control byte patterns are listed in the table below. Bits denoted by X may have arbitrary values and are not considered when matching a packet to a property. For ease of implementation, each entry specifies a mask and the corresponding masked value. A control byte matches a given property if: control_byte & mask == masked_value. If a control byte does not match any pattern except initiation_packet (e.g. 00000111), it should be treated as an error (invalid control byte).
| Name | Control byte (binary) | Mask (&) | Masked value | Description | Handled by layer |
|---|---|---|---|---|---|
| initiation_packet | 0XXXXXXX | 0x80 | 0x00 | Identifies an initiation packet. | L 2.2 - Segmenting |
| continuation_packet | 1XXXXXXX | 0x80 | 0x80 | Identifies a continuation packet. | L 2.2 - Segmenting |
| channel_allocation_request | 01000000 | 0xFF | 0x40 | Request for a new channel identifier. | L 2.4 - Allocation |
| channel_allocation_response | 01000001 | 0xFF | 0x41 | Response with a new channel identifier. | L 2.4 - Allocation |
| transport_error | 01000010 | 0xFF | 0x42 | Transport layer errors (e.g. UNALLOCATED_CHANNEL). | L 2.4 - Allocation |
| ping | 01000011 | 0xFF | 0x43 | Transport level ping-pong messages | L 2 |
| pong | 01000100 | 0xFF | 0x44 | Transport level ping-pong messages | L 2 |
| codec_v1 | 00111111 | 0xFF | 0x3F | Codec v1 message legacy protocol. | L 2 |
| ack | 0010X000 | 0xF7 | 0x20 | Acknowledgement message. | L 2.5 - Synchronization |
| handshake_init_request | 000XX000 | 0xE7 | 0x00 | First message in the handshake process | L 3 - Handshake phase |
| handshake_init_response | 000XX001 | 0xE7 | 0x01 | Second message in the handshake process | L 3 - Handshake phase |
| handshake_completion_request | 000XX010 | 0xE7 | 0x02 | Third message in the handshake process | L 3 - Handshake phase |
| handshake_completion_response | 000XX011 | 0xE7 | 0x03 | Fourth message in the handshake process | L 3 - Handshake phase |
| encrypted_transport | 000XX100 | 0xE7 | 0x04 | Noise message, i.e. encrypted application message. | L 3 |
The transport layer distinguishes two basic types of transport packets: initiation packets and continuation packets. The highest bit of the control byte specifies whether the packet is an initiation packet or a continuation packet.
- type = 0 → initiation packet
- type = 1 → continuation packet
Let n be the packet size in bytes supported by the data transfer layer.
Initiation Packet
An initiation packet is the first packet to be sent when transmitting a transport payload. It has the following structure:
| Offset | Size | Field name | Description |
|---|---|---|---|
| 0 | 1 | control_byte | Control byte is used on multiple layers. For recognized values, see table Transport packet structure |
| 1 | 2 | cid | Channel identifier as a 16-bit integer in big-endian byte order. |
| 3 | 2 | length | Total size of the transport payload with CRC in bytes. Encoded as a 16-bit integer in big-endian byte order. |
| 5 | n−5 | packet_payload | First part of the transport payload with CRC. Padded with null bytes if no continuation packets follow. |
Continuation Packet
Continuation packets are sent after the initiation packet in cases where the transport payload does not fit in the initiation packet. Each continuation packet contains the following information:
| Offset | Size | Field name | Description |
|---|---|---|---|
| 0 | 1 | control_byte | The control byte set to 0x80. |
| 1 | 2 | cid | Channel identifier as a 16-bit integer in big-endian byte order. |
| 3 | n−3 | packet_payload | Continuation part of the transport payload with CRC. Padded with null bytes in the last continuation packet. |
The seven least significant bits of the control byte in a continuation packet are reserved for future use. The reserved bits should be set to zero when transmitting a continuation packet, and ignored when receiving a continuation packet.
Transport layer structure
The transport layer is further divided into five sub-layers.

Channel multiplexing layer
Multiplexing enables one data transfer connection to support more than one channel. This layer manages the identification of the channel for each packet transferred over the data transfer connection, in order to ensure that packet payloads from the various multiplexed channels are not mixed. The receiver groups the packets based on their channel identifier (CID) field. The channel multiplexing layer does not provide any packet filtering or error handling. (TODO add relevant part of session locking)
Segmenting layer
The segmenting layer is responsible for mapping one transport payload with CRC onto an initiation packet and zero or more continuation packets.
The sender segments the transport payload with CRC into one or more packet payloads, starting with an initiation packet, followed by the least possible number of continuation packets. The last packet payload is padded with null bytes.
The receiver reassembles the transport payload with CRC by concatenating the packet payloads, starting with an initiation packet and awaiting continuation packets on the same channel until the expected length of the transport payload with CRC has been received. Any padding in the last packed payload is discarded.
If a new initiation packet is received on a given channel before enough continuation packets have been received to reassemble the previous transport payload on that channel, then the receiver will discard the previous transport payload with CRC and begin reassembling the new transport payload with CRC.
If an initiation packet is received on a channel CID2 while reassembling the transport payload with CRC on a different channel CID1, then the receiver should reassemble both transport payloads with CRC in parallel independently for each channel.
If the receiver is not able to reassemble multiple payloads in parallel, then it should measure the time that elapsed since the last packet was received on channel CID1. If that time exceeds MIN_CONTINUATION_WAIT_MS, it should abort the reassembly of the transport payload with CRC on channel CID1, discard any previously reassembled data and begin reassembling the transport payload on channel CID2. If MIN_CONTINUATION_WAIT_MS is not exceeded, then it should notify the allocation layer to send a TRANSPORT_BUSY error on channel CID2.
If a continuation packet is received on a given channel when none is expected on that channel, then the receiver will discard the continuation packet.
Error detection layer
A cyclic redundancy check (CRC) error detection code is used to detect data corruption or the loss of continuation packets by the data transfer layer. The algorithm used to compute the CRC is CRC-32-IEEE, which utilizes the polynomial 0x04C11DB7 with its reversed form equal to 0xEDB88320. The CRC is computed over the header of the initiation packet and the transport payload as outlined in the table below. The result is encoded as 4 bytes in big-endian byte order and appended to the transport payload, which is referred to as transport payload with CRC.
The CRC is computed over the following data:
| Offset | Size | Field name | Description |
|---|---|---|---|
| 0 | 1 | control_byte | The control byte of the initiation packet. |
| 1 | 2 | cid | Channel identifier as a 16-bit integer in big-endian byte order. |
| 3 | 2 | length | Total size of the transport payload with CRC in bytes. Encoded as a 16-bit integer in big-endian byte order. |
| 5 | length – 4 | transport_payload | The transport payload. (Does not include CRC or padding.) |
The receiver validates the CRC. If invalid, then the transport payload is discarded.
Allocation layer
The allocation layer handles the establishment and release of channels and transport error handling. Host applications initiate communication with Trezor by requesting the establishment of a channel. The Trezor is responsible for the allocation of a unique channel identifier (CID) to each host application.
If Trezor receives a transport payload with a channel identifier that is not allocated, it will respond with an UNALLOCATED_CHANNEL error using the same channel identifier. Note: Implementation can respond to not allocated channel already after receiving an initiation packet (with unknown/unallocated CID).
A host application will ignore any data transmitted on a channel that has not been allocated to it.
Since Trezor maintains a channel allocation table of limited size, it may release a channel without warning, on a least-recently-used basis. The host application is not given any notification of channel release. The application will detect the release of the channel the next time it attempts to use the channel identifier, since it will receive an UNALLOCATED_CHANNEL error.
The host application requests the establishment of a new channel with Trezor by using the broadcast channel to send a ChannelAllocationRequest with a randomly generated 8-byte nonce. Trezor responds by using the broadcast channel to send a ChannelAllocationResponse consisting of a new channel identifier, the same nonce, and Trezor’s device properties. When the response is received, the host application compares the sent nonce with the received one. In case of a positive match, the application stores the received channel identifier and uses that for subsequent communication with Trezor. If the received nonce differs from the sent nonce, the host application ignores the response and keeps waiting for a ChannelAllocationResponse that has a matching nonce.
ChannelAllocationRequest uses the channel_allocation_request control byte and has the following transport payload:
| Offset | Size | Field name | Description |
|---|---|---|---|
| 0 | 8 | nonce | A random nonce to identify the Trezor's response. |
ChannelAllocationResponse uses the channel_allocation_response control byte and has the following transport payload:
| Offset | Size | Field name | Description |
|---|---|---|---|
| 0 | 8 | nonce | The nonce from the ChannelAllocationRequest. |
| 8 | 2 | cid | A new channel identifier. |
| 10 | var | device_properties | Properties of the Trezor device containing a basic description of the device (model, device color) and capabilities (supported protocol version and pairing methods), see below. |
The device_properties field contains a serialized ThpDeviceProperties message. The message is encoded using the Protocol Buffers version 2 wire format and has the following definition:
message ThpDeviceProperties {
    required string internal_model = 1;               // Internal model name, e.g. "T2B1".
    optional uint32 model_variant = 2 [default = 0];  // Encodes the device properties such as color.
    required uint32 protocol_version_major = 3;       // The major version of the communication protocol used by the firmware.
    required uint32 protocol_version_minor = 4;       // The minor version of the communication protocol used by the firmware.
    repeated ThpPairingMethod pairing_methods = 5;    // Pairing methods supported by the Trezor.
}
The pairing methods are further described in the Pairing phase.
// Numeric identifiers of pairing methods.
enum ThpPairingMethod {
    SkipPairing = 1;  // Trust without MITM protection.
    CodeEntry = 2;    // User rewrites code displayed on Trezor into the host application.
    QrCode = 3;       // User scans QR-code displayed on Trezor into the host application.
    NFC = 4;          // Trezor and host application exchange authentication secrets via NFC.
}
The supported pairing methods are not implied by the model because some may be disabled by user settings or device mode. Trezor may also indicate a different set of pairing methods depending on the underlying means of data transfer, e.g., USB and Bluetooth.
Protocol-level errors are represented by messages identifed by the transport_error control byte. Such messages have the following transport payload:
| Offset | Size | Field name | Description |
|---|---|---|---|
| 0 | 1 | error_code | Transport error code encoded as a single byte. |
Recognized transport error codes are:
| Code | Name | Description |
|---|---|---|
| 0 | Reserved for future use. | |
| 1 | TRANSPORT_BUSY | Issued by the recipient when the transport layer is busy reassembling a message on another channel. |
| 2 | UNALLOCATED_CHANNEL | Issued by Trezor in response to a message that has a channel identifier which is not allocated. |
| 3 | DECRYPTION_FAILED | Issued by Trezor in response to a message that has an invalid authentication tag. For more information, see Secure channel layer. |
| 4 | Reserved for future use. | |
| 5 | DEVICE_LOCKED | Issued by Trezor in response to handshake messages (HandshakeInitiationRequest, HandshakeCompletionRequest) received while the device is locked. See Handshake phase. |
When the sender receives a TRANSPORT_BUSY error, it should notify the segmenting layer to cease transmitting packets and notify the synchronization layer to increase the timeout for the next retransmission of the transport payload by a random value in the range [0, MAX_BUSY_BACKOFF_MS].
When the host receives an UNALLOCATED_CHANNEL or DECRYPTION_FAILED error, it should consider the channel released, destroy any channel context, and establish a new channel with Trezor.
In addition, THP supports sending and receiving keep-alive messages (Ping and Pong) over a channel. Ping is sent with a random 8-byte nonce, to make sure the peer is available and responsive when Pong response is received (with the same nonce). Since it is a single packet message, no payload reassembly is required. This mechanism can be used by both sides (for example, the device can check that the channel is still responsive, and close it if needed).
Synchronization layer
The synchronization layer handles acknowledgement messages, which allow the receiver to inform the sender of the receipt of each transport payload. If acknowledgement is not received within a defined time, the sender infers the non-receipt of a transport payload and the need to re-transmit it. The sender may re-transmit the transport payload indefinitely. However, implementations can set a limit on the number of retransmissions (MAX_RETRANSMISSION_COUNT) to prevent power drainage or blocking of system resources. In particular, if the sender needs to transmit a transport payload on another channel and does not have the system resources to do so in parallel on both channels, then it should terminate retransmission on the unresponsive channel as long as at least MIN_RETRANSMISSION_COUNT retransmissions have been attempted. When retransmission is
- terminated without having received acknowledgement, the sender should release the unresponsive channel.
- interrupted (e.g. by losing BLE connection), the sender could continue the retransmission when the connection is (possibly) restored (or terminate the channel).
Sender should not assume a message to be received without a receipt of an acknowledgement message.
The primary function of the synchronization layer is to work as the Alternating Bit Protocol (ABP)[ABP69] ensuring reliable communication over an unreliable transport. As such, it handles sequence numbers, ACK messages, retransmissions, and timeouts. Secondly, it provides the higher layers (e.g., the Secure channel layer) with data payloads (and notifications).
It is possible that some packets are lost by the Data transfer layer (L1). In order to guarantee reliable communication, THP uses the Alternating Bit Protocol in combination with a CRC32 checksum.
Alternating Bit Protocol
The Alternating Bit Protocol (ABP) is a protocol between a sender and a receiver over an unreliable channel. The channel is unreliable in the sense that it can discard or duplicate messages, but it cannot change their order or content. The protocol guarantees the eventual and non-duplicative delivery of messages.
After sending a message, the sender doesn't send any further messages until it receives an acknowledgement message (ACK). After receiving a valid message, the receiver sends an ACK. If the ACK does not reach the sender before a timeout, the sender re-transmits the message. THP uses a 1-bit sequence number that is part of the header of the initialization packet. This sequence number alternates (from 0 to 1) in subsequent messages. When the receiver sends an ACK, it includes the sequence number of the message it received.
The receiver can detect duplicated frames by checking if the message sequence numbers alternate. If two subsequent messages have the same sequence number, they are duplicates, and the second message is discarded. Similarly, if two subsequent ACKs reference the same sequence number, they are acknowledging the same message.
The situation is described by the following state machine.
ABP State machine
The sender alternates among states S0a, S0b, S1a, and S1b. The sender also keeps the state of a stopwatch. The sender starts in the state S0a.
The behavior of the sender in the state S0a is defined as follows:
- If there is a message that needs to be sent, take the following actions:
- Send the message with the sequence number equal to 0.
- Switch to state S0b.
- Reset and start the stopwatch.
- When the acknowledgment message is received and its sequence number equals 1, take the following actions:
- Consider the message to be a duplicate acknowledgment of the previously sent message.
- Transition to the state S0a.
- When the acknowledgment message is received and its sequence number equals 0, take the following actions:
- Consider the message to be an acknowledgment received out of order.
- Transition to the state S0a.
The behavior of the sender in the state S0b is defined as follows:
- When the acknowledgment message is received and its sequence number equals 0, take the following actions:
- Consider the previously sent message to be delivered.
- Transition to the state S1a.
- When the acknowledgment message is received and its sequence number equals 1, take the following actions:
- Consider the message to be a duplicate acknowledgment of the message sent before the previously sent one.
- Transition to the state S0b.
- When the stopwatch exceeds timeout, take the following actions:
- Consider the previously sent message or the corresponding acknowledgment to be lost.
- Resend the previously sent message, which is the last message with the sequence number equal to 0.
- Reset and start the stopwatch. (Note that the timeout does not need to be constant.)
- Transition to the state S0b.
The behavior of the sender in the state S1 is analogous. The full finite-state transducer of the sender is depicted in the following diagram:
flowchart LR
    S0a["S0a (send 0)"]
    S0b["S0b (wait Ack0)"]
    S1a["S1a (send 1)"]
    S1b["S1b (wait Ack1)"]

    S0a -- send Message(Seq=0) --> S0b
    S0b -- receive Ack(0) --> S1a
    S0b -- receive Ack(Seq=1) OR timeout+resend --> S0b

    S1a -- send Message(Seq=1) --> S1b
    S1b -- receive Ack(Seq=1) --> S0a
    S1b -- receive Ack(Seq=0) OR timeout+resend --> S1b

    S0a -- receive Ack(Seq=*) --> S0a
    S1a -- receive Ack(Seq=*) --> S1a
The receiver alternates between states R0 and R1. The receiver starts in the state R0.
The behavior of the receiver in the state R0 is defined as follows:
- When the message is received and its sequence number equals 0, take the following actions:
- Reply with an acknowledgement message with the sequence number equal to 0.
- Submit the received message to further processing.
- Transition to the state R1.
- When the message is received and its sequence number equals 1, take the following actions:
- Reply with an acknowledgement message with the sequence number equal to 1.
- Consider the message to be a duplicate of the previously received message (discard).
- Transition to the state R0.
The behavior of the receiver in the state R1 is analogous. The full finite-state transducer of the receiver is depicted in the following diagram:
flowchart LR
    R0["R0"]
    R1["R1"]

    R0 -- in: Message(Seq=0); out: Ack(Seq=0); return Message for processing --> R1
    R0 -- in: Message(Seq=1); out: Ack(Seq=1); discard Message as duplicate --> R0
    R1 -- in: Message(Seq=1); out: Ack(Seq=1); return Message for processing --> R0
    R1 -- in: Message(Seq=0); out: Ack(Seq=0); discard Message as duplicate --> R1
ACK Message structure
The ACK message has no payload except for the CRC. Its control_byte is set to ack with the appropriate sequence number, i.e. ACK_0 = 00100000 and ACK_1 = 00101000. The ACK message has the same sequence number as the message it acknowledges.
ACK piggybacking
ACK piggybacking is an optional feature. It allows to use a regular transport message to work as an ACK of the latest message received by using the ACK bit in the transport message control byte. ACK piggybacking significantly reduces the number of messages sent which is useful for longer flows - e.g. signing a transaction with a plethora of inputs/outputs.
Protocol parameters
| Parameter name | Default/suggested value | Description |
|---|---|---|
| MIN_RETRANSMISSION_COUNT | 2 | The minimum number of transport payload retransmissions that the sender should attempt, if under pressure to release system resources. |
| MAX_RETRANSMISSION_COUNT | 50 | The maximum number of transport payload retransmissions that the sender should attempt. |
| RETRANSMISSION_TIMEOUT_MS | variable | The interval between transport payload retransmissions in milliseconds. |
| MAX_BUSY_BACKOFF_MS | 500 | Maximum backoff time in milliseconds that the sender should add to the retransmission timeout when the receiver is busy receiving on another channel. |
| MIN_CONTINUATION_WAIT_MS | 200 | The minimum time in milliseconds that the receiver should wait for a continuation packet before terminating transport payload reassembly in favor of packets that are arriving on another channel. |
Secure channel layer
Connection process
The connection process involves the following steps:
- The parties establish communication over the data transfer layer.
- The host requests the allocation of a new communication channel by sending a
ChannelAllocationRequest, see Allocation layer. - The host initiates a secure channel handshake in order for the two parties to establish encrypted communication, see Handshake phase.
- If the host and the Trezor have not paired in the past, they mutually authenticate to protect against man-in-the-middle (MITM) attacks, see Pairing phase.
- After a successful pairing/connection, the host can ask Trezor for a long-time pairing credential. The credential allows the host to skip the pairing procedure when connecting from the same app and the same host device in the future, see Credential phase.
Trezor keeps a state machine of the channel. The possible states are the following:
- UNALLOCATED: Trezor does not recognize a channel with given
channel id. - Handshake states - TH1, TH2: Channel is in a handshake phase.
- Pairing states - TP0, TP1, TP2, TP3a, TP3b, TP3c: Channel is in a pairing phase.
- TC1: Channel is in a credential phase.
- ENCRYPTED_TRANSPORT: Channel is fully prepared for encrypted application communication.
Similarly, Host state machine has the following states: UNALLOCATED, HH0, HH1, HH2, HH3, HP0, HP1, HP2, HP3a, HP3b, HP4, HP5, HP6, HP7, HC0, HC1, ENCRYPTED_TRANSPORT. The meaning of the UNALLOCATED and ENCRYPTED_TRANSPORT states is the same for both the Trezor and the host. Detailed information about the handshake, pairing, and credential phase states is provided in their respective sections.
The Trezor and the host each have a static X25519 key pair that they use to mutually authenticate one another when establishing a secure communication channel, see Common definitions. The Trezor’s static key pair is denoted by $(S_{T,priv}, S_{T,pub})$ and the host’s static key pair is denoted $(S_{H,priv}, S_{H,pub})$. The process for establishing the secure channel is referred to as a handshake. This process results in a pair of AES encryption keys $k_{req}$ and $k_{resp}$, which are used to encrypt request messages sent by the host to the Trezor and responses from Trezor to the host. During the handshake, the parties determine whether they have paired in the past. If not, then a pairing phase follows the handshake. After these phases have been successfully completed, the parties enter the application traffic phase.
If either party encounters any error in the secure channel communication, such as unexpected messages, invalid message format, failure to decrypt data, or verify a MAC, it should terminate the handshake process and transition the channel to UNALLOCATED state.
Handshake phase
The handshake is based on the XX handshake pattern as specified by the Noise Protocol Framework. Trezor’s static key pair is not used directly in the handshake. A masked public key is used instead. It is derived as shown below from the Trezor’s ephemeral public key, which is generated during the handshake.
trezor_masked_static_pubkey = X25519(SHA-256(trezor_static_pubkey || trezor_ephemeral_pubkey), trezor_static_pubkey).
Messages
The following messages are handled by the secure channel layer. The receiver of the messages HandshakeInitiationRequest, HandshakeInitiationResponse, HandshakeCompletionRequest and HandshakeCompletionResponse must assert that their control byte corresponds to the expected message given by the state machine.
| Message | Control byte | Sender |
|---|---|---|
| HandshakeInitiationRequest | handshake_init_request | host |
| HandshakeInitiationResponse | handshake_init_response | Trezor |
| HandshakeCompletionRequest | handshake_completion_request | host |
| HandshakeCompletionResponse | handshake_completion_response | Trezor |
sequenceDiagram
  participant host
  participant Trezor

  host ->> Trezor: HandshakeInitiationRequest(host_ephemeral_pubkey)
  Trezor ->> host: HandshakeInitiationResponse(trezor_ephemeral_pubkey, encrypted_trezor_static_pubkey)
  host ->> Trezor: HandshakeCompletionRequest(encrypted_host_static_pubkey, encrypted_payload)
  Trezor ->> host: HandshakeCompletionResponse(encrypted_trezor_state)
Handshake initiation request (HandshakeInitiationRequest)
The message is sent from the host to the Trezor.
| Offset | Size | Field name | Description |
|---|---|---|---|
| 0 | 32 | host_ephemeral_pubkey | host’s ephemeral public key |
| 32 | 1 | try_to_unlock | do not raise error on locked device, show pin_entry screen, used with 0x01 mask |
Handshake initiation response (HandshakeInitiationResponse)
The message is sent from the Trezor to the host.
| Offset | Size | Field name | Description |
|---|---|---|---|
| 0 | 32 | trezor_ephemeral_pubkey | Trezor’s ephemeral public key |
| 32 | 48 | encrypted_trezor_static_pubkey | encrypted and authenticated Trezor’s masked static public key |
| 80 | 16 | tag | encrypted and authenticated empty string |
Handshake completion request (HandshakeCompletionRequest)
The message is sent from the host to the Trezor.
| Offset | Size | Field name | Description |
|---|---|---|---|
| 0 | 48 | encrypted_host_static_pubkey | encrypted and authenticated host’s static public key |
| 48 | var | encrypted_payload | encrypted authenticated message payload |
Before the payload is encrypted, it is encoded using the Protocol Buffers version 2 wire format as a message with the following definition:
message ThpHandshakeCompletionReqNoisePayload {
    optional bytes host_pairing_credential = 1;  // Host's pairing credential
}
Handshake completion response (HandshakeCompletionResponse)
The message is sent from the Trezor to the host. It is sent as an encrypted payload.
| Offset | Size | Field name | Description |
|---|---|---|---|
| 0 | 17 | encrypted_trezor_state | encrypted and authenticated Trezor’s state |
Common definitions
The X25519 function, Curve25519, and key pair generation are specified in RFC 7748.
Let protocol_name = Noise_XX_25519_AESGCM_SHA256\\x00\\x00\\x00\\x00.
Let HKDF(ck, input) be the function defined as follows:
- Let temp_key = HMAC-SHA-256(ck, input).
- Let output_1 = HMAC-SHA-256(temp_key, byte(0x01)).
- Let output_2 = HMAC-SHA-256(temp_key, output_1 || byte(0x02)).
- Return (output_1, output_2).
Notation
-
0^n— a string ofnzero bits. Example:0^96represents a 96-bit string of all zeros. -
0^n || 1— concatenation ofnzero bits with a single bit1. Example:0^95 || 1represents 95 zero bits followed by a 1 bit (total 96 bits). -
||— concatenation of byte strings. -
empty_string— a zero-length byte string. -
SHA-256(input)— the SHA-256 hash of the input byte string. -
X25519(privkey, pubkey)— X25519 scalar multiplication usingprivkeyandpubkey. -
AES-GCM-ENCRYPT(key, IV, ad, plaintext)— AES encryption in Galois/Counter Mode. -
AES-GCM(key, IV, ad, plaintext)— AES-GCM operation returning the authentication tag. -
ELLIGATOR2(input)— maps an input to a Curve25519 public key using the Elligator 2 encoding. -
HKDF(ck, input)— HMAC-based key derivation function producing a new chaining key and session key, see Common definitions. -
PROTOBUF-DECODE(type, data)— deserializes the byte stringdatainto a Protocol Buffers message of the specifiedtype. -
ValidateCredential(cred_auth_key, credential, host_static_public_key)— returnsTrueifcredentialis valid for the givencred_auth_keyandhost_static_public_key; otherwise returnsFalse.
Trezor’s state machine
Let device_properties be the properties advertised by the Trezor in ChannelAllocationResponse.
Let (trezor_static_privkey, trezor_static_pubkey) be a X25519 key pair that persists Trezor restarts.
Let cred_auth_key be a symmetric 16-byte key that persists Trezor's restarts.
flowchart TD TH1 -- in: HandshakeInitiationRequest<br>out: HandshakeInitiationResponse --> TH2 TH2 -- in: HandshakeCompletionRequest [paired]<br>out: HandshakeCompletionResponse --> TC1 TH2 -- in: HandshakeCompletionRequest [unpaired]<br>out: HandshakeCompletionResponse --> TP1
State TH1
The behavior of the Trezor in the state TH1(device_properties, trezor_static_privkey, trezor_static_pubkey) is defined as follows:
When the message HandshakeInitiationRequest(host_ephemeral_pubkey, try_to_unlock) is received, take the following actions:
- Generate a new ephemeral X25519 key pair (trezor_ephemeral_privkey, trezor_ephemeral_pubkey).
- Set h = SHA-256(protocol_name || device_properties).
- Set h = SHA-256(h || host_ephemeral_pubkey).
- Set h = SHA-256(h || try_to_unlock).
- Set h = SHA-256(h || trezor_ephemeral_pubkey).
- Set ck, k = HKDF(protocol_name, X25519(trezor_ephemeral_privkey, host_ephemeral_pubkey)).
- Set mask = SHA-256(trezor_static_pubkey || trezor_ephemeral_pubkey).
- Set trezor_masked_static_pubkey = X25519(mask, trezor_static_pubkey).
- Set encrypted_trezor_static_pubkey = AES-GCM-ENCRYPT(key=k, IV=0^96, ad=h, plaintext=trezor_masked_static_pubkey).
- Set h = SHA-256(h || encrypted_trezor_static_pubkey).
- Set ck, k = HKDF(ck, X25519(mask, X25519(trezor_static_privkey, host_ephemeral_pubkey))).
- Set tag = AES-GCM(key=k, IV=0^96, ad=h, plaintext=empty_string).
- Set h = SHA-256(h || tag).
- Send the message HandshakeInitiationResponse(trezor_ephemeral_pubkey, encrypted_trezor_static_pubkey, tag) to the host.
- Transition to the state TH2(h, k, ck, trezor_ephemeral_privkey).
State TH2
The behavior of the Trezor in the state TH2(h, k, ck, trezor_ephemeral_privkey) is defined as follows:
When the message HandshakeCompletionRequest(encrypted_host_static_pubkey, encrypted_payload) is received, take the following actions:
- Set host_static_pubkey, success = AES-GCM-DECRYPT(key=k, IV=0^95 || 1, ad=h, ciphertext=encrypted_host_static_pubkey). Assert that success is True.
- Set h = SHA-256(h || encrypted_host_static_pubkey).
- Set ck, k = HKDF(ck, X25519(trezor_ephemeral_privkey, host_static_pubkey)).
- Set payload_binary, success = AES-GCM-DECRYPT(key=k, IV=0^96, ad=h, ciphertext=encrypted_payload). Assert that success is True.
- Set h = SHA-256(h || encrypted_payload).
- Set payload = PROTOBUF-DECODE(type=ThpHandshakeCompletionReqNoisePayload, data=payload_binary).
- If ValidateCredential(cred_auth_key, payload.host_pairing_credential, host_static_pubkey) == True, then:
- Set credential = PROTOBUF-DECODE(type=ThpPairingCredential, data=payload.host_pairing_credential).
- Set host_name = credential.cred_metadata.host_name.
- Set app_name = credential.cred_metadata.app_name.
- Set trezor_state = STATE_PAIRED (or STATE_PAIRED_AUTOCONNECT - see Channel replacement). Otherwise, set trezor_state = STATE_UNPAIRED.
- Set key_request, key_response = HKDF(ck, empty_string).
- Set encrypted_trezor_state = AES-GCM-ENCRYPT(key=key_response, IV=0^96, ad=empty_string, plaintext=trezor_state).
- Send the message HandshakeCompletionResponse(encrypted_trezor_state) to the host.
- Set nonce_request = 0 and nonce_response = 1.
- Set encryption_state = (key_request, key_response, nonce_request, nonce_response).
- If trezor_state == STATE_PAIRED, transition to the state TC1(host_static_pubkey, host_name, app_name). If trezor_state == STATE_UNPAIRED, transition to the state TP1.
Host’s state machine
Let (host_static_privkey, host_static_pubkey) be a X25519 key pair that persists host restarts.
Let credentials be a list of pairs consisting of Trezor’s static public key and the corresponding credential.
Let device_properties be the Trezor’s properties advertised by the Trezor in ChannelAllocationResponse.
Let pairing_methods be the pairing methods supported by the Trezor (retrieved from the device_properties).
flowchart TD
HH0 -- out: HandshakeInitiationRequest --> HH1
HH1 -- [Trezor is known]<br>in: HandshakeInitiationResponse<br>out: HandshakeCompletionRequest --> HH2
HH1 -- [Trezor is unknown]<br>in: HandshakeInitiationResponse<br>out: HandshakeCompletionRequest --> HH3
HH3 -- in: HandshakeCompletionResponse [trezor is not paired] ---> HP0
HH2 -- in: HandshakeCompletionResponse [trezor is paired] ---> HC0
HH2 -- in: HandshakeCompletionResponse [trezor is not paired] ---> HP0
State HH0
The behavior of the host in the state HH0(try_to_unlock) is defined as follows:
Take the following actions:
- Generate a new ephemeral X25519 key pair (host_ephemeral_privkey, host_ephemeral_pubkey).
- Send the message HandshakeInitiationRequest(host_ephemeral_pubkey, try_to_unlock) to the Trezor.
- Transition to the state HH1(host_ephemeral_privkey, host_ephemeral_pubkey, try_to_unlock).
State HH1
The behavior of the host in the state HH1(host_ephemeral_privkey, host_ephemeral_pubkey, try_to_unlock) is defined as follows:
When the message HandshakeInitiationResponse(trezor_ephemeral_pubkey, encrypted_trezor_static_pubkey, tag) is received, take the following actions:
- Set h = SHA-256(protocol_name || device_properties).
- Set h = SHA-256(h || host_ephemeral_pubkey).
- Set h = SHA-256(h || try_to_unlock).
- Set h = SHA-256(h || trezor_ephemeral_pubkey).
- Set ck, k = HKDF(protocol_name, X25519(host_ephemeral_privkey, trezor_ephemeral_pubkey)).
- Set trezor_masked_static_pubkey, success = AES-GCM-DECRYPT(key=k, IV=0^96, ad=h, ciphertext=encrypted_trezor_static_pubkey). Assert that success is True.
- Set h = SHA-256(h || encrypted_trezor_static_pubkey).
- Set ck, k = HKDF(ck, X25519(host_ephemeral_privkey, trezor_masked_static_pubkey)).
- Set payload_of_tag, success = AES-GCM-DECRYPT(key=k, IV=0^96, ad=h, ciphertext=tag). Assert that success is True and payload_of_tag == empty_string.
- Set h = SHA-256(h || tag).
- Search credentials for pairs (trezor_static_pubkey, credential) such that trezor_masked_static_pubkey == X25519(SHA-256(trezor_static_pubkey || trezor_ephemeral_pubkey), trezor_static_pubkey).
- If found, then do the following:
- Find a tuple (host_static_privkey, host_static_pubkey) associated with the trezor_static_pubkey
- Set state = STATE_PAIRED.
- Set host_pairing_credential = credential.
- If not found, then do the following:
- Generate a new tuple (host_static_privkey, host_static_pubkey).
- Set state = STATE_UNPAIRED.
- Set host_pairing_credential = None (the optional field host_pairing_credential in the protobuf message is omitted).
- If found, then do the following:
- Set encrypted_host_static_pubkey = AES-GCM-ENCRYPT(key=k, IV=0^95 || 1, ad=h, plaintext=host_static_pubkey).
- Set h = SHA-256(h || encrypted_host_static_pubkey).
- Set ck, k = HKDF(ck, X25519(host_static_privkey, trezor_ephemeral_pubkey)).
- Set payload_binary = PROTOBUF-ENCODE(type=ThpHandshakeCompletionReqNoisePayload, host_pairing_credential).
- Set encrypted_payload = AES-GCM-ENCRYPT(key=k, IV=0^96, ad=h, plaintext=payload_binary).
- Set h = SHA-256(h || encrypted_payload).
- Send the message HandshakeCompletionRequest(encrypted_host_static_pubkey, encrypted_payload) to the Trezor.
- If state == STATE_PAIRED, then transition to the state HH2(ck). Otherwise, transition to the state HH3(pairing_methods, ck).
State HH2
The behavior of the host in the state HH2(ck) is defined as follows:
When the message HandshakeCompletionResponse(encrypted_trezor_state) is received, take the following actions:
- Set key_request, key_response = HKDF(ck, empty_string).
- Set trezor_state, success = AES-GCM-DECRYPT(key=key_response, IV=0^96, ad=empty_string, ciphertext=encrypted_trezor_state). Assert that success is True.
- Set nonce_request = 0 and nonce_response = 1.
- Set encryption_state = (key_request, key_response, nonce_request, nonce_response).
- If trezor_state == STATE_PAIRED (or STATE_PAIRED_AUTOCONNECT - see Channel replacement), then transition to the state HC0. Otherwise, transition to the state HP0(pairing_methods).
State HH3
The behavior of the host in the state HH3(pairing_methods, ck) is defined as follows:
When the message HandshakeCompletionResponse(encrypted_trezor_state) is received, take the following actions:
- Set key_request, key_response = HKDF(ck, empty_string).
- Set trezor_state, success = AES-GCM-DECRYPT(key=key_response, IV=0^96, ad=empty_string, ciphertext=encrypted_trezor_state). Assert that success is True.
- Assert that trezor_state == STATE_UNPAIRED.
- Set nonce_request = 0 and nonce_response = 1.
- Set encryption_state = (key_request, key_response, nonce_request, nonce_response).
- Transition to the state HP0(pairing_methods).
Pairing phase
Pairing phase protects against potential MITM attacks. Currently, three pairing methods are designed:
- Code Entry - the user must re-write a code displayed on the Trezor to the host device.
- NFC - the host and the Trezor have a short communication using NFC, the host must be in proximity of the Trezor.
- QrCode - the user must scan a QR-Code from the Trezor's display.
As of 2026/04/07, only CodeEntry pairing method is fully supported by Trezor devices. (See GitHub issue: Add support for more THP pairing methods)
Messages
The following messages are handled by the application layer.
message ThpPairingRequest {
    required string host_name = 1;  // Human-readable host name (browser name for web apps)
    required string app_name = 2;   // Human-readable application name
}

message ThpPairingRequestApproved {}

message ThpSelectMethod {
    required ThpPairingMethod selected_pairing_method = 1;  // Pairing method selected by the host
}

message ThpPairingPreparationsFinished {}

message ThpCodeEntryCommitment {
    required bytes commitment = 1;  // SHA-256 of Trezor's random 32-byte secret
}

message ThpCodeEntryChallenge {
    required bytes challenge = 1;  // Host's random 32-byte challenge
}

message ThpCodeEntryCpaceTrezor {
    required bytes cpace_trezor_public_key = 1;  // Trezor's ephemeral CPace public key
}

message ThpCodeEntryCpaceHostTag {
    required bytes cpace_host_public_key = 1;  // Host's ephemeral CPace public key
    required bytes tag = 2;                    // SHA-256 of shared secret
}

message ThpCodeEntrySecret {
    required bytes secret = 1;  // Trezor's secret
}

message ThpQrCodeTag {
    required bytes tag = 1;  // SHA-256 of shared secret
}

message ThpQrCodeSecret {
    required bytes secret = 1;  // Trezor's secret
}

message ThpNfcTagHost {
    required bytes tag = 1;  // Host's tag
}

message ThpNfcTagTrezor {
    required bytes tag = 1;  // Trezor's tag
}
Trezor’s state machine
flowchart TD
selected_method[selected method]
style selected_method stroke-dasharray: 2 ,2
subgraph "TP3" [" "]
TP3a
TP3b
TP3c
end
TP0 -- "in: ThpPairingRequest<br>out: ThpPairingRequestApproved" --> TP1
TP1 -- "in: ThpSelectMethod" --> selected_method
TP2 -- "in: ThpCodeEntryChallenge<br>out: ThpCodeEntryCpaceTrezor" --> TP3a
selected_method -- "[selected_method == CodeEntry and it WAS NOT selected before]<br>out: ThpCodeEntryCommitment" --> TP2
selected_method -- "[selected_method == CodeEntry and it WAS selected before]<br>out: ThpPairingPreparationsFinished" --> TP3a
selected_method -- "[selected_method == QrCode]<br>out: ThpPairingPreparationsFinished" --> TP3b
selected_method -- "[selected_method == Nfc]<br>out: ThpPairingPreparationsFinished" --> TP3c
TP3 -- "in: ThpSelectMethod" --> selected_method
TP3a -- "in: ThpCodeEntryCpaceHostTag <br>out: ThpCodeEntrySecret" --> TC1
TP3b -- "in: ThpQrCodeTag<br>out: ThpQrCodeSecret" --> TC1
TP3c -- "in: ThpNfcTagHost<br>out: ThpNfcTagTrezor" --> TC1
State TP0
The behavior of Trezor in the state TP0 is defined as follows:
When the message ThpPairingRequest(host_name, app_name) is received, take the following action:
- Display a dialog "Allow {app_name} on {host_name} to pair with this Trezor?" on the screen.
- Send ButtonRequest message.
- Wait for ButtonAck Response from the host.
- Wait for user interaction:
- The user cancelled the dialog - end pairing, send ActionCancelled Failure, drop the channel
- The user confirmed the dialog - transition to state TP1
State TP1
The behavior of Trezor in the state TP1 is defined as follows:
- When the message ThpSelectMethod(selected_pairing_method) is received, transition to the intermediate state “selected method”.
State “selected method”
- Read selected_pairing_method from the received message ThpSelectMethod(selected_pairing_method).
- Check that selected_pairing_method is allowed and supported by the Trezor. If it is not allowed, raise an exception.
- selected_pairing_method is ThpPairingMethod_CodeEntry and it WAS NOT selected before
- Generate a random 16-byte code_entry_secret.
- Set commitment = SHA-256(code_entry_secret).
- Send the message ThpCodeEntryCommitment(commitment) to the host.
- Transition to the state TP2.
- selected_pairing_method is ThpPairingMethod_CodeEntry and it WAS selected before
- Display code_code_entry on the Trezor’s screen. (Note that code_code_entry is created only once per pairing - see State TP2).
- Send the message ThpPairingPreparationsFinished() to the host.
- Transition to the state TP3a.
- selected_pairing_method is ThpPairingMethod_QrCode
- Generate a random 16-byte qr_code_secret.
- Set code_qr_code = SHA-256(ThpPairingMethod_QrCode || handshake_hash || qr_code_secret)[:16].
- Display QR Code on the Trezor’s screen.
- Send the message ThpPairingPreparationsFinished() to the host.
- Transition to the state TP3b.
- selected_pairing_method is ThpPairingMethod_NFC
- Generate a random 16-byte nfc_secret_trezor.
- Display “NFC Dialog” on the Trezor’s screen.
- Enable NFC (read-mode).
- Send the message ThpPairingPreparationsFinished() to the host.
- Transition to the state TP3c.
State TP2
The behavior of Trezor in the state TP2 is defined as follows:
- When the message ThpCodeEntryChallenge(challenge) is received, take the following actions:
- Set code_code_entry_hash = SHA-256(ThpPairingMethod_CodeEntry || handshake_hash || code_entry_secret || challenge).
- Interpret code_code_entry_hash as an unsigned big-endian integer and set code_code_entry = code_code_entry_hash % 1000000.
- Display code_code_entry on the screen.
- Compute pregenerator as the first 32 bytes of SHA-512(prefix || code_code_entry || padding || handshake_hash || 0x00), where prefix is the byte-string 0x08 || 0x43 || 0x50 || 0x61 || 0x63 || 0x65 || 0x32 || 0x35 || 0x35 || 0x06, code_code_entry is encoded as an ASCII representation of the 6-digit code (with prepended zeroes if needed -
f"{code_code_entry:06}".encode("ascii")), and padding is the byte-string 0x6f || 0x00 ^ 111 || 0x20. - Set generator = ELLIGATOR2(pregenerator).
- Generate a random 32-byte cpace_trezor_private_key.
- Set cpace_trezor_public_key = X25519(cpace_trezor_private_key, generator).
- Send the message ThpCodeEntryCpaceTrezor(cpace_trezor_public_key) to the host.
- Transition to the state TP3a.
State TP3a
- When the message ThpSelectMethod(selected_pairing_method) is received, transition to the intermediate state “selected method”.
- When the message ThpCodeEntryCpaceHostTag(cpace_host_public_key, tag) is received, take the following actions:
- Clear the screen.
- Set shared_secret = X25519(cpace_trezor_private_key, cpace_host_public_key).
- Assert that tag == SHA-256(shared_secret).
- Send the message ThpCodeEntrySecret(code_entry_secret) to the host.
- Transition to the state TC1.
State TP3b
- When the message ThpSelectMethod(selected_pairing_method) is received, transition to the intermediate state “selected method”.
- When the message ThpQrCodeTag(tag) is received, take the following actions:
- Clear the screen.
- Assert that tag == SHA-256(handshake_hash || code_qr_code).
- Send the message ThpQrCodeSecret(qr_code_secret) to the host.
- Transition to the state TC1.
State TP3c
- When the message ThpSelectMethod(selected_pairing_method) is received, transition to the intermediate state “selected method”.
- When data is received over NFC, take the following action:
- Parse the received data as nfc_secret_host || handshake_hash_digest_H.
- Set handshake_hash_digest_T as the first 16 bytes of handshake_hash.
- Assert that handshake_hash_digest_H == handshake_hash_digest_T.
- Send nfc_secret_trezor || handshake_hash_digest_T over the NFC.
- When the message ThpSelectMethod(selected_pairing_method) is received, transition to the intermediate state “selected method”.
- When the message ThpNfcTagHost(tag_host) is received, take the following actions:
- Clear the screen.
- Assert that tag_host == SHA-256(ThpPairingMethod_NFC || handshake_hash || nfc_secret_trezor).
- Set tag_trezor = SHA-256(ThpPairingMethod_NFC || handshake_hash || nfc_secret_host).
- Send the message ThpNfcTagTrezor(tag_trezor) to the host.
- Transition to the state TC1.
Host’s state machine
flowchart TD HP0 -- "out: ThpPairingRequest" --> HP1 HP1 -- in: ThpPairingRequestApproved<br>out: ThpSelectMethod[CodeEntry] --> HP2 HP1 -- in: ThpPairingRequestApproved<br>out: ThpSelectMethod[Nfc or QrCode] --> HP3b HP2 -- in: ThpCodeEntryCommitment<br>out: ThpCodeEntryChallenge --> HP3a HP3a -- in: ThpCodeEntryCpaceTrezor --> HP4 HP3b -- in: ThpPairingPreparationsFinished --> HP4 HP4 -- in: [user wants to change pairing method]<br>[selected method is CodeEntry and it was selected for the first time]<br> out: Select Method[CodeEntry] --> HP2 HP4 -- in: [user wants to change pairing method]<br>[Nfc or QrCode or CodeEntry (not first time)]<br> out: Select Method --> HP3b HP4 -- in: [user enters code]<br>out: ThpCodeEntryCpaceHostTag--> HP5 HP5 -- in: ThpCodeEntrySecret --> HC0 HP4 -- in: [user scans qr code]<br>out: ThpQrCodeTag --> HP6 HP6 -- in: ThpQrCodeSecret --> HC0 HP4 -- in: [user uses NFC]<br>out: ThpNfcTagHost --> HP7 HP7 -- in: ThpNfcTagTrezor --> HC0
State HP0
The behavior of the host in the state HP0 is defined as follows:
- Take the following actions:
- Send the message ThpPairingRequest(host_name, app_name) to the Trezor.
- Transition to the state HP1
State HP1
The behavior of the host in the state HP1 is defined as follows:
- When the message ThpPairingRequestApproved is received, take the following actions:
- Set selected_pairing_method to one of the pairing method supported by Trezor from the device_properties received during handshake. The selection can be done by the user or by using pre-defined default settings.
- Send the message ThpSelectMethod(selected_pairing_method) to the Trezor.
- When the selected_pairing_method is CodeEntry, take the following action:
- Transition to the state HP2.
- When the selected_pairing_method is NOT CodeEntry, take the following action:
- Transition to the state HP3b.
State HP2
The behavior of the host in the state HP2 is defined as follows:
- When the message ThpCodeEntryCommitment(commitment) is received, take the following actions:
- Generate a random 16-byte challenge.
- Send the message ThpCodeEntryChallenge(challenge) to the Trezor.
- Transition to the state HP3a.
State HP3a
The behavior of the host in the state HP3a is defined as follows:
- When the message ThpCodeEntryCpaceTrezor(cpace_trezor_public_key) is received, take the following actions:
- Transition to the state HP4.
State HP3b
The behavior of the host in the state HP3b is defined as follows:
- When the message ThpPairingPreparationsFinished() is received, take the following actions:
- Transition to the state HP4.
State HP4
- When changing the pairing method to CodeEntry and CodeEntry is selected for the first time in this pairing process, take the following actions:
- Set selected_pairing_method to ThpPairingMethod_CodeEntry
- Send the message ThpSelectMethod(selected_pairing_method) to the Trezor.
- Transition to the state HP2.
- When changing the pairing method to CodeEntry and CodeEntry is selected for the second time (or more) in this pairing process, take the following actions:
- Set selected_pairing_method to ThpPairingMethod_CodeEntry
- Send the message ThpSelectMethod(selected_pairing_method) to the Trezor.
- Transition to the state HP3b.
- When changing the pairing method to Nfc or QrCode, take the following actions:
- Set selected_pairing_method to one of (ThpPairingMethod_NFC, ThpPairingMethod_QrCode).
- Send the message ThpSelectMethod(selected_pairing_method) to the Trezor.
- Transition to the state HP3b.
- When the selected_pairing_method is CodeEntry and user enters code, take the following action:
- Disable all code entry methods.
- Compute pregenerator as the first 32 bytes of SHA-512(prefix || code || padding || handshake_hash || 0x00), where prefix is the byte-string 0x08 || 0x43 || 0x50 || 0x61 || 0x63 || 0x65 || 0x32 || 0x35 || 0x35 || 0x06, code is encoded using ASCII, and padding is the byte-string 0x6f || 0x00 ^ 111 || 0x20.
- Set generator = ELLIGATOR2(pregenerator).
- Generate a random 32-byte cpace_host_private_key.
- Set cpace_host_public_key = X25519(cpace_host_private_key, generator).
- Set shared_secret = X25519(cpace_host_private_key, cpace_trezor_public_key).
- Set tag = SHA-256(shared_secret).
- Send the message ThpCodeEntryCpaceHostTag(cpace_host_public_key, tag) to the Trezor.
- Transition to the state HP5.
- When the selected_pairing_method is QrCode and host scans the code from Trezor’s display, take the following action:
- Set code as the data scanned from the Qr Code.
- Set tag = SHA-256(handshake_hash || code).
- Send the message ThpQrCodeTag(tag).
- Transition to the state HP6.
- When the selected_pairing_method is Nfc and user brings the device close (nfc communication is possible), take the following action:
- Generate a random 16-byte secret_H.
- Set handshake_hash_digest_H as the first 16 bytes of handshake_hash.
- Send secret_H || handshake_hash_digest_H over the NFC.
- Read secret_T || handshake_hash_digest_T from the NFC.
- Assert that handshake_hash_digest_H == handshake_hash_digest_T.
- Set tag_H = SHA-256(ThpPairingMethod_NFC || handshake_hash_H || secret_T).
- Send the message ThpNfcTagHost(tag_H).
- Transition to the state HP7.
State HP5
The behavior of the host in the state HP5 is defined as follows:
- When the message ThpCodeEntrySecret(secret) is received, take the following actions:
- Assert that commitment = SHA-256(secret).
- Assert that code = SHA-256(ThpPairingMethod_CodeEntry || handshake_hash_H || secret || challenge) % 1 000 000 (BigEndian).
- Transition to the state HC0.
State HP6
The behavior of the host in the state HP6 is defined as follows:
- When the message ThpQrCodeSecret(secret) is received, take the following actions:
- Assert that code = SHA-256(ThpPairingMethod_QrCode || handshake_hash_H || secret)[:16].
- Transition to the state HC0.
State HP7
The behavior of the host in the state HP7 is defined as follows:
- When the message ThpNfcTagTrezor(tag_T) is received, take the following actions:
- Assert that tag_T = SHA-256(ThpPairingMethod_NFC || handshake_hash_H || secret_H).
- Transition to the state HC0.
Notes
The purpose of prefix and padding is to be compatible with the suite CPACE-X25519-SHA512 in the symmetric setting as it was in draft-irtf-cfrg-cpace-10 where
- the associated data fields (ADa and ADb) are empty strings,
- the session identifier (sid) and the channel identifier (CI) are empty strings
- the password-related string (PRS) is the code that the user rewrites from Trezor to the host and
- pairing_secret is the resulting intermediate session key (ISK).
NFC pairing sequence
sequenceDiagram
  participant host
  participant Trezor
  host ->> Trezor: ThpSelectMethod[Nfc]
  note over Trezor: secret_T = random_bytes(16)
  Trezor ->> host: ThpPairingPreparationsFinished
  note over host: secret_H = random_bytes(16)
  host -->> Trezor: secret_H, handshake_hash_H[:16] (over NFC)
  note over Trezor: assert handshake_hash_H[:16] == handshake_hash_T[:16]
  Trezor -->> host: secret_T, handshake_hash_T[:16] (over NFC)
  note over host: assert handshake_hash_T[:16] == handshake_hash_H[:16]
  note over host: tag_H = sha256(ThpPairingMethod_NFC || handshake_hash_H || secret_T)
  host ->> Trezor: tag_H
  note over Trezor: assert tag_H == sha256(ThpPairingMethod_NFC || handshake_hash_T || secret_T)
  note over Trezor: tag_T = sha256(ThpPairingMethod_NFC || handshake_hash_T || secret_H)
  Trezor ->> host: tag_T
  note over host: assert tag_T == sha256(ThpPairingMethod_NFC || handshake_hash_H || secret_H)
QR Code pairing sequence
sequenceDiagram
  participant host
  participant Trezor

  host ->> Trezor: ThpSelectMethod[QrCode]
  note over Trezor: secret = random_bytes(16)
  note over Trezor: code = sha256(ThpPairingMethod_QrCode || handshake_hash_T || secret)[:16]
  Trezor ->> host: ThpPairingPreparationsFinished
  Trezor -->> host: code (QR Code)
  note over host: tag = sha256(handshake_hash_H || code)
  host ->> Trezor: tag
  note over Trezor: assert tag == sha256(handshake_hash_T || code)
  Trezor->> host: secret
  note over host: assert code == sha256(ThpPairingMethod_QrCode || handshake_hash_H || secret)[:16]
Code Entry pairing sequence
Separated diagrams
sequenceDiagram
  participant host - first time
  participant Trezor

  host - first time ->> Trezor: ThpSelectMethod[CodeEntry]
  note over Trezor: secret = random_bytes(16)
  note over Trezor: commitment = sha256(secret)
  Trezor ->> host - first time: commitment
  note over host - first time: challenge = random_bytes(16)
  host - first time ->> Trezor: challenge
  note over Trezor: code = sha256(ThpPairingMethod_CodeEntry || handshake_hash_T || secret || challenge) % 1 000 000 (BigEndian)
  note over Trezor: pregenerator = sha512(prefix || code || padding || handshake_hash_T || 0x00)[:32]<br>generator = ELLIGATOR2(pregenerator)<br>cpace_trezor_private_key = random_bytes(32)<br>cpace_trezor_public_key = X25519(cpace_trezor_private_key, generator)
  Trezor ->> host - first time: cpace_trezor_public_key
  Trezor -->> host - first time: code (user rewrites code from Trezor to host)
  note over host - first time: pregenerator = sha512(prefix || code || padding || handshake_hash_H || 0x00)[:32]<br>generator = ELLIGATOR2(pregenerator)<br>cpace_host_private_key = random_bytes(32)<br>cpace_host_public_key = X25519(cpace_host_private_key, generator)<br>shared_secret = X25519(cpace_host_private_key, cpace_trezor_public_key)<br>tag=sha256(shared_secret)
  host - first time ->> Trezor: cpace_host_public_key, tag
  note over Trezor: shared_secret = X25519(cpace_trezor_private_key, cpace_host_public_key)
  note over Trezor: assert tag == sha256(shared_secret)
  Trezor ->> host - first time: secret
  note over host - first time: assert commitment == sha256(secret)
  note over host - first time: assert code == SHA-256(ThpPairingMethod_CodeEntry || handshake_hash_H || secret || challenge) % 1 000 000 (BigEndian)
sequenceDiagram
  participant host - second (or more) time
  participant Trezor

  host - second (or more) time ->> Trezor: ThpSelectMethod[CodeEntry]

  Trezor ->> host - second (or more) time : ThpPairingPreparationsFinished
  Trezor -->> host - second (or more) time : code (user rewrites code from Trezor to host)
  note over host - second (or more) time : pregenerator = sha512(prefix || code || padding || handshake_hash_H || 0x00)[:32]<br>generator = ELLIGATOR2(pregenerator)<br>cpace_host_private_key = random_bytes(32)<br>cpace_host_public_key = X25519(cpace_host_private_key, generator)<br>shared_secret = X25519(cpace_host_private_key, cpace_trezor_public_key)<br>tag=sha256(shared_secret)
  host - second (or more) time  ->> Trezor: cpace_host_public_key, tag
  note over Trezor: shared_secret = X25519(cpace_trezor_private_key, cpace_host_public_key)
  note over Trezor: assert tag == sha256(shared_secret)
  Trezor ->> host - second (or more) time : secret
  note over host - second (or more) time : assert commitment == sha256(secret)
  note over host - second (or more) time : assert code == SHA-256(ThpPairingMethod_CodeEntry || handshake_hash_H || secret || challenge) % 1 000 000 (BigEndian)
Combined diagram
sequenceDiagram
  participant host
  participant Trezor
  participant host - first time
  participant host - second or more time

  host - first time ->> Trezor: ThpSelectMethod[CodeEntry]
  note over Trezor: secret = random_bytes(16)
  note over Trezor: commitment = sha256(secret)
  Trezor ->> host - first time: commitment
  note over host - first time: challenge = random_bytes(16)
  host - first time ->> Trezor: challenge
  note over Trezor: code = sha256(ThpPairingMethod_CodeEntry || handshake_hash_T || secret || challenge) % 1 000 000 (BigEndian)
  note over Trezor: pregenerator = sha512(prefix || code || padding || handshake_hash_T || 0x00)[:32]<br>generator = ELLIGATOR2(pregenerator)<br>cpace_trezor_private_key = random_bytes(32)<br>cpace_trezor_public_key = X25519(cpace_trezor_private_key, generator)
  Trezor ->> host - first time: cpace_trezor_public_key
  host - second or more time ->> Trezor: ThpSelectMethod[CodeEntry]
  Trezor ->> host - second or more time: ThpPairingPreparationsFinished
  Trezor -->> host: code (user rewrites code from Trezor to host)
  note over host: pregenerator = sha512(prefix || code || padding || handshake_hash_H || 0x00)[:32]<br>generator = ELLIGATOR2(pregenerator)<br>cpace_host_private_key = random_bytes(32)<br>cpace_host_public_key = X25519(cpace_host_private_key, generator)<br>shared_secret = X25519(cpace_host_private_key, cpace_trezor_public_key)<br>tag=sha256(shared_secret)
  host ->> Trezor: cpace_host_public_key, tag
  note over Trezor: shared_secret = X25519(cpace_trezor_private_key, cpace_host_public_key)
  note over Trezor: assert tag == sha256(shared_secret)
  Trezor ->> host: secret
  note over host: assert commitment == sha256(secret)
  note over host: assert code == SHA-256(ThpPairingMethod_CodeEntry || handshake_hash_H || secret || challenge) % 1 000 000 (BigEndian)
Credential phase
In credential phase, the host can request a long-term pairing credential (THP credential) from Trezor. THP credential can be used by the host next time in the handshake phase - to avoid the need to go through the pairing procedure. Even when the host is connecting with a credential, a confirmation of connection by user is required (by default). However, when the host has a valid credential available, they can ask Trezor for an autoconnect credential. When a valid autoconnect credential is used during the handshake phase, no connection confirmation is required from the user .
Messages
The following messages are handled by the application layer.
message ThpCredentialRequest {
    required bytes host_static_public_key = 1;        // Host's static public key identifying the credential.
    optional bool autoconnect = 2 [default = false];  // Whether host wants to autoconnect without user confirmation
    optional bytes credential = 3;                    // Host's previous credential
}

message ThpCredentialResponse {
    required bytes trezor_static_public_key = 1;  // Trezor's static public key used in the handshake.
    required bytes credential = 2;                // The pairing credential issued by the Trezor to the host.
}

message ThpEndRequest {}

message ThpEndResponse {}
The following messages are used internally by Trezor - should not be transported over-the-wire or used in the host's implementation. The host should treat the pairing credential as opaque bytes.
message ThpCredentialMetadata {
    option (internal_only) = true;
    required string host_name = 1;  // Human-readable host name (browser name for web apps)
    optional bool autoconnect = 2;  // Whether host is allowed to autoconnect without user confirmation
    required string app_name = 3;   // Human-readable application name
}

message ThpPairingCredential {
    option (internal_only) = true;
    required ThpCredentialMetadata cred_metadata = 1;  // Credential metadata
    required bytes mac = 2;                            // Message authentication code generated by the Trezor
}

message ThpAuthenticatedCredentialData {
    option (internal_only) = true;
    required bytes host_static_public_key = 1;         // Host's static public key used in the handshake
    required ThpCredentialMetadata cred_metadata = 2;  // Credential metadata
}
Credential authentication key
For credential issuance and validation, a credential authentication key (cred_auth_key) is used. This key is derived from two components - device secret and a counter (cred_auth_key_counter). The device secret is independent of seed and is generated randomly first time it is needed. The cred_auth_key_counter is 4 bytes big-endian initiated to zero.
Credential validation
Let ValidateCredential(cred_auth_key, credential_binary, host_static_pubkey) be the function defined as follows:
- Set credential = PROTOBUF-DECODE(type=ThpPairingCredential, credential_binary).
- Set authenticated_credential_data = PROTOBUF-ENCODE(type=ThpAuthenticatedCredentialData, host_static_pubkey, credential.cred_metadata).
- Set mac = HMAC-SHA-256(cred_auth_key, authenticated_credential_data).
- Return mac == credential.mac.
Credential invalidation
Incrementing the cred_auth_key_counter results in a new cred_auth_key, invalidating all previously issued THP credentials. The design does not allow to invalidate a single selected credential - only all credentials can be invalidated, or none.
Credential issuance
Let IssueCredential(cred_auth_key, host_static_pubkey, credential_metadata) be the function defined as follows:
- Set authenticated_credential_data = PROTOBUF-ENCODE(type=ThpAuthenticatedCredentialData, host_static_pubkey, credential_metadata).
- Set mac = HMAC-SHA-256(cred_auth_key, authenticated_credential_data).
- Set credential_raw = PROTOBUF-ENCODE(type=ThpPairingCredential, credential_metadata, mac).
- Return credential_raw.
Autoconnect credential issuance
The host can request an autoconnect credential by sending the ThpCredentialRequest message to the Trezor - it is even possible to do when the communication is in the encrypted transport phase. The request must contain an already issued (valid) credential. Trezor does not allow host to request an autoconnect credential without the host providing a valid credential.
Trezor’s state machine
graph TD
    TC1 -- in: ThpCredentialRequest<br>out: ThpCredentialResponse --> TC1
    TC1 -- in: ThpEndRequest<br>out: ThpEndResponse --> TS["transport state"]
State TC1
The behavior of Trezor in the state TC1(host_static_pubkey, host_name, app_name) is defined as follows:
- When the message ThpEndRequest() is received, take the following actions:
- Transition to the transport state.
- When the message ThpCredentialRequest(host_static_pubkey) is received, take the following actions:
- Set credential_metadata = ThpCredentialMetadata(host_name, app_name).
- Set credential = IssueCredential(cred_auth_key, host_static_pubkey, credential_metadata).
- Send the message ThpCredentialResponse(trezor_static_pubkey, credential) to the host.
- Transition to the state TC1.
Host’s state machine
flowchart TD
  HC0 -- out: ThpEndRequest --> HC2
  HC0 -- out: ThpCredentialRequest --> HC1
  HC1 -- in: ThpCredentialResponse<br>out: ThpCredentialRequest --> HC1
  HC1 -- in: ThpCredentialResponse<br>out: ThpEndRequest --> HC2
  HC2 -- in: ThpEndResponse --> TS["transport state"]
State HC0
The behavior of the host in the state HC0 is defined as follows:
-
Take the following actions:
- Send ThpCredentialRequest(host_static_pubkey) to the Trezor. Transition to the state HC1.
OR
- Exit the Credential phase by sending ThpEndRequest() to Trezor. Transition to state HC2.
State HC1
The behavior of the host in the state HC1 is defined as follows:
-
When the message ThpCredentialResponse(trezor_static_pubkey, credential) is received, take the following actions:
- Append (trezor_static_pubkey, credential) to credentials. If the host uses multiple static key-pairs, associate the tuple (host_static_privkey, host_static_pubkey) generated for this connection with the trezor_static_pubkey.
Then take one of the following actions:
- Send the message ThpEndRequest() to the Trezor and transition to the state HC2.
OR
- Send another message ThpCredentialRequest(host_static_pubkey) to the Trezor. Keep the state HC1.
State HC2
The behavior of the host in the state HC2 is defined as follows:
- When the message ThpEndResponse() is received, take the following actions:
- Transition to the transport state.
Other features
Channel replacement
A new trezor_state STATE_PAIRED_AUTOCONNECT was introduced. The name is a bit misleading, as it is not used for autoconnect credentials, yet. It is generally the same as STATE_PAIRED with an additional guarantee that there will not be a user confirmation required. It is currently used only when a channel is being replaced.
When a new channel is created and an old channel with the same host static public key is still in the Trezor's cache, all sessions from the old channel are migrated to the new one and the provided credential is treated as if it were autoconnect even if it is not.
It is not used for autoconnect credentials yet, as the host knows whether it used an autoconnect credential and thus whether to expect user confirmation. In the case of channel replacement, the host cannot be sure that the old channel is still in Trezor's cache.
Possible trezor_state values:
- STATE_UNPAIRED - Pairing is required. If a credential was used during handshake, it did not pass Trezor's validation (the credential failed verification).
- STATE_PAIRED - Pairing is skipped. User confirmation of the connection might be required - it is determined by the autoconnect field of the credential used.
- STATE_PAIRED_AUTOCONNECT - Pairing is skipped. User confirmation of the connection will not be required.
Channel replacement helps to reduce the number of user confirmations in cases where the host is already trusted and the connection was interrupted (the old channel must be valid - in the ENCRYPTED_TRANSPORT state). Also, as the sessions from the old channel are migrated to the new one - it allows users to not enter passphrases repeatedly in case of such interruption.
Example usecase - the host application crashes/restarts.
Note: STATE_PAIRED_AUTOCONNECT can be viewed as a special case of STATE_PAIRED.
References
[ABP69] K. A. Bartlett, R. A. Scantlebury, and P. T. Wilkinson, “A note on reliable full-duplex transmission over half-duplex links,” Communications of the ACM, vol. 12, no. 5, pp. 260–261, May 1969. https://dl.acm.org/doi/pdf/10.1145/362946.362970
Introduction
This document specifies the application layer of the Trezor-Host protocol (THP). For general information about the protocol, and lower protocol layers, see specification.md.
Application layer
The THP application layer has the following structure:
| Offset | Size | Field name | Description |
|---|---|---|---|
| 0 | 1 | session_id | A single byte identifying the session. |
| 1 | 2 | message_type | Big-endian encoded protobuf-message's type. |
| 3 | var | protobuf_encoded_message | Message encoded using protocol buffers v2. |
Session vs. channel
THP Channel represents a single encrypted connection ("encrypted channel"). Each channel can contain multiple sessions. A (standard) session represents a single passphrase-wallet. Each session can have arbitrary passphrase (or none), there can be multiple sessions with the same passphrase.
Session
A new session is created by sending a ThpCreateNewSession with desired parameters to the Trezor.
Seedless sessions
Seedless sessions are a special kind of sessions. These sessions can be used for operations that do not require the seed to be derived - for instance management tasks. Only seedless sessions can be used on uninitialized devices.
Bitcoin signing flow
The Bitcoin signing process is one of the most complicated workflows in the Trezor codebase. This is because Trezor cannot store arbitrarily large transactions in memory, so both the input data and the results must be sent in chunks. The Protobuf messages cannot fully encode the data pertaining to a single transaction; instead, the data is spread out over multiple messages.
Overview
The signing flow is initiated by a SignTx command. The message contains the name of
the coin, number of inputs and outputs, and transaction metadata: version, lock time,
and others that are required for some coins.
In response, Trezor will send a number of TxRequest messages, asking for additional
data from the host. The host is supposed to respond with a TxAck providing the
requested data.
Trezor can request the following kinds of items:
- input of the transaction being signed
- output of the transaction being signed
- metadata of a previous transaction, i.e., the transaction whose UTXO is being spent
- metadata of an original transaction, i.e., a transaction that is being replaced by the current transaction
- input of a previous or original transaction
- output of a previous or original transaction
- additional trailing data of a previous transaction
As part of each TxRequest message, Trezor can also send a chunk of the resulting
serialized transaction, and/or a signature of one of the inputs.
The flow ends when Trezor sends a TxRequest with request_type of TXFINISHED.
Signing phases
The following content is for reference only, and details might change in the future. Host code should make no assumptions about the order of the phases.
The list of phases here also does not necessarily correspond to internal phase numbering.
Gathering info about current transaction
Trezor will request all inputs and outputs of the transaction to be signed, and set up data structures that allow it to verify that the same data is sent in the following phases.
In this phase, Trezor will also ask the user to confirm destination addresses, the transaction fee, metadata, and the total being sent. If the user confirms, we continue to the next phase.
Validation of input data
Trezor must verify that the host does not lie about input amounts, i.e., that the transaction total in the first phase was calculated correctly.
For this reason, Trezor will ask the host to send each input again. It will then request data about the referenced previous transaction: metadata, all inputs, all outputs, and possible trailing data. This allows Trezor to reconstruct the previous transaction and calculate its hash. If this hash matches the provided one, and the amount on selected UTXO matches the input amount, the given input is considered valid.
If all internal inputs are taproot, then the verification of the previous transactions is skipped. This is possible because if the host provides invalid information about the UTXOs being spent, then the resulting taproot signatures will also be invalid.
Trezor Core also supports pre-signed inputs for multi-party signing. If an input has script
type EXTERNAL and provides a signature, Trezor will validate the signature against the
previous transaction in this step.
Serialization and signing
Trezor will ask once again about every input and begin outputting a serialization of the transaction. For every legacy (non-segwit) input, it is necessary to stream the full set of inputs and outputs again, so that Trezor can compute the transaction digest which it then signs. For segwit inputs this is not necessary.
When all inputs are serialized, Trezor will ask for every output, so that it can serialize it, fill out change addresses, and return the full transaction.
Finally Trezor asks again about segwit inputs to sign them and to serialize the witnesses.
Old versus new data structures
Originally, the TxAck message contained one field of type TransactionType. This, in
turn, contained all the possible fields that Trezor could request:
TransactionTypeitself contains fields for all necessary metadata, plus a fieldextra_datafor trailing data.TransactionType.inputsis an array ofTxInputTypeobjects, each of which can describe either the current input, or an input of a previous transaction.TransactionType.outputsis an array ofTxOutputTypeobjects, each of which can describe an output of the current transaction.TransactionType.bin_outputsis an array ofTxOutputBinTypeobjects, each of which can describe an output of a previous transaction.
This organization makes it practical to use the TransactionType for host-side storage:
a transaction can be fully stored in one object, and in order to send a TxAck
response, you only need to extract the appropriate data.
The cost of this is that this organization makes it extremely unclear which data should be extracted at which points.
To make the constraints more visible, a new set of data types was designed. There is a
TxAck<Kind> message for every Kind of data. These only define the fields that are
appropriate for that kind of request.
It is possible to use both representations, as they are wire-compatible. However, we recommend using the new definitions for new applications.
Request types
The TxRequest message always contains a request_type field, indicating which kind of
data it wants. In addition, request_details specify the particular piece of data
requested.
If request_details.tx_hash is set, Trezor is requesting data about a specified
previous transaction. If it is unset, Trezor wants data about current transaction.
Transaction input
Trezor sets request_type to TXINPUT, and request_details.tx_hash is unset.
request_details.request_index is the index of the input in the transaction: 0 is the
first input, 1 is second, etc.
Old style: Host must respond with a TxAck message. The field tx.inputs must be
set to an array of one element, which describes the requested input. All other fields
should be left unset.
New style: Host must respond with a TxAckInput message. All relevant data must be
set on tx.input.
Normal (internal) inputs
Usually, the user owns, and wants to sign, all inputs of the transaction. For that, the
host must specify a derivation path for the key, and script type SPENDADDRESS (legacy),
SPENDP2SHWITNESS (P2SH segwit), SPENDWITNESS (native segwit) or SPENDTAPROOT.
Multisig inputs
For multisig inputs, the XPUBs of all signers (including the current user) must be
provided in the multisig structure. Legacy multisig uses type SPENDMULTISIG, P2SH
segwit and native segwit multisig use the same type as non-multisig inputs, i.e.
SPENDP2SHWITNESS or SPENDWITNESS.
Full documentation for multisig is TBD.
External inputs
Trezor can include inputs that it will not sign, typically because they are
owned by another party. Such inputs are of type EXTERNAL and the host does
not specify a derivation path for the key, but sets the script_pubkey field
to the scriptPubKey of the previous output that is being spent by the external
input. An external input can either be verified or unverified. The amounts
supplied to the transaction by verified external inputs are subtracted from the
transaction total that the user is asked to confirm, whereas unverified
external inputs are not subtracted.
Verified external inputs are only supported on the Trezor Core. They must either
already have a valid signature or they must come with an ownership proof. If
the input already has a valid signature, then the host provides the
script_sig and/or witness fields. If the other signing party hasn't signed
their input yet (i.e., with two Trezors, one must sign first so that the other
can include a pre-signed input), they can instead provide a
SLIP-19
ownership proof in the ownership_proof field, with optional commitment data
in commitment_data.
Unverified external inputs are accepted by Trezor only if safety checks are disabled on the device.
Transaction output
Trezor sets request_type to OUTPUT, and request_details.tx_hash is unset.
request_details.request_index is the index of the output in the transaction: 0 is the
first input, 1 is second, etc.
Old style: Host must respond with a TxAck message. The field tx.outputs must be
set to an array of one element, which describes the requested output. All other fields
should be left unset.
New style: Host must respond with a TxAckOutput message. All relevant data must be
set on tx.output.
External outputs
Outputs that send coins to a particular address are always of type PAYTOADDRESS. The
address is sent as a string in the field address.
Change outputs
Outputs that send coins back to the same owner must specify a derivation path and the appropriate script type. If the derivation path has the same prefix as all inputs, and a matching script type (legacy, p2sh segwit, native segwit), it is considered to be a change output, and its amount is subtracted from the total.
address must not be specified in this case. It is instead derived internally from the
provided derivation path.
OP_RETURN outputs
Outputs of type PAYTOOPRETURN must not specify address nor address_n, and the
amount must be zero. The OP_RETURN data is sent as op_return_data field.
Previous transaction metadata
Trezor sets request_type to TXMETA. request_details.tx_hash is a transaction hash,
matching one of the current transaction inputs.
Old style: Host must respond with a TxAck message. The structure tx must be
filled out with relevant data, in particular, inputs_cnt and outputs_cnt must be set
to the number of transaction inputs and outputs. Arrays inputs, outputs,
bin_outputs and extra_data should be empty.
New style: Host must respond with a TxAckPrevMeta message. All relevant data must
be set on tx.
Extra data
Some coins (e.g., Zcash) contain data at the end of transaction serialization that
Trezor does not understand. The host must indicate the length of this extra data in the
field extra_data_len.
To figure out which is the extra data, the host must parse the serialized previous transaction up to the last field understood by Trezor. In case of Zcash, that is:
- version + version group ID
- number of inputs, and every input
- number of outputs, and every output
- lock time
- expiry
All data after the expiry field is considered "extra data".
Previous transaction input
Trezor sets request_type to TXINPUT. request_details.tx_hash is a transaction
hash, matching one of the current transaction inputs.
Old style: Host must respond with a TxAck message. The field tx.inputs must be
set to an array of one element, which describes the requested input of the specified
previous transaction. All other fields should be left unset.
New style: Host must respond with a TxAckPrevInput message. All relevant data must
be set on tx.input.
Previous transaction output
Trezor sets request_type to TXOUTPUT. request_details.tx_hash is a transaction
hash, matching one of the current transaction inputs.
Old style: Host must respond with a TxAck message. The field tx.bin_outputs must
be set to an array of one element, which describes the requested output of the specified
previous transaction. All other fields should be left unset.
New style: Host must respond with a TxAckPrevOutput message. All relevant data
must be set on tx.output.
Previous transaction trailing data
On some coins, such as Zcash, the transaction serialization can contain data not understood by Trezor. This data is not relevant for validation, but it must be included so that Trezor can correctly compute the previous transaction hash.
Trezor sets request_type to TXEXTRADATA. request_details.tx_hash is a transaction
hash, matching one of the current transaction inputs.
request_details.extra_data_offset specifies the offset of the requested data from the
start of the extra data. request_details.extra_data_length specifies the length of
the requested chunk.
Old style: Host must respond with a TxAck message. The field tx.extra_data must
contain the specified chunk, starting at the given offset and of exactly the given
length. All other fields should be unset.
New style: Host must respond with a TxAckPrevExtraData message. The chunk must be
set to tx.extra_data_chunk.
Original transaction input
Trezor sets request_type to TXORIGINPUT. request_details.tx_hash is the
transaction hash of the original transaction.
The host must respond with a TxAckInput message. All relevant data must be set in
tx.input. The derivation path and script_type are mandatory for all original
internal inputs. All original internal inputs must also be accompanied with full
transaction signature data in the script_sig and/or witness fields.
Original transaction output
Trezor sets request_type to TXORIGOUTPUT. request_details.tx_hash is the
transaction hash of the original transaction.
Host must respond with a TxAckOutput message. All relevant data must be set in
tx.output. The derivation path and script type are mandatory for all original
change-outputs.
Payment request
Trezor sets request_type to TXPAYMENTREQ, and request_details.tx_hash is unset.
request_details.request_index is the index of the payment request in the transaction:
0 is the first payment request, 1 is second, etc.
The host must respond with a PaymentRequest message.
Replacement transactions
A replacement transaction is a transaction that uses the same inputs as one or more transactions which have already been signed (the original transactions). Replacement transactions can be used to securely bump the fee of an already signed transaction (BIP-125) or to participate as a sender in PayJoin (BIP-78). Trezor only supports signing of replacement transaction which do not increase the amount that the user is spending on external outputs. Thus when signing a replacement transaction the user only needs to confirm the fee modification and the original TXIDs without being shown any outputs, since the original external outputs must have already been confirmed by the user and any new external outputs can only be paid for by new external inputs.
The host signals that a transaction is a replacement transaction by setting the
orig_hash and orig_index fields for at least one TxInput. Trezor will then
automatically request metadata about the original transaction and verify the original
signatures.
A replacement transaction in Trezor must satisfy the following requirements:
- All inputs of the original transactions must be inputs of the replacement transaction.
- All external outputs of the original transactions must be outputs of the replacement transaction.
- The value of an external output may be decreased only if there are no new external inputs. This should only be used to bump the fee if the original transaction transfers the entire account balance and there is no other source available to bump the fee.
- The replacement transaction must not increase the amount that the user is spending on external outputs.
- Original transactions must have the same effective
nLockTimeas the replacement transaction. - The inputs and outputs of the original transactions must not be permuted in the replacement transaction, but they can be interleaved with new inputs or with inputs from another original transaction.
- New
OP_RETURNoutputs cannot be added in the replacement transaction.
So the replacement transaction is, for example, allowed to:
- Increase the user's contribution to the mining fee by adding new inputs or decreasing or removing change outputs.
- Decrease the user's contribution to the mining fee by increasing or adding change-outputs.
- Add external inputs (PayJoin) and use them to introduce new outputs, increase the original external outputs or even to increase the user's change outputs so as to decrease the amount that the user is spending.
Payment requests
In Trezor Core a set of transaction outputs can be accompanied by a payment request. Multiple payment requests per transaction are also possible. A payment request is a message signed by a trusted party requesting payment of certain amounts to a set of outputs as specified in SLIP-24. The user then does not have to verify the output addresses, but only confirms the payment of the requested amount to the recipient.
The host signals that an output belongs to a payment request by setting the
payment_req_index field in the TxOutput message. When Trezor encounters the first
output that has this field set to a particular index, it will ask for the payment request
that has the given index.
All outputs belonging to one payment request must be consecutive in the transaction.
Implementation notes
Pseudo-code
The following is a rough outline of host-side implementation. See above for detailed info.
transaction_bytes = ""
signatures = [""] * len(INPUTS)

def sign_tx():
    # send initial message
    send_message(
        SignTx(
            coin_name,
            inputs_count=len(INPUTS),
            outputs_count=len(OUTPUTS),
            # ...fill individual metadata fields
        )
    )

    # wait for TxAck forever, until Trezor indicates we are finished
    while True:
        msg = receive_message()

        # extract data first
        extract_streamed_data(msg.serialized)

        if msg.request_type == TXFINISHED:
            # we are done
            break

        if msg.details.tx_hash is not None:
            # Trezor requires data about some previous transaction
            send_response_prev(msg.request_type, msg.details)
        else:
            # Trezor requires data about this transaction
            send_response_current(msg.request_type, msg.details)

def extract_streamed_data(ser: TxRequestSerializedType):
    global transaction_bytes, signatures
    # append serialized data to what we got so far
    transaction_bytes += ser.serialized_tx
    if ser.signature_index is not None:
        # read the signature
        signatures[ser.signature_index] = ser.signature

def send_response_prev(request_type: RequestType, details: TxRequestDetailsType):
    prev_tx = get_prev_tx(details.tx_hash)
    if request_type == TXINPUT:
        send_prev_input(prev_tx.inputs[details.request_index])
    elif request_type == TXOUTPUT:
        send_prev_output(prev_tx.outputs[details.request_index])
    elif request_type == TXMETA:
        send_prev_metadata(prev_tx)
    elif request_type == TXEXTRADATA:
        offset = details.extra_data_offset
        length = details.extra_data_length
        extra_data_chunk = prev_tx.extra_data[offset : offset + length]
        send_prev_extra_data(extra_data_chunk)

def send_response_current(request_type: RequestType, details: TxRequestDetailsType):
    if request_type == TXINPUT:
        send_input(INPUTS[details.request_index])
    elif request_type == TXOUTPUT:
        send_output(OUTPUTS[details.request_index])
Wire compatibility
The new definitions are structured so that the Protobuf binary encoded form can be decoded into both representations. This means that the host can encode data in the old representation, and Trezor will successfully and correctly decode it into the new one.
This is done by reusing field IDs as appropriate, and taking advantage of the fact that Protobuf encodes arrays as a sequence of the same field repeated a number of times.
For example, here is a part of the TxAck definition:
message TxAck {
    optional TransactionType tx = 1;

    message TransactionType {
        // ... some fields omitted ...
        repeated TxInputType inputs = 2;
        // ... some fields omitted ...

        message TxInputType {
            repeated uint32 address_n = 1;
            // ... some fields omitted ...
            optional uint64 amount = 8;
            // ... some fields omitted ...
        }
    }
}
A message carrying these fields would look like this:
FIELD 1 (type NESTED):
    FIELD 2 (type NESTED):
        FIELD 1 (type int): 0x8000002c
        FIELD 1 (type int): 0x80000000
        FIELD 1 (type int): 0x80000000
        FIELD 1 (type int): 0
        FIELD 1 (type int): 0
        FIELD 8 (type int): 1234567
We can see that this is identical as if the type definition looked as follows; indeed,
we only renamed the types, removed some fields, and set some optional or repeated
to required instead.
message TxAckInput {
    required TxAckInputWrapper tx = 1;

    message TxAckInputWrapper {
        required TxInput input = 2; // the field is now required instead of repeated

        message TxInput {
            repeated uint32 address_n = 1;
            required uint64 amount = 8;
        }
    }
}
A caveat of this approach is that this introduces invisible dependencies: TxInput and
PrevInput fold into the same old-style TxInputType, so adding new fields must be
done carefully.
We expect to gradually deprecate the TransactionType. At that point, the new-style
types will be fully independent.
Reproducible build
We want to invite the wider community to participate in the verification of the firmware built by Trezor Company. With reasonable effort you should be able to build the firmware and verify that it's identical to the official firmware.
Trezor Firmware uses Nix, uv and Cargo to make the build environment deterministic. We also provide a Docker-based script so that the build can be performed with a single command on usual x86 Linux system.
Building
First you need to determine which version tag you want to build:
- for Trezor One it is
legacy/vX.Y.Z, e.g.legacy/v1.10.3, - for newer models, it is
core/vX.Y.Z, e.g.core/v2.4.2.
Assuming you want to build core/v2.8.3:
- install Docker
- clone the firmware repository:
git clone https://github.com/trezor/trezor-firmware.git - go into the firmware directory:
cd trezor-firmware - checkout the version tag:
git checkout core/v2.8.3 - run:
bash build-docker.sh core/v2.8.3
After the build finishes the firmware images are located in:
build/legacy/firmware/firmware.binandbuild/legacy-bitcoinonly/firmware/firmware.binfor Trezor One,build/core-<model>/firmware/firmware.binandbuild/core-<model>-bitcoinonly/firmware/firmware.binfor later models.
Model identifiers
You can speed up the build process by adding options to the script:
--models=A,B,Cto only build for specific model(s) which are not Trezor One.
The following models are supported:
T1B1- Trezor OneT2T1- Trezor Model TT2B1- Trezor Safe 3 rev.AT3B1- Trezor Safe 3 rev.BT3T1- Trezor Safe 5T3W1- Trezor Safe 7
Examples:
bash build-docker.sh --models=T1B1 legacy/v1.10.3  # build only for Trezor One
bash build-docker.sh --models=T3T1 core/v2.8.3  # build only for Trezor Safe 5
Verifying
The result won't be bit-by-bit identical with the official images because the official images are signed while local builds aren't.
Trezor T and the Safe family
You can use trezorctl to download the official firmware image for your device:
trezorctl firmware download --model t3t1 --version 2.8.3
Or locate the firmware image in the Trezor Data repository.
The firmware binary starts with a vendor header whose size is:
- Model T: 4608 bytes
- Safe 3: 512 bytes
- Safe 5: 1024 bytes
- Safe 7: 1024 bytes
The vendor header is followed by a firmware header
that contains a 65-byte signature at offset 0x3bf (959 in decimal).
You will need to calculate the right offset for the signature based on the model:
- Model T: 4608 + 959 = 5567
- Safe 3: 512 + 959 = 1471
- Safe 5: 1024 + 959 = 1983
- Safe 7: 1024 + 959 = 1983
Zero out the signature data to obtain an image identical to the one built locally:
OFFSET=<your offset here>
# the following line removes 65 bytes of signature data from the official firmware
dd if=/dev/zero of=trezor-t3t1-2.8.3.bin bs=1 seek=$OFFSET count=65 conv=notrunc

# the following two lines print out the hashes of the firmwares
sha256sum trezor-t3t1-2.8.3.bin
sha256sum build/core-T3T1/firmware/firmware.bin
Trezor One
You can use trezorctl to download the official firmware image for your device:
trezorctl firmware download --model 1 --version 1.10.3
Or locate the firmware image in the Trezor Data repository.
Official Trezor One firmware older than 1.12 starts with 256-byte legacy header used for compatibility with old bootloaders. Locally built firmware doesn't have this header.
# strip legacy header
tail -c +257 trezor-1.10.3.bin > trezor-1.10.3-nolegacyhdr.bin
The v2 header has 3x65 bytes of signature data at offset 0x220. Overwrite by zeros to obtain image identical to the one built locally.
dd if=/dev/zero of=trezor-1.10.3-nolegacyhdr.bin bs=1 seek=544 count=195 conv=notrunc

sha256sum trezor-1.10.3-nolegacyhdr.bin
sha256sum build/legacy/firmware/firmware.bin
Note: Fingerprints displayed for T1 at the end of build-docker.sh do not match fingerprints of
official firmware due to the legacy header.
Note: T1 firmware built this way won't boot because unsigned firmware needs to be built with
PRODUCTION=0.
Message Workflows
This page was migrated from the Trezor Wiki. The content here may contain outdated information.
In general, the API implements a simple request-response protocol. The computer sends a request to the device and the device sends back a response. The response can be a simple Success message, a Failure message, or an answer to the request giving the requested data. Moreover, the response can be a request from the device to the computer, e.g., for entering the PIN, the passphrase or giving some other information. In that case the computer should send the corresponding Ack packet to answer the request and wait for another response.
Initialize/Features
As first message, the computer should send an empty Initialize packet and expect a Features packet as response. The Initialize packet will cause the device to stop what it is currently doing and should work at any time. Thus, it can also be used to recover from previous errors.
Button meta-workflow
If the device requires the user to press a button, it will reply with a ButtonRequest to the computer. The computer should immediately send a ButtonAck acknowledging the request. But it should also display an indication to the user that it should follow the instruction on the device. The field code in the ButtonRequest message explains what type of request the user should acknowledge with a button.
If the user never presses the button, there will never be a reply to the ButtonAck message. The computer can use Cancel to abort the current operation. This should result in a Failure response.
PinMatrix meta-workflow
If the device requires the user to unlock the device with a PIN, it will reply with a PinMatrixRequest. The field type gives some explanation what PIN is required (current pin, new pin, or confirmation of new pin). The computer should display an empty pin matrix and let the user enter the pin. The computer should encode the PIN as if the numbers are ordered like they are on the numeric keypad. The encoded PIN should then be send with a PinMatrixAck message.
Passphrase meta-workflow
If the device requires the user to enter the passphrase, it will reply with a PassphraseRequest. The computer should ask the user for the passphrase and send it in clear text with a PassphraseAck message.
GetAddress
The message GetAddress (send from the computer to the device) serves two purposes. It can be used to get a valid address or to display the address on the device. The field address_n gives the bip-32 path to the address. The field coin_name should be set to some supported coin (see the Feature message for a list of supported coins). For multisig addresses multisig must be filled out with all participating master public keys and their bip-32 path. The script_type field has the same meaning as for transaction inputs when signing:
- SPENDADDRESS (standard P2PKH address)
- SPENDMULTISIG (P2SH multisig address)
- SPENDWITNESS (native segwit P2WPKH or multisig p2wsh address)
- SPENDP2SHWITNESS (segwit encapsulated in a p2sh address)
If show_display is set the address is displayed to the user. In any case, it is also sent to the computer with an Address response.
GetPublicKey
The message GetPublicKey can be used to get a bip-32 master public key from the trezor or to display it to the user. The field address_n gives the bip-32 path to the master key. The field ecdsa_curve_name can be used to get Ed25519 or NIST256P1 public keys.
SignTx
The following may contain imprecise/obsolete information. Refer to Bitcoin signing flow for more relevant information.
Signing a transaction is a little bit complicated. The reason is that transactions can be several hundred kilobytes in size, but Trezor has only 64 kilobytes memory. So it is the task of the computer to split the transactions in small pieces and send only those pieces that Trezor requested. The general workflow is given below
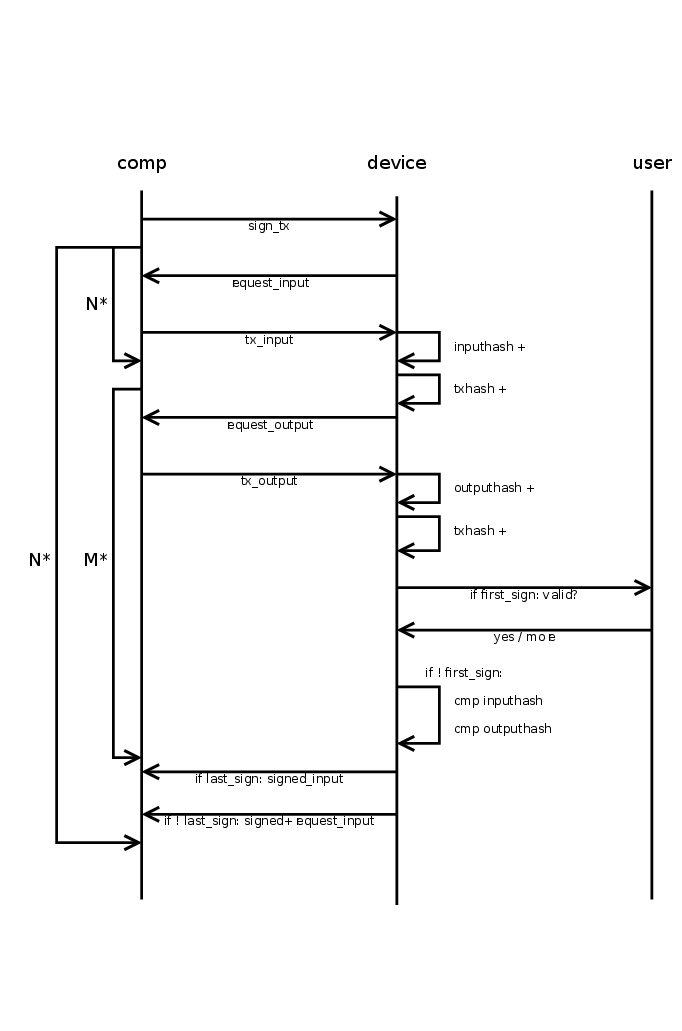
The computer starts the transaction signing process by sending a SignTx message. From then on, the device drives all further communications by sending requests to the computer until it finally sends a TxRequest with request set to TXFINISHED. This final message should not be acknowledged by the computer.
The SignTx message contains only the meta data of the transaction that should be signed, i.e., the number of inputs and outputs, the coin name, the version number, and lock_time (only for pre-signed time locked transactions). If the device was not unlocked before, it will respond with the usual PinMatrixRequest and PasswordRequest messages to authenticate the user. See the corresponding sections above. It may also send a ButtonRequest at any time to indicate that the user should confirm a transaction output or the total fee.
Then the main process begins and Trezor will respond with TxRequest messages, which should be answered by TxAck message. A TxRequest message has up to three parts.
- Parts of the signed transactions.
- A signature for one of the inputs.
- A request for one piece of the new transaction or a previous transaction.
If the field serialized.serialized_tx is set, it contains a chunk of the signed transaction in serialized format. The chunks are returned in the right order and just concatenating all returned chunks will result in the signed transaction.
If the field serialized.signature is set, it contains a signature for one of the inputs. The signatures are returned in the same order as they appear in the serialized transactions. I.e., the non-segwit signatures come before the segwit signatures, since the latter are part of the witness, which is serialized at the end. Apart from that, the signatures are returned in the order the inputs appear in the transaction. The signatures are not really needed, as they are already in the serialized transaction. They can be useful for combining multisig signatures without having to parse the transactions again.
If the field request equals TXFINISHED, this message contained the last chunk of the transaction. The signing is finished and the computer must not reply to this packet. In any other case, the device requested some piece of some transaction, which is specified by request and details. This request must be answered by a TxAck package containing the requested piece of data.
If the field details.tx_hash is not set, some piece of the transaction that should be signed is requested. Otherwise, this field contains the hash of some input transaction and some piece of that transaction is requested.
For request = TXMETA, the fields tx.version, tx.lock_time, tx.inputs_cnt (number of inputs), and tx.outputs_cnt must be filled. For ZCash transactions also tx.extra_data_len must be given. This will only be requested for input transactions (for the signed transaction it was given in the SignTx call).
For request = TXINPUT, the field details.request_index contains the number of the input requested (starting with zero). The reply must fill the structure tx.inputs[0] (there must be exactly one input in the reply). Which fields must be set depends on whether details.tx_hash is set (an input of some previous transaction is requested, that is spend in the new transaction), or whether an input of the new transaction is requested. In both cases prev_hash, prev_index and sequence must be set. For a previous transaction, the script_sig must be set to the raw signature data.
But if details.tx_hash is unset, the data must instead describe the private key that should be used to sign the input. This is specified by address_n (the bip-32 path to the private key), script_type and multisig. The field multisig is only given for multisig transactions and contains the master public keys and the derivation paths for all signers. The field script_type can be
- SPENDADDRESS (standard p2pkh address)
- SPENDMULTISIG (p2sh multisig address)
- SPENDWITNESS (native segwit p2wpkh or multisig p2wsh address)
- SPENDP2SHWITNESS (segwit encapsulated in a p2sh address)
Note, that for segwit script_type does not distinguish between multisig or p2wpkh addresses. Instead the presence of the multisig decides this. For segwit inputs also the amount field must be set to the amount of satoshis in the input transaction.
For request = TXOUTPUT, the field details.request_index contains the number of the output requested (starting with zero). If details.tx_hash is set, this is an output of a previous transaction and the tx.bin_outputs[0] field must be filled in the TxAck reply. Otherwise, the tx.outputs[0] field must be filled. For change outputs, the field address_n must be filled and address must be omitted. If the change is multisig, the multisig must be filled and it must use the same extended public keys as all inputs. For a change address, the script_type should be PAYTOADDRESS, PAYTOMULTISIG, PAYTOWITNESS or PAYTOP2SHWITNESS matching the corresponding cases SPEND... for inputs. For OP_RETURN outputs, set script_type = PAYTOOPRETURN and set the op_return_data field. Otherwise address should be set to a base58 encoded address and script_type to PAYTOADDRESS. Older firmware required script_type = PAYTOSCRIPTHASH for p2sh addresses, though (and newer firmware still support this).
SignMessage/VerifyMessage
Sign message
Signing messages can be used to prove ownership of a specific address. To sign message with Trezor device, it is needed to send the message which the user wants to sign and also specify BIP-32 path which to use for message signing. There are also two optional arguments: to specify coin (Bitcoin is default, for more information about available coins check this GitHub page) and specify script type (0 = SPENDADDRESS/standard P2PKH address, 1 = SPENDMULTISIG/P2SH multisig address, 2 = EXTERNAL/reserved for external inputs (coinjoin), 3 = SPENDWITNESS/native SegWit, 4 = SPENDP2SHWITNESS/SegWit over P2SH (backward compatible))
Verify message
Verify message asks device to verify if the signature is a signed message with the given address. The arguments of the message are signature, message being verified, address and coin which should be used for verifying.
CipherKeyValue
Cipher key value provides symmetric encryption in the Trezor device, where the key doesn't exit the device, and where the user might be forced to confirm the encryption/decryption on the display. The data sent to the device are The following data are BIP-32 derivation path, key (that is being shown on the device), value, encrypt/decrypt direction, should user confirm on encrypt?, should user confirm on decrypt? and optional IV. Value is what is actually being encrypted. The key for the encryption is constructed from the private key on the BIP address, the key displayed on the device, and the two informations about whether to ask for confirmation. It is constructed in such a way, that different path, key or the confirm information will get a different encryption key and IV. So, you cannot "skip" the confirmation by using different input. IV can be either manually set, or it is computed together with the key. The value must be divisible into 16-byte blocks. The application has to pad the blocks itself and ensure safety; for example, by using PKCS7. See https://github.com/satoshilabs/slips/blob/master/slip-0011.md.
ResetDevice
The ResetDevice message performs Trezor device setup and generates a new wallet with a new recovery seed. The device must be in unitialized state, meaning that the firmware is already installed but it has not been initialized yet. If it is initialized and the user wants to perform a device reset, the device must be wiped first. If the Trezor is prepared for its initialization, the screen is showing "Go to trezor.io". The device reset can be done in the Trezor Suite interface (https://trezor.io/start) or using Python trezorctl command. After sending the ResetDevice message to the device, the device warns the user to never make a digital copy of their recovery seed and never upload it online, this message has to be confirmed by pressing "I understand" on the device. After confirmation, the device produces internal entropy which is a random value of 32 bytes, requests external entropy which is produced in the host computer and computes the mnemonic (recovery seed) using internal, external entropy and the given strength (12, 18 or 24 words). Trezor Suite interface doesn't provide an option to choose how many words there should be in the generated mnemonic (recovery seed). It is hardcoded to 12 words for Trezor Model T but if done with python's trezorctl command it can be chosen (for initialization with python's trezorctl command, 24 words mnemonic is default). After showing mnemonic on the Trezor device, Trezor Model T requires the user to enter several words at random positions in the mnemonic to confirm that the user has written down the mnemonic properly. If there are errors in the entered words, the device shows the recovery seed again. If the backup check is successful, the setup is finished. If the Trezor Wallet interface is used, the user is asked to set the label and PIN (setting up the PIN can be skipped) for the wallet, this is optional when using python trezorctl command.
The ResetDevice command supports two types of workflows.
Simple ResetDevice workflow
- H -> T
ResetDevice(Host specifies strength, backup type, etc.) - H <- T
EntropyRequest(No parameters.) - H -> T
EntropyAck(Host provides external entropy.) - H <- T
Success
Entropy check workflow
The purpose of this workflow is for the host to verify that when Trezor
generates the seed, it correctly includes the external entropy from the host.
The host performs a randomized test asking Trezor to generate several seeds,
checking that they were generated correctly and using the last one as the final
seed. The workflow is triggered by setting ResetDevice.entropy_check to true.
The host chooses a small random number n, e.g. from 1 to 5, and proceeds as follows:
- H -> T
ResetDevice(Host specifies strength, backup type, etc.) - H <- T
EntropyRequest(Trezor commits to an internal entropy value.) - H -> T
EntropyAck(Host provides external entropy.) - H <- T
EntropyCheckReady(Trezor stores the seed in storage cache.) - Host obtains the XPUBs for several accounts that the user intends to use:
- H -> T
GetPublicKey - H <- T
PublicKey
- H -> T
- If this step was executed less than n times, then:
- H -> T
EntropyCheckContinue(finish=False)(Host instructs Trezor to prove seed correctness.) - H <- T
EntropyRequest(Trezor reveals previous internal entropy and commits to a new internal entropy value.) - The host verifies that the entropy commitment is valid, derives the seed and checks that it produces the same XPUBs as Trezor provided in step 5.
- Go to step 3.
- H -> T
- Host instructs trezor to store the current seed in flash memory.
- H -> T
EntropyCheckContinue(finish=True) - H <- T
Success
- H -> T
The host should record the XPUBs that it received in the last repetition of step 5. Every time the user connects the Trezor to the host, it should verify that the XPUBs for the given accounts remain the same in order to prevent a fake malicious Trezor from changing the seed.
The purpose of Trezor's commitment to internal entropy is to enforce that
Trezor chooses its internal entropy before the host provides the external
entropy. This ensures that Trezor cannot choose its internal entropy based on
the external entropy and manipulate the value of the resulting seed. The
commitment is computed as
entropy_commitment=HMAC-SHA256(key=internal_entropy, msg="").
RecoveryDevice
Recovery device lets user to recover BIP39 seed into empty Trezor device. First the device asks user for the number of words in recovered seed, the words are typed in one by one - on the device screen when using Trezor model T, with Trezor One the user can decide to do the advanced recovery (with entering seed using matrix similarly to entering PIN) or standard recovery (with entering the seed to the host computer one by one in random order). The process continues with optional check of the seed validity and optional setting up the PIN, which has to be confirmed. Finally the recovered wallet is saved into device storage.
The same process is used with the dry run recovery, the differences are that this process can be done only with already initialized device and that the mnemonic is not saved into the device but it is only compared to the mnemonic already loaded into the device with the successful result (The seed is valid and matches the one in the device) or unsuccessful result (The seed is valid but does not match the one in the device).
A third kind of recovery is one that is done in order to unlock a repeated backup. This is similar to the dry run recovery in that the device needs to be already initialized and that the mnemonic entered is compared against the one stored in the device. Once successful, a special mode is activated, which allows an additional backup to be performed. This is useful for upgrading SLIP39 backups to multiple shares.
LoadDevice
Load device lets user to load the device with the specific recovery seed. This command is the subset of the recovery device and it can not be done with Trezor Wallet interface, only with python command trezorctl. This message can be used only if the device is not initialized.
WipeDevice
Wipe device lets user wipe the device. It is possible to wipe only user's wallet or erase all the data from the Trezor device including installed firmware. Wiping device in Trezor Wallet interface wipes only user's wallet. It is also possible to wipe the firmware with python trezorctl command, Trezor device must be in bootloader mode.
ApplySettings
Apply settings lets user change settings on the Trezor device, mainly its homescreen, label and passphrase settings. Passphrase can be set to enabled or disabled. Furthermore it can be set that passphrase is entered solely on device or solely on host, by default the device always ask where the user wants to enter the passphrase. All these settings have to be confirmed by user on the device.
ChangePin
This message lets user change, remove or set new PIN. First the user is asked to enter old PIN if it was set before. The user is then asked to enter new PIN and re-enter it to confirm match. It is also possible to not enter new PIN, so the Change PIN message will just remove the old one. The action has to be confirmed by user.
External definitions
A lot of modern blockchains support tokens tradeable on top of the base chain. For proper support in Trezor, we need to know parameters of the tokens that are not part of the signed data -- most typically, the name, currency symbol and the number of decimal places.
Similarly, the "Ethereum" implementation in Trezor actually supports any EVM chain, but we again need some identifying data about the chain in order to display amounts in an user-friendly way.
Currently, Trezor has the capability to load external definitions of:
- EVM chains (networks), identified by their chain ID,
- ERC20 tokens, identified by the chain ID and token address,
- Solana tokens, identified by the mint account.
Built-in definitions
A subset of definitions for the most common EVM chains and ERC20 tokens is baked into the firmware image.
The set of built-in definitions is declared in the following files:
- networks -
networks.json - tokens -
tokens.json
These definitions need to be modified manually.
External definitions
A full list of definitions is compiled from multiple sources and is available in a separate repository.
From this list, a collection of binary blobs is generated, signed, and made available online.
A given Trezor firmware will only accept signed definitions newer than a certain date, typically one month before firmware release. This means that a client application should either always fetch fresh definitions from the official URLs, or refresh its local copy frequently.
Retrieving the definitions
The base URL for the definitions is https://data.trezor.io/firmware/definitions/.
EVM ecosystem
Chain ID is known
To look up a network definition by its chain ID, use the following URL:
https://data.trezor.io/firmware/definitions/eth/chain-id/<CHAIN_ID>/network.dat
<CHAIN_ID> is a decimal number, e.g., 1 for Ethereum mainnet.
To look up a token definition for a given chain ID and token address, use the following URL:
https://data.trezor.io/firmware/definitions/eth/chain-id/<CHAIN_ID>/token-<TOKEN_ADDRESS>.dat
<CHAIN_ID> is again a decimal number.
<TOKEN_ADDRESS> is all lowercase (no checksum) token address hex without the 0x prefix.
E.g., this is the URL for Görli TST token: [https://data.trezor.io/firmware/definitions/eth/chain-id/5/token-7af963cf6d228e564e2a0aa0ddbf06210b38615d.dat]
Chain ID is not known
Certain Ethereum calls, such as EthereumGetAddress and EthereumSignMessage, do not
require the caller to know the chain ID, because their results do not depend on it.
For this situation, it is possible to look up a network definition by a SLIP-44 identifier on the following URL:
https://data.trezor.io/firmware/definitions/eth/slip44/<SLIP44_ID>/network.dat
<SLIP44_ID> is a decimal number, e.g., 60 for Ethereum mainnet.
In some cases, multiple network definitions can be registered for the same SLIP-44
number. The retrieved definition is valid for an unspecified one of those colliding
networks. This does not matter for purposes of EthereumGetAddress and the like,
because the information in the network definition is only used to prove validity of the
derivation path.
When using Ethereum's SLIP-44 number 60 in the derivation path, the caller does not need to provide the network definition, because Ethereum network is always built-in.
Solana
To look up a token definition for a given token mint account, use the following URL:
https://data.trezor.io/firmware/definitions/solana/token/<MINT_ACCOUNT>.dat
<MINT_ACCOUNT> is base58-encoded mint account of the token, e.g., So11111111111111111111111111111111111111112.
Full set of definitions
It is possible to download the full set of signed definitions in a single tar archive from the following URL:
https://data.trezor.io/firmware/definitions/definitions.tar.xz.
Definition format
Each definition is encoded as a protobuf message specified in the file
messages-definitions.proto
and packaged in the following binary format.
All numbers are unsigned little endian.
- magic string
trzd1(5 bytes) - definition type according to
DefinitionTypeenum (1 byte) - data version of the definition (4 bytes)
- protobuf payload length (2 bytes)
- protobuf payload (N bytes)
A Merkle tree is constructed from all binary definitions (see below) and its root is signed by the CoSi algorithm.
The full format of the definition is as follows:
- Data payload (see above)
- Number of Merkle proof entries (1 byte)
- Sequence of 32-byte proof entries (N * 32 bytes)
- CoSi sigmask (1 byte)
- CoSi signature (64 bytes)
Merkle tree algorithm
The input for the Merkle tree calculation is a collection of binary values.
- For each entry, calculate a leaf hash:
SHA256(0x00 || entry), with||denoting string concatenation. - Sort the leaf hashes lexicographically in ascending order. This is the base level of a binary tree.
- For each level of the tree, build the next level by taking a pair of entries from the
left and calculating an internal hash:
a. Set
minto the smaller of the two entries, andmaxto the larger one. b. The internal hash isSHA256(0x01 || min || max). - If there is a left-over odd entry, append it to the end of the next level.
- Continue until there is only one entry left. This is the root hash.
For each leaf, its proof is a sequence of neighbor hashes going up the tree. One way to keep track of the proof is, whenever constructing an internal node, add the right hash to the left child's proof list and vice versa.
A reference implementation is provided.
Data sources
External Ethereum definitions are generated based on data from external APIs and repositories:
- CoinGecko for most of the info about networks and tokens
- defillama to pair as much networks as we can to CoinGecko ID
- Ethereum Lists - chains as the only source of EVM-based networks
- Ethereum Lists - tokens as another source of tokens
Trezor Storage
The storage folder contains the implementation of Trezor's internal storage, which is common for both Legacy (Trezor One) and Core (Trezor T and later models). This README also contains a detailed description of the cryptographic design.
Due to differences of the underlying hardware, the storage uses two different format of stored data, referenced further as Bitwise and Blockwise
All tests are located in the tests subdirectory, which also includes a Python implementation to run tests against this C production version and the Python one.
Norcow data format
Bitwise flash
All items are stored with single format:
| Data | KEY | APP | LEN | DATA |
|---|---|---|---|---|
| Length (bytes) | 1 | 1 | 2 | LEN |
If any item is overwritten or deleted, the old entry is erased, i.e., DATA, APP, KEY are set to 0. LEN is kept for purposes of finding next item.
Blockwise flash (16 byte blocks)
For optimization, we use two different formats for items, small items with up to 12 bytes of data, and larger items.
Small items have the following format:
| Data | KEY | APP | LEN | DATA | PADDING |
|---|---|---|---|---|---|
| Length (bytes) | 1 | 1 | 2 | LEN | 12 - LEN |
If any item is overwritten or deleted, the old entry is erased, i.e., DATA, APP, KEY and LEN are set to 0. When finding next item, we assume that zero LEN items means small item with 12 bytes of data.
Larger items have the following format:
| Data | KEY | APP | LEN | PADDING | DATA | VALID FLAG | PADDING |
|---|---|---|---|---|---|---|---|
| Length (bytes) | 1 | 1 | 2 | 12 | LEN | 1 | to 16 bytes |
If any item is overwritten or deleted, the old entry is erased, i.e., DATA, are set to 0. LEN is kept for purposes of finding next item, and with it KEY and APP has to be kept too. To recognize data as deleted, the VALID FLAG is set to 0.
Storage format
Entries fall into three categories:
| Category | Condition | Read | Write |
|---|---|---|---|
| Private | APP = 0 | Never | Never |
| Protected | 1 ≤ APP ≤ 127 | Only when unlocked | Only when unlocked |
| Public | 128 ≤ APP ≤ 191 | Always | Only when unlocked |
| Writable | 192 ≤ APP ≤ 255 | Always | Always |
The format of public and writable entries is trivial:
| Data | DATA |
|---|---|
| Length (bytes) | LEN |
Private values are used to store storage-specific information and cannot be directly accessed through the storage interface. Protected entries have the following format:
| Data | IV | ENCRDATA | TAG |
|---|---|---|---|
| Length (bytes) | 12 | LEN - 28 | 16 |
The random salt (32 bits), EDEK (256 bits), ESAK (128 bits) and PVC (64 bits) is stored in a single entry under APP=0, KEY=2:
| Data | SALT | EDEK | ESAK | PVC |
|---|---|---|---|---|
| Length (bytes) | 4 | 32 | 16 | 8 |
The storage authentication tag (128 bits) is stored in a single entry under APP=0, KEY=5:
| Data | TAG |
|---|---|
| Length (bytes) | 16 |
Storage entries are stored as items in norcow flash. The format of the items is described in the section above.
PIN
The PIN is not stored in the flash storage. An entry is added to the flash storage consisting of a 256-bit encrypted data encryption key (EDEK) followed by a 128-bit encrypted storage authentication key (ESAK) and a 64-bit PIN verification code (PVC). The PIN is used to decrypt the EDEK and ESAK and the PVC is used to verify that the correct PIN was used. The resulting data encryption key (DEK) is then used to encrypt/decrypt protected entries in the flash storage. We use Chacha20Poly1305 as defined in RFC 7539 to encrypt the EDEK and the protected entries. The storage authentication key (SAK) is used to authenticate the list of (APP, KEY) values for all protected entries that have been set in the storage. This prevents an attacker from erasing or adding entries to the storage.
PIN verification and decryption of protected entries in flash storage
-
From the flash storage read the entry containing the random salt, EDEK and PVC.
-
Gather constant data from various system resources such as the ProcessorID (aka Unique device ID) and any hardware serial numbers that are available. The concatenation of this data with the random salt will be referred to as salt.
-
Prompt the user to enter the PIN and compute:
PBKDF2(PRF = HMAC-SHA256, Password = pin, Salt = salt, iterations = 10000, dkLen = 352 bits)The first 256 bits of the output will be used as the key encryption key (KEK) and the remaining 96 bits will be used as the key encryption initialization vector (KEIV).
Note: Since two blocks of output need to be produced in PBKDF2 the total number of iterations is 20000.
-
Compute:
(dek, tag) = ChaCha20Poly1305Decrypt(kek, keiv, edek) -
Compare the PVC read from the flash storage with the first 64 bits of the computed tag value. If there is a mismatch, then fail. Otherwise store the DEK in a global variable.
-
When a protected entry needs to be decrypted, load the IV, ENCRDATA and TAG of the entry and compute:
(data, tag) = ChaCha20Poly1305Decrypt(dek, iv, (key || app), encrdata)where the APP and KEY of the entry is used as two bytes of associated data. Compare the TAG read from the flash storage with the computed tag value. If there is a mismatch, then fail.

Initializing the EDEK
-
When the storage is initialized, generate the 32 bit random salt and 256 bit DEK using a cryptographically secure random number generator.
-
Set a boolean value in the storage denoting that the PIN has not been set. Use an empty PIN to derive the KEK and KEIV as described above.
-
Encrypt the DEK using the derived KEK and KEIV:
(edek, tag) = ChaCha20Poly1305Encrypt(kek, keiv, dek) -
Store the random salt, EDEK value and the first 64 bits of the tag as the PVC.
Setting a new PIN
-
If the PIN has already been set, then prompt the user to enter the old PIN value, check the PVC and compute the DEK as described above in steps 1-4.
-
Generate a new 32 bit random salt and prompt the user to enter the new PIN value. Use these values to derive the new KEK and KEIV as described above.
-
Encrypt the DEK using the new KEK and KEIV:
(edek, tag) = ChaCha20Poly1305Encrypt(kek, keiv, dek) -
Store the new EDEK value and the first 64 bits of the tag as the new PVC. This operation should be atomic, i.e. either both values should be stored or neither. Overwrite the old values of the EDEK and PVC with zeros.
Encryption of protected entries in flash storage
Whenever the value of an entry needs to be updated, a fresh IV is generated using a cryptographically secure random number generator and the data is encrypted as (encrdata, tag) = ChaCha20Poly1305Encrypt(dek, iv, (key || app), data).
Storage authentication
The storage authentication key (SAK) will be used to generate a storage authentication tag (SAT) for the list of all (APP, KEY) values of protected entries (1 ≤ APP ≤ 127) that have been set in the storage. The SAT will be checked during every get operation. When a new protected entry is added to the storage or when a protected entry is deleted from the storage, the value of the SAT will be updated. The value of the SAT is defined as the first 16 bytes of
HMAC-SHA-256(SAK, ⨁_i HMAC-SHA-256(SAK, KEY_i || APP_i))
where ⨁ denotes the n-ary bitwise XOR operation and KEYi || APPi is a two-byte encoding of the value of the i-th (APP, KEY) such that 1 ≤ APP ≤ 127.
Design rationale
-
The purpose of the PBKDF2 function is to thwart brute-force attacks in case the attacker is able to circumvent the PIN entry counter mechanism but does not have full access to the contents of the flash storage of the device, e.g. fault injection attacks. For an attacker that would be able to read the flash storage and obtain the salt, the PBKDF2 with 20000 iterations and a 4- to 9-digit PIN would not pose an obstacle.
-
The reason why we use a separate data encryption key rather than using the output of PBKDF2 directly to encrypt the sensitive entries is so that when the user decides to change their PIN, only the EDEK needs to be reencrypted, but the remaining entries do not need to be updated.
-
We use ChaCha20 for encryption, because as a stream cipher it has no padding overhead and its implementation is readily available in trezor-crypto. A possible alternative to using ChaCha20Poly1305 for DEK encryption is to use AES-CTR with HMAC in an encrypt-then-MAC scheme. A possible alternative to using ChaCha20 for encryption of other data entries is to use AES-XTS (XEX-based tweaked-codebook mode with ciphertext stealing), which was designed specifically for disk-encryption. The APP || KEY value would be used as the tweak.
- Advantages of AES-XTS:
- Does not require an initialization vector.
- Ensures better diffusion than a stream cipher, which eliminates the above concerns about malleability and fault injection attacks.
- Disadvantages of AES-XTS:
- Not implemented in trezor-crypto.
- Requires two keys of length at least 128 bits.
- Advantages of AES-XTS:
-
The 64 bit PVC means that there is less than a 1 in 1019 chance that a wrong PIN will happen to have the same PVC as the correct PIN. The existence of false PINs does not pose a security weakness since a false PIN cannot be used to decrypt the protected entries.
-
Instead of using separate IVs for each entry we considered using a single IV for the entire sector. Upon sector compaction a new IV would have to be generated and the encrypted data would have to be reencrypted under the new IV. A possible issue with this approach is that compaction cannot happen without the DEK, i.e. generally data could not be written to the flash storage without knowing the PIN. This property might not always be desirable.
PIN entry counter protection
Bitwise flash
The former implementation of the PIN entry counter was vulnerable to fault injection attacks.
Under the former implementation the PIN counter storage entry consisted of 32 words initialized to 0xFFFFFFFF. The first non-zero word in this area was the current PIN failure counter. Before verifying the PIN the lowest bit with value 1 was set to 0, i.e. a value of FFFFFFFC indicated two PIN entries. Upon successful PIN entry, the word was set to 0x00000000, indicating that the next word was the PIN failure counter. Allegedly, by manipulating the voltage on the USB input an attacker could convince the device to read the PIN entry counter as 0xFFFFFFFF even if some of the bits had been set to 0.
Design goals
- Make it easy to decrement the counter by changing a 1 bit to 0.
- Make it hard to reset the counter by a fault injection, i.e. counter values should not have an overly simple binary representation like 0xFFFFFFFF.
- If possible, use two or more different methods of checking the counter value so that an attacker has to mount different fault injection attacks to succeed.
- Optimize the format for successful PIN entry.
- Minimize the number of branching operations. Avoid loops, instead utilize bitwise and arithmetic operations when processing the PIN counter data.
Proposal summary
Under the former implementation, for every unsuccessful PIN entry we discarded one bit from the counter, while for every successful PIN entry we discard an entire word. In the new implementation we optimize the counter operations for successful PIN entry.
The basic idea is that there are two binary logs stored in the flash storage, e.g.:
...0001111111111111... pin_success_log
...0000001111111111... pin_entry_log
Before every PIN verification the highest 1-bit in the pin_entry_log is set to 0. If the verification succeeds, then the corresponding bit in the pin_success_log is also set to 0. The example above shows the status of the logs when the last three PIN entries were not successful.
In actual fact the logs are not written to the flash storage exactly as shown above, but they are stored in a form that should protect them against fault injection attacks. Only half of the stored bits carry information, the other half acts as "guard bits". So a stored value ...001110... could look like ...0g0gg1g11g0g..., where g denotes a guard bit. The positions and the values of the guard bits are determined by a guard key. The guard_key is a randomly generated uint32 value stored as an entry in the flash memory in cleartext. The assumption behind this is that an attacker attempting to reset or decrement the PIN counter by a fault injection is not able to read the flash storage. However, the value of guard_key also needs to be protected against fault injection, so the set of valid guard_key values should be limited by some condition which is easy to verify, such as guard_key mod M == C, where M and C a suitably chosen constants. The constants should be chosen so that the binary representation of any valid guard_key value has Hamming weight between 8 and 24. These conditions are discussed below.
Storage format
The PIN log has APP = 0 and KEY = 1. The DATA part of the entry consists of 33 words (132 bytes, assuming 32-bit words):
guard_key(1 word)pin_success_log(16 words)pin_entry_log(16 words)
Each log is stored in big-endian word order. The byte order of each word is platform dependent.
Guard key validation
The guard_key is said to be valid if the following three conditions hold true:
- Each byte of the binary representation of the
guard_keyhas a balanced number of zeros and ones at the positions corresponding to the guard values (that is those bits in the mask 0xAAAAAAAA). - The
guard_keybinary representation does not contain a run of 5 (or more) zeros or ones. - The
guard_keyinteger representation is congruent to 15 modulo 6311.
Key validity can be checked with this function:
int key_validity(uint32_t guard_key)
{
  uint32_t count = (guard_key & 0x22222222) + ((guard_key >> 2) & 0x22222222);
  count = count + (count >> 4);

  uint32_t zero_runs = ~guard_key;
  zero_runs = zero_runs & (zero_runs >> 2);
  zero_runs = zero_runs & (zero_runs >> 1);
  zero_runs = zero_runs & (zero_runs >> 1);
  uint32_t one_runs = guard_key;
  one_runs = one_runs & (one_runs >> 2);
  one_runs = one_runs & (one_runs >> 1);
  one_runs = one_runs & (one_runs >> 1);

  return ((count & 0x0e0e0e0e) == 0x04040404) & (one_runs == 0) & (zero_runs == 0) & (guard_key % 6311 == 15);
}
Key generation
The guard_key may be generated in the following way:
- Generate a random integer r in such that 0 ≤ r ≤ 680552 with uniform probability.
- Set r = r * 6311 + 15.
- If key_validity(r) is not true go back to the step 1.
Note that on average steps 1 to 3 are repeated about one hundred times.
Key expansion
The guard_key is read from storage, its value is checked for validity and used to compute the guard_mask (indicating the positions of the guard bits) and guard value (indicating the values of the guard bits on their actual positions):
LOW_MASK = 0x55555555
guard_mask = ((guard_key & LOW_MASK) << 1) |
             ((~guard_key) & LOW_MASK)
guard = (((guard_key & LOW_MASK) << 1) & guard_key) |
        (((~guard_key) & LOW_MASK) & (guard_key >> 1))
Explanation:
The guard_key contains two pieces of information. The position of the guard bits but also their corresponding values. The bitwise format of the guard_key is vpvpvp...vp. The bits labelled p indicate the position of each guard bit and the bits labelled v indicate its value.
The guard_mask is derived from the guard_key and has the form xyxyxy...xy where x+y = 1 (in other words, there is exactly one 1 bit in each pair xy). First, we set the x bits:
(guard_key & LOW_MASK) << 1
and the y bits to its corresponding complement:
(~guard_key) & LOW_MASK
That ensures that only one 1 bit is present in each pair xy. The guard value is equal to the bits labelled v in the guard_key but only at the positions indicated by the guard_mask. The guard value is therefore equal to:
        -------- x bits mask --------- & -- guard_key --
guard = (((guard_key & LOW_MASK) << 1) & guard_key) |
        ----- y bits mask ---- & - guard_key shifted to v bits
        (((~guard_key) & LOW_MASK) & (guard_key >> 1))
Log initialization
Each log is stored as 16 consecutive words each initialized to:
guard | ~guard_mask
Removing and adding guard bits
After reading a word from the flash storage we verify the format by checking the condition:
(word & guard_mask) == guard
and then remove the guard bits as follows:
word = word & ~guard_mask
word = ((word  >> 1) | word ) & LOW_MASK
word = word | (word << 1)
This operation replaces each guard bit with the value of its neighbouring bit, e.g. …0g0gg1g11g0g… is converted to …000011111100… Thus each non-guard bit is duplicated.
The guard bits can be added back as follows:
word = (word & ~guard_mask) | guard
Determining the number of PIN failures
Remove the guard bits from the words of the pin_entry_log using the operations described above and verify that the result has form 0*1* by checking the condition:
word & (word + 1) == 0
Then verify that the pin_entry_log and pin_success_log are in sync by checking the condition:
pin_entry_log & pin_success_log == pin_entry_log
Finally, determine the current number of PIN failures by counting the number of set bits in the evaluation of the following expression:
pin_success_log xor pin_entry_log
Note that the number of set bits in a word can be counted using bitwise and arithmetic operations. For a 32-bit word the following can be used:
count = word - ((word >> 1) & 0x55555555)
count = (count & 0x33333333) + ((count >> 2) & 0x33333333)
count = (count + (count >> 4)) & 0x0F0F0F0F
count = count + (count >> 8)
count = (count + (count >> 16)) & 0x3F
Blockwise flash
For blockwise flash, the PIN counter protection was significantly simplified. This is fine because models with this type of flash use secure element for additional protection. The flash is also ECC protected, so fault injection attacks are harder.
Design goals
- Fit one block to not waste too much space when counting PIN failures.
- Provide a simple way to check the PIN counter value.
- Make it reasonably hard to reset the counter by a fault injection.
- Significantly reduce the code complexity.
Format
The counter is 8 bit value, stored in such a way that every 1 bit is expanded to 01 and every 0 bit is expanded to 10. The resulting 16 bit value is written into the flash block as many times as needed to fill the block.
Expanding the counter
The counter is expanded by the following procedure:
c = ((c << 4) | c) & 0x0f0f;
c = ((c << 2) | c) & 0x3333;
c = ((c << 1) | c) & 0x5555;
c = ((c << 1) | c) ^ 0xaaaa;
Compressing the counter
The counter is compressed by the following procedure:
c = c & 0x5555;
c = ((c >> 1) | c) & 0x3333;
c = ((c >> 2) | c) & 0x0f0f;
c = ((c >> 4) | c) & 0x00ff;
Checking the counter
The counter format is checked by the following operation:
((c ^ (c << 1)) & 0xAAAA != 0xAAAA)
Tests
Burn tests
These tests are doing a simple read/write operations on the device to see if the hardware can endure high number of flash writes. Meant to be run on the device directly for a long period of time.
Device tests
Device tests are integration tests that can be run against either emulator or on an actual device. You are responsible to provide either an emulator or a device with Debug mode present.
Device tests
The original version of device tests. These tests can be run against both Model One and Model T.
See device-tests.md for instructions how to run it.
UI tests
UI tests use device tests and take screenshots of every screen change and compare them against fixtures.
See ui-tests.md for more info.
Click tests
Click tests are a next-generation of the Device tests. The tests are quite similar, but they are capable of imitating user's interaction with the screen.
Fido tests
Implement U2F/FIDO2 tests.
Upgrade tests
These tests test upgrade from one firmware version to another. They initialize an emulator on some specific version and then pass its storage to another version to see if the firmware operates as expected. They use fixtures from https://data.trezor.io/dev/firmware/releases/emulators-new/ which can be downloaded using the download_emulators.sh script.
See the upgrade-tests.md for instructions how to run it.
Persistence tests
These tests test the Persistence mode, which is currently used in the device recovery. These tests launch the emulator themselves and they are capable of restarting or stopping it simulating user's plugging in or plugging out the device.
Running device tests
1. Running the full test suite
Note: You need Uv, as mentioned in the core's documentation section.
In the trezor-firmware checkout, in the root of the monorepo, install the environment:
uv sync
And run the automated tests:
uv run make -C core test_emu
2. Running tests manually
Install the uv environment as outlined above. Then activate the environment:
source .venv/bin/activate
If you want to test against the emulator, run it in a separate terminal:
./core/emu.py
Now you can run the test suite with pytest from the root directory:
pytest tests/device_tests
Useful Tips
The tests are randomized using the pytest-random-order plugin. The random seed is printed in the header of the tests output, in case you need to run the tests in the same order.
If you only want to run a particular test, pick it with -k <keyword> or -m <marker>:
pytest -k nem      # only runs tests that have "nem" in the name
pytest -k "nem or stellar"  # only runs tests that have "nem" or "stellar" in the name
pytest -m stellar  # only runs tests marked with @pytest.mark.stellar
If you want to see debugging information and protocol dumps, run with -v.
Print statements from testing files are not shown by default. To enable them, use -s flag.
If you would like to interact with the device (i.e. press the buttons yourself), just prefix pytest with INTERACT=1:
INTERACT=1 pytest tests/device_tests
When testing transaction signing, there is an option to check transaction hashes on-chain using Blockbook. It is chosen by setting CHECK_ON_CHAIN=1 environment variable before running the tests.
CHECK_ON_CHAIN=1 pytest tests/device_tests
To run the tests quicker, spawn the emulator with disabled animations using -a flag.
./core/emu.py -a
To run the tests even quicker, the emulator should come from a frozen build. (However, then changes to python code files are not reflected in emulator, one needs to build it again each time.)
PYOPT=0 make build_unix_frozen
It is possible to specify the timeout for each test in seconds, using PYTEST_TIMEOUT env variable.
PYTEST_TIMEOUT=15 pytest tests/device_tests
When running tests from Makefile target, it is possible to specify TESTOPTS env variable with testing options, as if pytest would be called normally.
TESTOPTS="-x -v -k test_msg_backup_device.py" make test_emu
When troubleshooting an unstable test that is failing occasionally, following runs it until it fails (so failure is visible on screen):
export TESTOPTS="-x -v -k test_msg_backup_device.py"
while make test_emu; do sleep 1; done
3. Using markers
When you're developing a new currency, you should mark all tests that belong to that currency. For example, if your currency is called NewCoin, your device tests should have the following marker:
@pytest.mark.newcoin
This marker must be registered in REGISTERED_MARKERS file in tests folder.
Tests can be run only for specific models. The marker @pytest.mark.models() can be
used to narrow the selection:
@pytest.mark.models("t3b1", "t2t1)- only for Safe 3 rev2 and Trezor T@pytest.mark.models("core")- only for trezor-core models (skip Trezor One)@pytest.mark.models(skip="t3t1")- for all models except Safe 5@pytest.mark.models("core", skip="t3t1")- for all trezor-core models except Safe 5
Arguments can be a list of internal model names, or one of the following shortcuts:
core- all trezor-core modelslegacy- just Trezor Onesafe- Trezor Safe familysafe3- Trezor Safe 3 (covers T2B1 and T2T1)delizia- covers thedeliziaUI (currently T3T1 only)eckhart- covers theeckhartUI (currently T3W1 only)
You can specify a list as positional arguments, and exclude from it via skip keyword argument.
You can provide a list of strings, a list of TrezorModel instances, or a
comma-separated string of model names or shortcuts.
You can specify a skip reason as reason="TODO implement for Delizia too".
Extended testing and debugging
Building for debugging (Emulator only)
Build the debuggable unix binary so you can attach the gdb or lldb. This removes optimizations and reduces address space randomizaiton.
make build_unix_debug
The final executable is significantly slower due to ASAN(Address Sanitizer) integration. If you want to catch some memory errors use this.
time ASAN_OPTIONS=verbosity=1:detect_invalid_pointer_pairs=1:strict_init_order=true:strict_string_checks=true TREZOR_PROFILE="" uv run make test_emu
Coverage (Emulator only)
Get the Python code coverage report.
If you want to get HTML/console summary output you need to install the coverage.py tool.
pip3 install coverage
Run the tests with coverage output.
make build_unix && make coverage
GC leak check (both Emulator and Hardware)
DebugLink interface supports polling the device for its current GC-related information.
On every test setup/teardown, we check for whether the free memory has decreased (indicating that the GC didn't free all allocated heap memory).
By default, the test will fail if a leak is detected. In order to issue a warning instead, use --ignore-gc-leak CLI flag.
Running Upgrade Tests
- As always, use
nix-shell+uvenvironment:
nix-shell
uv sync
source .venv/bin/activate
- Download the emulators for the models you want to test, if you have not already:
tests/download_emulators.sh {model}
For tropic-capable models, this also downloads tropic-enabled emulator variants into the same subfolder layout as on S3.
- Build the emulator for the model you want to test, use
DISABLE_TROPIC=0for tropic-enabled models:
make -C core build_unix TREZOR_MODEL=T2T1
make -C core build_unix TREZOR_MODEL=T3W1 DISABLE_TROPIC=0
- And run the tests using pytest:
pytest tests/upgrade_tests
You can use TREZOR_UPGRADE_TEST to limit the run to specific models.
Accepted values are model internal names (T1B1, T2T1, T3W1), and they can be combined as a comma-separated list.
TREZOR_UPGRADE_TEST="T2T1" pytest tests/upgrade_tests
TREZOR_UPGRADE_TEST="T3W1" pytest tests/upgrade_tests
TREZOR_UPGRADE_TEST="T1B1,T3W1" pytest tests/upgrade_tests
If TREZOR_UPGRADE_TEST is not set, this command auto-selects targets based on locally available emulator builds.
T1B1 (legacy) runs when the local legacy emulator is available, and T2T1/T3W1 (core) runs when the local core emulator is available.
For local core builds, the suite detects the model from the build tree; if it cannot be determined, the run fails explicitly and you should set TREZOR_UPGRADE_TEST yourself.
Running UI tests
1. Running the full test suite
Note: You need Uv, as mentioned in the core's documentation section.
In the trezor-firmware checkout, in the root of the monorepo, install the environment:
uv sync
And run the tests:
uv run make -C core test_emu_ui
2. Running tests manually
Install the uv environment as outlined above. Then activate the environment:
source .venv/bin/activate
If you want to test against the emulator, run it with disabled animation in a separate terminal:
./core/emu.py -a
Now you can run the test suite with pytest from the root directory:
pytest tests/device_tests --ui=test
If you wish to check that all test cases in fixtures.json were used set the --ui-check-missing flag. Of course this is meaningful only if you run the tests on the whole device_tests folder.
pytest tests/device_tests --ui=test --ui-check-missing
Updating Fixtures ("Recording")
Short version:
uv run make -C core test_emu_ui_record
Long version:
The --ui pytest argument has two options:
- record: Create screenshots and calculate theirs hash for each test. The screenshots are gitignored, but the hash is included in git.
- test: Create screenshots, calculate theirs hash and test the hash against the one stored in git.
If you want to make a change in the UI you simply run --ui=record. An easy way
to proceed is to run --ui=test at first, see what tests fail (see the Reports section below),
decide if those changes are the ones you expected and then finally run the --ui=record
and commit the new hashes.
Also here we provide an option to check the fixtures.json file. Use --ui-check-missing flag again to make sure there are no extra fixtures in the file:
pytest tests/device_tests --ui=record --ui-check-missing
Reports
Tests
Each --ui=test creates a clear report which tests passed and which failed.
The index file is stored in tests/ui_tests/reports/test/index.html.
The script tests/show_results.py starts a local HTTP server that serves this page --
this is necessary for access to browser local storage, which enables a simple reviewer
UI.
On CI this report is published as an artifact.
If needed, you can use python3 -m tests.ui_tests to regenerate the report from local
recorded screens.
Master diff
In the ui tests folder you will also find a Python script report_master_diff.py, which
creates a report where you find which tests were altered, added, or removed relative to
master. This useful for Pull Requests.
This report is available as an artifact on CI as well. You can find it by
visiting the "unix ui changes" job in your pipeline - browse the
artifacts and open master_diff/index.html.
Click Tests
This set of tests is intended for cases where USB communication must be decoupled from
the input stream. They are mainly based on sending simulated clicks and reading screen
contents. Unlike device tests that use the client fixture, click tests generally
use the device_handler fixture. TODO fixture documentation, the important point is
that device_handler runs trezorlib calls in the background and leaves the main
thread free to interact with the device from the user's perspective.
Running the full test suite
Note: You need uv, as mentioned in the core's documentation section.
In the trezor-firmware checkout, in the root of the monorepo, install the environment:
uv sync
Activate the uv environment:
source .venv/bin/activate
If you want to test against the emulator, run it in a separate terminal:
./core/emu.py
Now you can run the test suite with pytest from the root directory:
pytest tests/click_tests
Click test recorder
The repository now includes a tool for automatically generating testcases from user interaction. The resulting test cases must still be tweaked manually, but they can provide a solid starting point for a complex interaction pattern.
Caveat: The testcase recorder is in alpha-stage, both in terms of functionality and code quality. Your mileage may vary.
Run the tool with:
python tests/click_tests/record_layout.py
The tool accepts the same arguments as trezorctl. For example, to record yourself
getting an address, use:
python tests/click_tests/record_layout.py btc get-address -n m/44h/0h/0h/0/0 -d
Instead of clicking buttons on the emulator, type commands in the terminal that ran the tool. A list of possible button clicks will be shown in your terminal. These will be sent to the emulator over debuglink.
(Note that if a particular click does not react through the tool, there is a good chance that it won't work in the testcase either. Please file an issue.)
After the session is over (when you type stop), the tool will collect all layout
changes and output a testcase in pytest format. Copy-paste that into your test file
and tweak as appropriate.
Assorted knowledge
This file serves as a dumping ground for important knowledge tidbits that do not clearly fit in any particular location. Please add any information that you think should be written down.
At any time, information stored here might be restructured or moved to a different location, so as to ensure that the documentation is well structured overall.
List of third parties
That need to be notified when a protocol breaking change occurs.
Using trezorlib:
This usually requires some code changes in the affected software.
- Electrum https://github.com/spesmilo/electrum
- HWI https://github.com/bitcoin-core/HWI
- Trezor Agent https://github.com/romanz/trezor-agent
- Shadowlands https://github.com/kayagoban/shadowlands
Using HWI
Updating HWI to the latest version should be enough.
- BTCPay https://github.com/btcpayserver/btcpayserver
- Wasabi https://github.com/zkSNACKs/WalletWasabi
Using no Trezor libraries
- Sparrow Wallet https://github.com/sparrowwallet/sparrow
- Monero https://github.com/monero-project/monero
- Mycelium Android https://github.com/mycelium-com/wallet-android
- Mycelium iOS https://github.com/mycelium-com/wallet-ios
- Blockstream Green Android https://github.com/Blockstream/green_android
- Blockstream Green iOS https://github.com/Blockstream/green_ios
Using Connect:
See https://github.com/trezor/connect/network/dependents for a full list of projects depending on Connect.
Connect dependencies introduction
Javascript projects that have Connect as a dependency are using the Connect NPM package on version specified in their yarn.lock (or similar). This NPM package is not a complete Connect library, it is a simple layer that deals with opening an iframe and loading the newest Connect from connect.trezor.io.
Such project must have the newest MAJOR version of this NPM package (v8 at the moment). But then the main logic library (dealing with devices etc.) is fetched from connect.trezor.io and is therefore under our control and can be updated easily.
So in a nutshell:
- If there is a new MAJOR version of Connect we indeed want to notify these parties below.
- In other cases we do not, we just need to deploy updated Connect before releasing firmwares.
Notable third-parties
- Trezor Password Manager https://github.com/trezor/trezor-password-manager
- Exodus (closed source)
- MagnumWallet (closed source)
- CoinMate (closed source)
- MyEtherWallet https://github.com/MyEtherWallet/MyEtherWallet
- MyCrypto https://github.com/MyCryptoHQ/MyCrypto
- MetaMask https://github.com/MetaMask/metamask-extension
- SimpleStaking https://github.com/simplestaking/wallet
- AdaLite https://github.com/vacuumlabs/adalite
- Stellarterm https://github.com/stellarterm/stellarterm
- frame https://github.com/floating/frame
- web3-react https://github.com/NoahZinsmeister/web3-react
- KyberSwap https://github.com/KyberNetwork/KyberSwap
- Balance Manager https://github.com/balance-io/balance-manager
- www.coinpayments.net
- www.bancor.network
- dubiex.com
- www.coinmap.org
- mydashwallet.org
- app.totle.com
- manager.balance.io
- faa.st
- beta.shapeshift.com
Changelog
Our releases are accompanied by changelogs based on the Keep a Changelog format. We are using the towncrier utility to generate them at the time a new version is released. There are currently 8 such changelogs for different components of the repository:
core/CHANGELOG.mdfor Trezor T firmwarecore/embed/projects/boardloader/CHANGELOG.mdfor Trezor T boardloadercore/embed/projects/bootloader/CHANGELOG.mdfor Trezor T bootloadercore/embed/projects/bootloader_ci/CHANGELOG.mdfor Trezor T CI bootloaderlegacy/firmware/CHANGELOG.mdfor Trezor 1 firmwarelegacy/bootloader/CHANGELOG.mdfor Trezor 1 bootloaderlegacy/intermediate_fw/CHANGELOG.mdfor Trezor 1 intermediate firmwarepython/CHANGELOG.mdfor Python client library
Adding changelog entry
towncrier aims to create changelogs
that are convenient to read, at the expense of being somewhat inconvenient to
create.
Furthermore every changelog entry should be linked to a GitHub issue or pull
request number. If you don't want to create an issue just to satisfy this rule
you can use self-reference to your change's pull request number by first
creating the PR and then adding the entry. If this is not suitable, the word
noissue can be used in place of the issue number.
There are a few types of changelog entries, as described by the Keep a Changelog format:
addedchangeddeprecatedremovedfixedsecurityincompatible(for backwards incompatible changes)
Entries are added by creating files in the .changelog.d directory where the
file name is <number>.<type> and contains single line describing the change,
ending with a period.
As an example, an entry describing bug fix for issue 1234 in Trezor T firmware
is added by creating file core/.changelog.d/1234.fixed. The file can be
formatted with markdown. If more entries are desired for single issue number and
type you can add numeral suffix, e.g. 1234.fixed.1, 1234.fixed.2, etc.
You can also add this entry using your $VISUAL editor by running towncrier create --edit 1234.fixed in the core directory.
Changes that only affect a subset of hardware models
If an entry is only relevant for certain model, put the internal name in square
brackets at the beginning of the entry. If there are multiple relevant models,
separate them by comas. Examples: [T2T1] Fix some bug., [T2T1,T2W1] Fix all bugs..
Not adding changelog entry
If you don't add an entry for changes in your branch, the changelog prebuild
CI job will remind you by failing. Sometimes adding an entry does not really make
sense, in that case you can include [no changelog] anywhere in the commit
message to exclude that commit from the check.
Generating changelog at the time of release
When it's time to release new version of a repository component the formatted
changelog needs to be generated using the tools/changelog.py generate command.
It accepts repo subdirectory and the version number as arguments and you can
specify the release date if it's different from today's date:
tools/changelog.py generate --date "20th April 2021" legacy/firmware 1.10.0
Cherry-picking changes to release branch
Branches named release/YY.MM already have their corresponding CHANGELOG.md
section generated. When cherry-picking bug fix to such branch you need to
bypass towncrier and edit CHANGELOG.md directly.
BIP-44 derivation paths
Each coin uses BIP-44 derivation path scheme. If the coin is UTXO-based the path
should have all five parts, precisely as defined in BIP-32. If it is account-based we
follow Stellar's SEP-0005 - paths have only three parts 44'/c'/a'. Unfortunately,
lot of exceptions occur due to compatibility reasons.
Keys are derived according to SLIP-10, which is a superset of the BIP-32 derivation algorithm, extended to work on other curves.
List of used derivation paths
| coin | curve | path | public node | note |
|---|---|---|---|---|
| Bitcoin | secp256k1 | 44'/c'/a'/y/i | yes | 1 |
| Ethereum | secp256k1 | 44'/c'/0'/0/a | yes | 2 |
| Ethereum | secp256k1 | 44'/c'/0'/a | yes | 2 |
| Ripple | secp256k1 | 44'/144'/a'/0/0 | 3 | |
| EOS | secp256k1 | 44'/194'/a'/0/0 | 3 | |
| Tron | secp256k1 | TODO | TODO | |
| Ontology | nist256p1 | TODO | TODO | |
| Cardano | ed25519 | 44'/1815'/a'/y/i | yes | 4 |
| Stellar | ed25519 | 44'/148'/a' | ||
| NEM | ed25519 | 44'/43'/a' | 5 | |
| Monero | ed25519 | 44'/128'/a' | ||
| Tezos | ed25519 | 44'/1729'/a' | 6 |
c stands for the SLIP-44 id of the currency, when multiple currencies are handled
by the same code. a is an account number, y is change address indicator (must be
0 or 1), and i is address index.
Paths that do not conform to this table are allowed, but user needs to confirm a warning on Trezor.
Public nodes
Some currencies allow exporting a public node, which lets the client derive all non-hardened paths below it. In that case, the conforming path is equal to the hardened prefix.
I.e., for Bitcoin's path 44'/c'/a'/y/i, the allowed public node path is 44'/c'/a'.
Trezor does not check if the path is followed by other non-hardened items (anyone can
derive those anyway). This is beneficial for Ethereum and its MEW compatibility, which
sends 44'/60'/0'/0 for getPublicKey.
Notes
-
For Bitcoin and its derivatives it is a little bit more complicated.
pis decided based on the following table:p type input script type 44 legacy SPENDADDRESS 48 legacy multisig SPENDMULTISIG 49 p2sh segwit SPENDP2SHWITNESS 84 native segwit SPENDWITNESS Other
pare disallowed. -
We believe this should be
44'/c'/a', because Ethereum is account-based, rather than UTXO-based. Unfortunately, lot of Ethereum tools (MEW, Metamask) do not use such scheme and seta = 0and then iterate the address indexi. Therefore for compatibility reasons we use the same scheme. Also to support "Ledger Live" legacy paths we allow44'/60'/0'/apaths. -
Similar to Ethereum this should be
44'/c'/a'. But for compatibility with other HW vendors we use44'/c'/a'/0/0. -
Cardano has CIP-0003 algorithm that allows non-hardened derivation on ed25519.
-
NEM's path should be
44'/43'/a'as per SEP-0005, but we allow44'/43'/a'/0'/0'as well for compatibility reasons with NanoWallet. -
Tezos supports multiple curves, but Trezor currently supports ed25519 only.
Sign message paths are validated in the same way as the sign tx paths are.
Allowed values
For UTXO-based currencies, account number a needs to be in the interval [0, 20]
and address index i in the interval [0, 1 000 000].
For account-based currencies (i.e., those that do not use address indexes), account
number a needs to be in the interval [0, 1 000 000]
Contribute to Trezor Firmware
Please read the general instructions you can find on our wiki.
Your Pull Request should follow these criteria:
- The code is properly tested.
- Tests must pass on CI.
- The code is properly formatted. Use
make style_checkto check the format andmake styleto do the required changes. - The generated files are up-to-date. Use
make genin repository root to make it happen. - Commits must have concise commit messages, we endorse Conventional Commits.
- A changelog entry must be part of the pull request.
Please read and follow our review procedure.
Adding a new coin
Forks and derivatives
If the coin you are adding is a fork of Bitcoin or other cryptocurrency we already support (in other words, new app is not needed) you can modify the definitions in the trezor-firmware repository and file a PR. In such case the coin does not have to be in TOP30 (see below), but we still reserve the right not to include the coin. The location depends on the type of the asset to be added:
- Bitcoin clones should be added to the common/defs/bitcoin subdirectory as separate .json files
- Ethereum networks/chains should be added to the ethereum-lists/chains
- Ethereum tokens should be added to the ethereum-lists/tokens repository
- NEM mosaics should be added to the common/defs/nem/nem_mosaics.json file
Other
At the moment, we do not have the capacity to add new coins that do not fit the aforementioned category. Our current product goal is to unite what we support in firmware and in Trezor Suite and since firmware is way ahead of Suite we want to pause for a bit, implement the remaining coins into Suite and then consider adding new coins. This effectively means that our team will not be accepting any requests to add new cryptocurrencies.
Firmware update and device wipe
This document describes under which circumstances the device gets wiped during a firmware update.
Trezor 1
The device gets wiped:
- If the firmware to be installed is unsigned.
- If the present firmware is unsigned.
- If the firmware to be installed has lower version than the current firmware's fix_version [1].
The device gets wiped on every reboot:
- If the firmware's debug mode is turned on.
Trezor T
In Trezor T this works a bit differently, we have introduced so-called vendors headers. Each firmware has its vendor header and this vendor header is signed by SatoshiLabs. The actual firmware is signed by the vendor header's key. That means that all firmwares are signed by someone to be able to run on Trezor T.
We currently have two vendors:
- SatoshiLabs
- UNSAFE DO NOT USE
As the names suggest, the first one is the official SatoshiLabs vendor header and all
public firmwares are signed with that. The second one is meant for generic audience; if
you build firmware this vendor header is automatically applied and the firmware is signed
with it (see core/tools/headertool.py).
The device gets wiped:
- If the firmware to be installed is from different vendor than the present firmware [2].
- If the firmware to be installed has lower version than the current firmware's fix_version [1].
The device gets wiped on every reboot:
- If the firmware's debug mode is turned on.
[1] Firmware contains a fix_version, which is the lowest version to which that particular firmware can be downgraded without wiping storage. This is typically used in case the internal storage format is changed. For example, in version 2.2.0, we have introduced Wipe Code, which introduced some changes to storage that the older firmwares (e.g. 2.1.8) would not understand. It can also be used to enforce security fixes.
[2] The most common example is if you have a device with the official firmware (SatoshiLabs) and you install the unofficial (UNSIGNED) firmware -> the device gets wiped. Same thing vice versa.
Generated files
Certain files in the repository are auto-generated from other sources, but the generated
content is stored in Git. The command make gen_check, run from CI, ensures that the
generated content matches its sources. The command make gen regenerates all relevant
files.
In general, generated files are not compatible between branches. After rebasing or
merging a different branch, you should immediately run make gen and make sure the
result is committed.
Do not fix merge conflicts in generated files. Instead, run make gen and commit
the result.
The following is a (possibly incomplete) list of files regenerated by make gen:
core/mocks/generated: mock Python stubs for C modules (modtrezor*). Generated from special comments inembed/upymod/modtrezor*.networks.py,tokens.py,coininfo.pyandnem_mosaics.pyin their respective subdirectories ofcore/src/apps. In general, any file matching*.py.makohas a corresponding*.pyfile generated from the Mako template. These files are based on coin data fromcommon/defs.- Protobuf class definitions in
core/src/trezor/messagesandpython/src/trezorlib/messages. Generated fromcommon/protob/*.proto.
Git Hooks
Install
Copy docs/git/hooks/ files to .git/hooks/ to activate them. Run in root:
cp docs/git/hooks/* .git/hooks/
Monorepo notes
Generating
Use the create_monorepo script to regenerate from current master(s).
Structure
This is a result of Git merge of several unrelated histories, each of which is moved to its own subdirectory during the merge.
That means that this is actually all the original repos at the same time. You can check out any historical commit hash, or any historical tag.
All tags from the previous history still exist, and in addition, each has a version
named by its directory. I.e., for trezor-mcu tag v1.6.3, you can also check out
legacy/v1.6.3.
Merging pre-existing branches
Because the repository shares all the histories, merging a branch or PR can be done
with a simple git merge. It's often necessary to add hints to git by specifying a merge strategy - especially when some commits add new files.
Use the following options: -s subtree -X subtree=<destdir>.
Example for your local checkout:
$ git remote add core-local ~/git/trezor-core
$ git fetch core-local
$ git merge core-local/wip -s subtree -X subtree=core
Same options should be used for git rebase of a pre-existing branch.
Sub-repositories
The monorepo has two subdirectories that can be exported to separate repos:
- common exports to https://github.com/trezor/trezor-common
- crypto exports to https://github.com/trezor/trezor-crypto
These exports are managed with git-subrepo tool. To export all commits that touch one of these directories, run the following command:
$ git subrepo push <dirname>
You will need commit access to the respective GitHub repository.
For installation instructions and detailed usage info, refer to the git-subrepo README.
Sketch of further details:
What git-subrepo does under the hood is create and fetch a remote for the export,
check out parent revision and replay all commits since commit using
something along the lines of git filter-branch --subdirectory-filter.
So basically a nicely tuned git-subtree.
This can all be done manually if need be (or if you need more advanced usecases like importing changes from the repo commit-by-commit, because git-subrepo will squash on import). See this nice article for hints.
Review Process
- File a Pull Request (PR) with a number of well-defined clearly described commits. Multiple commits per PR are allowed, but please do not include revert commits, etc. Use rebase.
- Do not use merge (e.g. merge trezor/master into ...). Again, use rebase.
- The general review workflow goes as follows:
- The author creates a PR. They should make sure it passes lints and anything that can be run quickly on their computer. When creating the PR, the author should also add links to any resources which might be helpful to the reviewer, namely the issue that the PR resolves or a design document, if there is one.
- The author assigns a reviewer. In some cases two or more reviewers can be assigned. One reason to do this is if the code under review is security-critical and deserves two pairs of eyes. Another reason is if the PR touches two very distinct areas of the codebase and the author wants a different specialist to review each one. In the latter case the author should clearly state who should review which part.
- The reviewer reviews the PR. In case they find something, they create a comment using the Github review system.
- The author implements the required changes and pushes the new commits. The author should never
force-push during code review. If an earlier commit needs to be fixed, then instead of fixing it and
force-pushing, it should be fixed by adding a so called fixup commit. This can be done by
git commit --fixup [commithash]which creates a new commit with the message "fixup! [orig_message]", where orig_message is the commit message of thecommithashit "fixes". If the fixes are across multiple earlier commits, then they need to be split into multiple fixup commits. - The author informs the reviewer with a simple comment "done" or similar to tell the reviewer their comment was implemented. Bonus points for including a revision of the fixup commit.
- The reviewer reviews the modifications and when they are finally satisfied they resolve the Github comment.
- The reviewer finally approves the PR with the green tick.
- The author runs
git rebase -i [main branch] --autosquashwhich squashes the fixup commits into their respective parents and then force-pushes the rebase branch. - The author makes a final check and merges the PR. If the rebase involved resolving some complicated merge conflicts, then the author may ask the reviewer for a final check. GitHub's Rebase and merge should be used, not Squash and merge.
- The author deletes their branch.
Example
If you find the description too difficult, then here is an example to make it more clear.
Andrew tries to add a number of commits very well structured and with nice and consistent commit messages. These will not be squashed together.
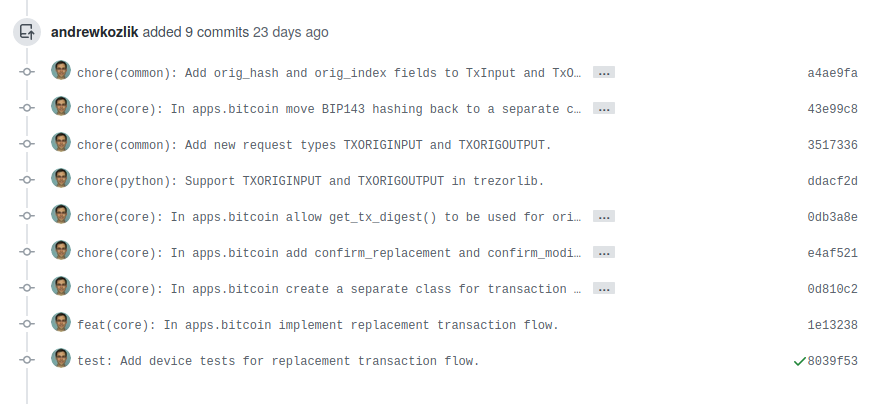
Matějčík starts to review and finds something he would like to improve:
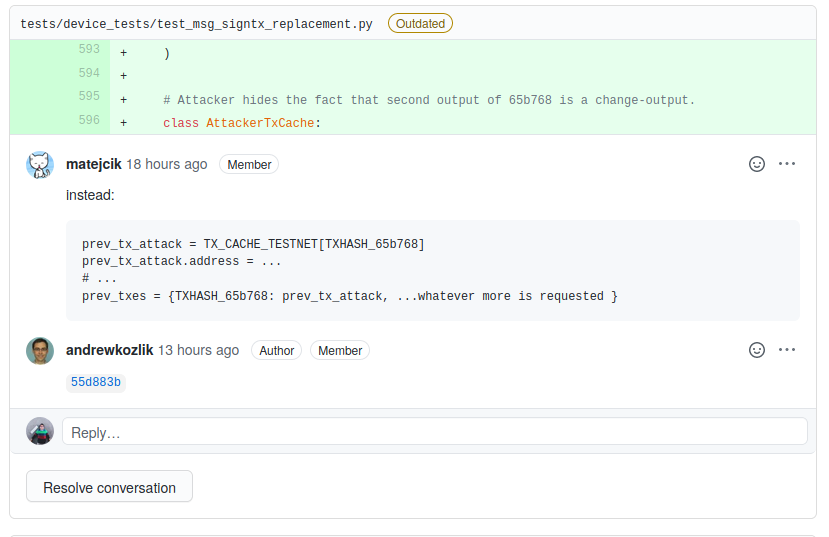
Andrew responds with a commit hash 55d883b informing that he has accepted and implemented the comment.
This commit is a fixup commit. Since it is a new commit he does not have to force-push. In the following image he is fixing the "test: Add device tests..." commit.

This way we can end up with number of fixup commits at the end of the review. Note that there is one commit in the following image that is not a fixup commit. That's totally okay in case it makes sense and the author indeed wants it as a separate commit.
Matějčík is happy and approves the PR. After that Andrew squashes his commits via git rebase -i [main branch] --autosquash. This command will squash the fixup commits into their respective places modifying the original commits. After this he force-pushes. As you can see the history we end up with is very nice.
We merge the PR and that's it!
Notes & Rationale
- If you want to fixup the latest commit, just use
git commit --fixup HEADas written above. If you want to fixup some older commit, usegit commit --fixup [commithash]. Or any other reference for that matter. - More good git rebase tips can be found at this Atlassian website.
- Some rationale why we avoid force pushing during code review, i.e. during the period starting with the creation of the PR until the last approval is given:
- Force pushing often makes it impossible to see the changes made by the author, so the reviewer has to go through the entire PR again. If it's just an amendment, then GitHub can show the differences, but in more complicated situations it's unable to untangle what happened. Especially if you rebase over master, which adds lots of new changes.
- A fixup commit can be easily referenced in the response to the reviewer's comment.
- Force pushing often breaks hyperlinks in GitHub comments, which is a real nuisance when somebody is referencing some code in their comment and you have no clue what they are talking about.
- It has led to code review comments being lost on multiple occasions. This seems to happen especially if you comment on a particular commit.
- What to do if you really need to rebase over master during an ongoing code review? This happens rarely, but if it's really necessary in order to implement the requested revisions, then:
- Try to resolve as many reviewer comments as possible before rebasing.
- Ask the reviewers for approval to go ahead with the rebase, i.e. give them time to confirm that the comments have been well resolved, avoiding as many of the problems mentioned above as possible.
- Rebase, do the stuff you need, force-push for a second round of review.
Trezor Optimized Image Format (TOIF)
All multibyte integer values are little endian!
Header
| offset | length | name | description |
|---|---|---|---|
| 0x0000 | 3 | magic | TOI |
| 0x0003 | 1 | fmt | data format: f or g (see below) |
| 0x0004 | 2 | width | width of the image |
| 0x0006 | 2 | height | height of the image |
| 0x0008 | 4 | datasize | length of the compressed data |
| 0x000A | ? | data | compressed data (see below) |
Format
TOI currently supports 4 variants:
f: full-color big endianF: full-color little endiang: gray-scale odd highG: gray-scale even high
Full-color
For each pixel a 16-bit value is used. First 5 bits are used for red component, next 6 bits are green, final 5 bits are blue:
| 15 | 14 | 13 | 12 | 11 | 10 | 9 | 8 | 7 | 6 | 5 | 4 | 3 | 2 | 1 | 0 |
|---|---|---|---|---|---|---|---|---|---|---|---|---|---|---|---|
| R | R | R | R | R | G | G | G | G | G | G | B | B | B | B | B |
The data is stored according to endianness.
Gray-scale
Each pixel is encoded using a 4-bit value. Each byte contains color of two pixels:
Odd high:
| 7 | 6 | 5 | 4 | 3 | 2 | 1 | 0 |
|---|---|---|---|---|---|---|---|
| Po | Po | Po | Po | Pe | Pe | Pe | Pe |
Even high:
| 7 | 6 | 5 | 4 | 3 | 2 | 1 | 0 |
|---|---|---|---|---|---|---|---|
| Pe | Pe | Pe | Pe | Po | Po | Po | Po |
Where Po is odd pixel and Pe is even pixel.
Compression
Pixel data is compressed using DEFLATE algorithm with 10-bit sliding window and no header. This can be achieved with ZLIB library by using the following:
import zlib
z = zlib.compressobj(level=9, wbits=-10)
zdata = z.compress(pixeldata) + z.flush()
TOIF tool
Tool for converting PNGs into TOI format and back, see the following links for more:
Developers guide
Libraries
This page was migrated from the old wiki, the content might be outdated.
There are several libraries available which can be used to implement Trezor device functionalities.
SatoshiLabs libraries
Trezor Connect (Web)
https://github.com/trezor/trezor-suite/tree/develop/packages/connect
Python-trezor
https://github.com/trezor/trezor-firmware/tree/master/python
https://pypi.org/project/trezor/
Android
https://github.com/trezor/trezor-android
Go
https://github.com/trezor/trezord-go
Third-party libraries
Check these third-party libraries for Trezor device.
Java
For Trezor-java library by Gary Rowe, see this GitHub page.
Trezor.Net
Trezor.Net supports Android, UWP, .NET Core and .NET Framework with Hid.Net. Support for other platforms can be added with the Hid.Net dependency injection. See this page or this GitHub page.
Hello World in Trezor Core
(How to develop on Trezor)
Overview
This document shows the creation of a custom functionality (feature, application) in Trezor Core firmware. It explains how to build both the Trezor (device, core) logic, as well as the client (computer, host, trezorlib) logic needed to speak with Trezor. For most new features, also the communication layer between Trezor and computer (protobuf) needs to be modified, to set up the messages they will exchange.
Intermediate knowledge of python and linux environment is assumed here to easily follow along. For steps how to set up the Trezor dev environment, refer to other docs - build or emulator. The most important part are nix and uv environments of this project, so all dependencies are installed.
Feature description
We will implement a simple "hello world" feature where Trezor gets some information from the host, will do something with it (optionally shows something on the screen), and returns some information back to the host, where we want to display them. (Note that there are no cryptographic operations involved in this example, it focuses only on basic communication between Trezor and host.)
Implementation
As already mentioned, to get something useful from Trezor, writing device logic is not enough. We need to have a specific communication channel between the computer and Trezor, and also the computer needs to know how to speak to the device to trigger wanted action.
TLDR: implementation in a single commit
1. Communication part (protobuf)
Communication between Trezor and the computer is handled by a protocol called protobuf. It allows for the creation of specific messages (containing clearly defined data) that will be exchanged. More details about this can be seen in docs.
Trezor on its own cannot send data to the computer, it can only react to a "request" message it recognizes and send a "response" message. Both of these messages will need to be specified, and both parts of communication will need to understand them.
Protobuf messages are defined in common/protob directory in .proto files. When we are creating a brand new feature (application), it is worth creating a new .proto file dedicated only for this feature. Let's call it messages-hello.proto and fill it with the content below.
common/protob/messages-helloworld.proto
syntax = "proto2";
package hw.trezor.messages.helloworld;

// Sugar for easier handling in Java
option java_package = "com.satoshilabs.trezor.lib.protobuf";
option java_outer_classname = "TrezorMessageHelloWorld";

/**
 * Request: Hello world request for text
 * @next HelloWorldResponse
 * @next Failure
 */
message HelloWorldRequest {
    required string name = 1;
    optional uint32 amount = 2 [default=1];
    optional bool show_display = 3;
}

/**
 * Response: Hello world text
 * @end
 */
 message HelloWorldResponse {
    required string text = 1;
}
There are some formalities at the top, the most important things are the message declarations. We are defining a HelloWorldRequest, that will be sent from the computer to Trezor, and HelloWorldResponse, that will be sent back from Trezor. There are many features and data-types protobuf supports - see Google docs or other common/protob/messages-*.proto files.
After defining the details of communication messages, we will also need to give these messages their unique IDs and specify the direction in which they are sent (into Trezor or from Trezor). That is done in common/protob/messages.proto file. We will append a new block at the end of the file:
common/protob/messages.proto
// Hello world
MessageType_HelloWorldRequest = 2900 [(wire_in) = true];
MessageType_HelloWorldResponse = 2901 [(wire_out) = true];
After this, we are almost done with protobuf! The only thing left is to run make gen in the root directory to create all the auto-generated files. By running this, the protobuf definitions will be translated into python classes in core, python and rust sub-repositories, so that they can understand these messages. Files under core/src/trezor, python/src/trezorlib and rust/trezor-client/src should be modified by this.
Optional step
This feature will be implemented only in Trezor Core and not for the legacy T1 model. If we want to be compatible with CI, we need to define these messages as unused for T1. That is done in legacy/firmware/protob/Makefile, where we will extend the SKIPPED_MESSAGES variable:
legacy/firmware/protob/Makefile
SKIPPED_MESSAGES := ... \
	HelloWorldRequest HelloWorldResponse
2. Trezor part (core)
The second part deals with creating the application code on Trezor. Surprisingly, this part is probably the easiest one from all three parts here (as this is just a "hello world" example).
All the applications running on Trezor are situated under core/src/apps directory. We could create a new application, or reuse the existing one if the feature logically corresponds to it. We will choose to implement this feature under misc application, as it is really a miscellaneous one.
We can therefore create a file core/src/apps/misc/hello_world.py and fill it with the content below:
core/src/apps/misc/hello_world.py
from typing import TYPE_CHECKING

from trezor.messages import HelloWorldResponse
from trezor.ui.layouts import confirm_text

if TYPE_CHECKING:
    from trezor.messages import HelloWorldRequest


async def hello_world(msg: HelloWorldRequest) -> HelloWorldResponse:
    text = _get_text_from_msg(msg)
    if msg.show_display:
        await confirm_text(
            "confirm_hello_world",
            "Hello world",
            text,
            description="Hello world example",
        )
    return HelloWorldResponse(text=text)


def _get_text_from_msg(msg: HelloWorldRequest) -> str:
    return msg.amount * f"Hello {msg.name}!\n"
Note that we need to import the newly created protobuf messages (HelloWorldRequest and HelloWorldResponse) to provide type hints and to be able to return the response. We are also importing a UI layout so that we can show a confirmation dialog.
All the protobuf fields are accessible on the msg object and are accessed via dot notation like class attributes (msg.show_display). When instantiating the response object, keyword arguments need to be used - HelloWorldResponse(text=text).
Even though the code in core is run by a micropython interpreter, almost all basic features from "classic" python are supported - like f-strings here.
As we want to also write unit tests for this module, we define a helper function _get_text_from_msg, even though it could easily be inlined in this case.
To see the details about code style and conventions, refer to codestyle.md.
We have defined all the logic, but it is not being called anywhere. We need to register the function to be called as a response to the appropriate message - in our case HelloWorldRequest. Registration is done in core/src/apps/workflow_handlers.py and the following two lines need to be added there (ideally under the misc section):
core/src/apps/workflow_handlers.py
if msg_type == MessageType.HelloWorldRequest:
    return "apps.misc.hello_world"
The above will make sure that the msg (of type HelloWorldRequest) will be supplied into the hello_world function we created.
Lastly, running make gen in the root directory makes sure the new misc/hello_world.py module will be discovered.
These are all the necessary code changes in core. For this code to work, we will still need to build it, but that will be done in Part 4. Next, we will focus on the client implementation.
3. Host part (trezorlib)
So far we have defined the messages going to the Trezor and back and the Trezor logic itself. What remains is the code sitting on the computer and sending these messages into Trezor and receiving them.
There are more ways how to achieve this, for example Connect is a way of communicating with Trezor from a web browser. However, we will decide to implement this connection via trezorlib, our own python library, which lives under python/src/trezorlib and acts as a CLI (command-line interface) to communicate with Trezor (via trezorctl command).
This implementation will be split into two parts, as we will create the Trezor communication logic in one file and the CLI logic taking arguments and calling this code in the second file. (It would be possible to define everything at once in the CLI file, but we want the possibility to call the Trezor speaking function separately, for example when testing.)
We will create the python/src/trezorlib/hello_world.py file and fill it with code to speak with Trezor:
python/src/trezorlib/hello_world.py
from __future__ import annotations

from typing import TYPE_CHECKING, Optional

from . import messages

if TYPE_CHECKING:
    from .transport.session import Session


def say_hello(
    session: "Session",
    name: str,
    amount: Optional[int],
    show_display: bool,
) -> str:
    return session.call(
        messages.HelloWorldRequest(
            name=name,
            amount=amount,
            show_display=show_display,
        ),
        expect=messages.HelloWorldResponse,
    ).text
Code above is sending HelloWorldRequest into Trezor and is expecting to get HelloWorldResponse back (from which it extracts the text string as a response).
This function is then called from the CLI function, which we will define in python/src/trezorlib/cli/hello_world.py.
python/src/trezorlib/cli/hello_world.py
from __future__ import annotations

from typing import TYPE_CHECKING, Optional

import click

from .. import hello_world
from . import with_session

if TYPE_CHECKING:
    from ..transport.session import Session


@click.group(name="helloworld")
def cli() -> None:
    """Hello world commands."""


@cli.command()
@click.argument("name")
@click.option("-a", "--amount", type=int, help="How many times to greet.")
@click.option(
    "-d", "--show-display", is_flag=True, help="Whether to show confirmation screen."
)
@with_session
def say_hello(
    session: "Session", name: str, amount: Optional[int], show_display: bool
) -> str:
    """Simply say hello to the supplied name."""
    return hello_world.say_hello(session, name, amount, show_display=show_display)
Code above is importing the hello_world module defined before and is calling its say_hello() function with arguments received from the user. We are using click library to create the CLI - first the helloworld group and then the say_hello command (which is invoked by say-hello).
Example of calling the say_hello function via command line is trezorctl helloworld say-hello George -a 3 -d, which utilizes all the defined arguments and options (only the name argument is required here).
However, the command above will not work yet, as the helloworld group is not registered in the main CLI file - python/src/trezorlib/cli/trezorctl.py. It will therefore need some small modifications - importing the new module and registering it:
python/src/trezorlib/cli/trezorctl.py
from . import hello_world
...
cli.add_command(hello_world.cli)
If we are currently in uv environment, the trezorctl command is being evaluated directly from the source code in python/src/trezorlib. That means it should be able to understand our example command trezorctl helloworld say-hello George -a 3 -d.
The example command on its own will however not work without a listening Trezor which understands the new messages. In the next and final part, we will build and spawn a Trezor on our computer with all the changes made in Part 1 and 2.
4. Putting it together
Now that all the code changes have been done, the final part is to build a Trezor image - emulator - so that we can actually run and test all the logic we created.
Detailed information about the emulator can be found in its docs, but we only need two most important commands, that will build and spawn the emulator:
cd core
make build_unix
./emu.py
After this, the emulator screen should be visible. Trying our example command should give a nice confirmation screen, and when confirming it with the green button, we should see the output in our terminal.
$ trezorctl helloworld say-hello George -a 3 -d
Please confirm action on your Trezor device.
Hello George!
Hello George!
Hello George!
For building the new feature into a physical Trezor, refer to embedded.
Testing
It is always good to include some tests validating the created functionality, so when we break it later, it will be noticed. Trezor Core supports both unit tests and integration tests (which are called device tests).
Unit tests
Unit tests can verify individual (mostly helper) functions that have clearly defined inputs and outputs.
They are stored under core/tests and can be run by make test in the core directory.
To call a specific test (the one we are about to create), run make test TESTOPTS=test_apps.misc.hello_world.py
core/tests/test_apps.misc.hello_world.py
from common import unittest

from trezor.messages import HelloWorldRequest

from apps.misc.hello_world import _get_text_from_msg


class TestHelloWorld(unittest.TestCase):
    def test_get_text_from_msg(self):
        msg = HelloWorldRequest(name="Satoshi", amount=2, show_display=False)
        self.assertEqual(_get_text_from_msg(msg), "Hello Satoshi!\nHello Satoshi!\n")


if __name__ == "__main__":
    unittest.main()
Code above is using the unittest testing framework, however not directly from python's standard library. As these unit tests are run by micropython, which does not have unittest library, we had to create the functionality ourselves in core/tests/unittest.py - see from common import *.
Current code checks one usage of _get_text_from_msg, the only deterministic helper function we use in our feature. One could create many test vectors trying different inputs and expecting different outputs.
Device tests
Device tests (our name for integration tests) should test the whole workflow from sending the first request into Trezor to Trezor sending the final response.
trezorlib is used extensively in these tests as a way to request something from Trezor and then assert the expected response (it actually uses the code we created in Part 3).
They are closely connected with ui tests, which assert Trezor's screens have a known and expected content during the device tests.
Device tests are stored in tests/device_tests and they can be run by make test_emu in core. Running the specific file we will create can be done by make test_emu TESTOPTS="-k test_hello_world.py".
tests/device_tests/misc/test_hello_world.py
import pytest

from trezorlib import hello_world
from trezorlib.debuglink import SessionDebugWrapper as Session

VECTORS = (  # name, amount, show_display
    ("George", 2, True),
    ("John", 3, False),
    ("Hannah", None, False),
)


@pytest.mark.models("core")
@pytest.mark.parametrize("name, amount, show_display", VECTORS)
def test_hello_world(
    session: Session, name: str, amount: int | None, show_display: bool
):
    greeting_text = hello_world.say_hello(
        session, name=name, amount=amount, show_display=show_display
    )
    greeting_lines = greeting_text.strip().splitlines()

    assert len(greeting_lines) == amount or 1
    assert all(name in line for line in greeting_lines)
Unlike in unit tests, pytest is used as the test framework, which is more suitable for bigger and more complex test suites.
As the functionality is developed only for core, we want to limit the test via @pytest.mark.models("core"), otherwise the CI would run it (and fail) for Trezor One too.
We are also using the @pytest.mark.parametrize decorator, which is an efficient way of testing multiple inputs into the same test case.
We are not asserting the exact result of the greeting (that is done by unit tests), we just check it has the expected structure, but we can check really anything here.
Note the usage of trezorlib.hello_world.say_hello, which we defined earlier, so we see how it can be useful for testing purposes.
Optional step
If we want to be fully compatible with CI, we need to update fixtures.json with results from the new workflow run. The most convenient way to do it is to let the tests run in CI first and then update fixtures.json using data from the run. The tool for this is update_fixtures.py; see ./update_fixtures.py ci --help.
Conclusion
All changes in one commit can be seen here.
Ideas for potentially useful Trezor features are welcome. Feel free to submit issues and open PRs, even if incomplete.